WHITEPAPER
Formlabs Logo

Using Color Resin

With Color Resin, 3D print parts in colors that represent your brand, product line, or creative vision with accuracy and consistency. Choose any color to closely match final parts without painting, coating, or pigment mixing. Each order is custom-manufactured and quality checked, ensuring reliable results.

Using Color Resin

With Color Resin, 3D print parts in colors that represent your brand, product line, or creative vision with accuracy and consistency. Choose any color to closely match final parts without painting, coating, or pigment mixing. Each order is custom-manufactured and quality checked, ensuring reliable results.

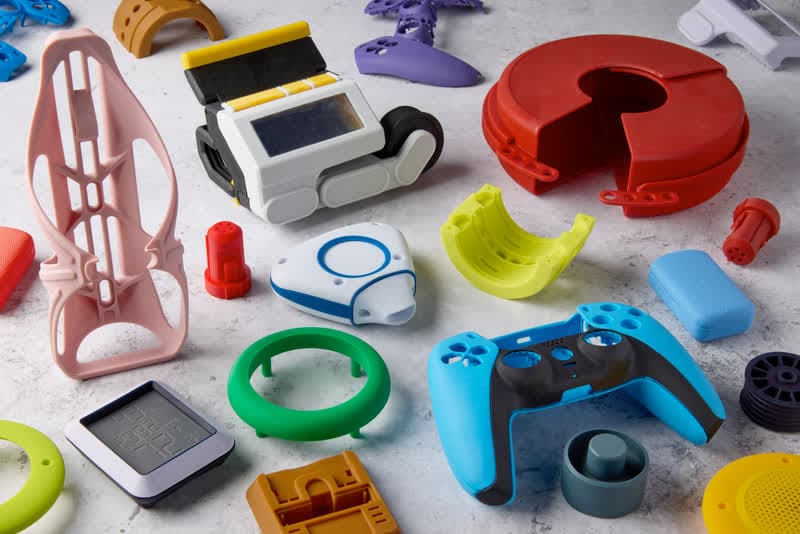
A variety of parts printed in Color Resin V5

Designed for both aesthetics and performance, this material offers properties ideal for:

  • Functional or form and fit prototypes that mimic injection molded parts with color requirements
  • Part identification aid in a multi-part assembly or the factory floor
  • Colored models, props, jigs and fixtures
  • Low volume manufacturing of end use parts with custom color requirements

Color Resin V5 is a custom-colored General Purpose Resin for Form 4 generation 3D printers similar to Black Resin V5, Grey Resin V5, and White Resin V5. You can expect this material to deliver similar dimensional accuracy, aesthetics, and mechanical properties.

Erforderliches Zubehör

Ordering Color Resin

Custom color

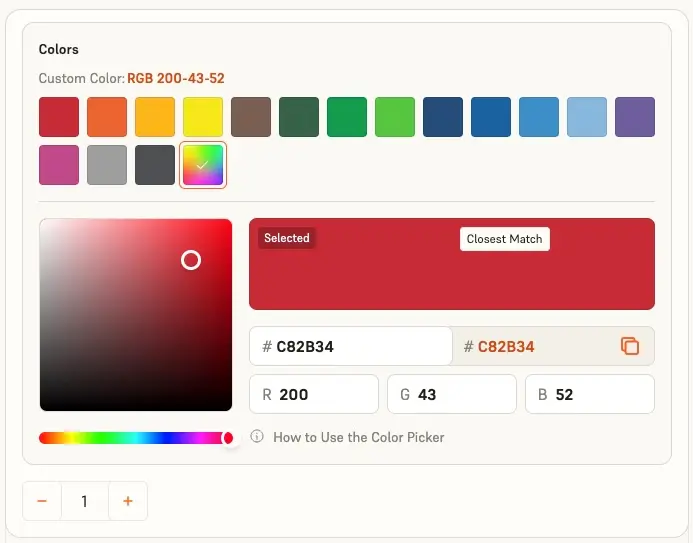
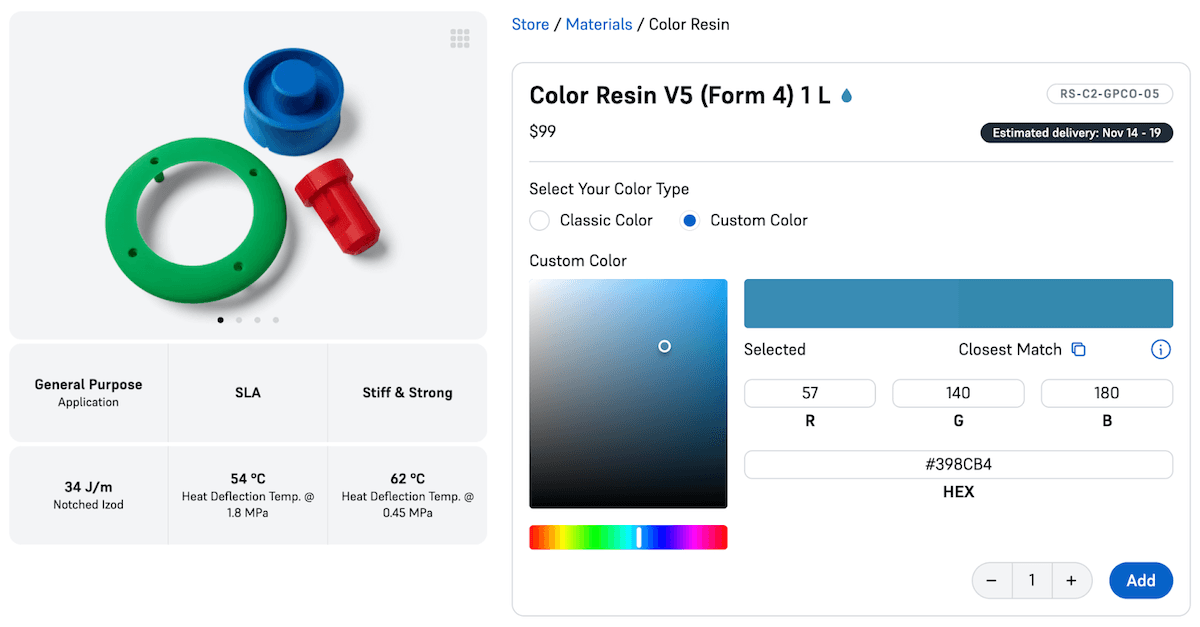
When ordering your custom cartridge of Color Resin on the Formlabs Store, choose your desired color on the color picker or by inputting a hex or RGB value. If you need to match a color specified in another way, you can use a variety of online tools to convert between color spaces.

You can also use a colorimeter or spectrophotometer to measure the color of an existing physical item and order the closest match from Formlabs.

Selecting a color of Color Resin to order

Select the rainbow Custom Color icon to begin choosing your color. The store page will show your Selected color and the Closest Match that can be achieved. Click the copy icon to copy the hex value of the closest achievable color. Please note that variation may exist between the color displayed on screen and the color of the physical product due to the color settings of your monitor.

We are continually refining our color-matching algorithm, the same color inputs may produce different achievable colors across different orders. Your subsequent order could be closer to your target but perceptibly different from an earlier order. If reordering an exact match of an existing order is important to you, click Reorder in your order history rather than creating a new order with the same color input.

When you receive your custom Color Resin cartridge, it will also include:

  • Resin puck on the top of the cartridge showing the color of the cured resin
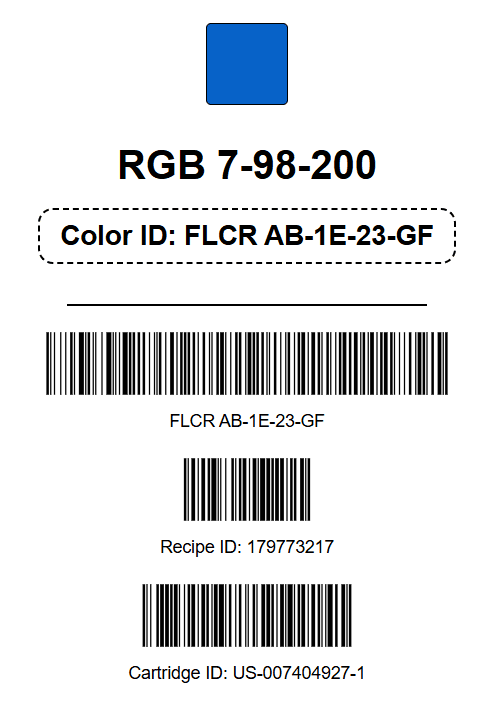
  • Label showing the color you input during ordering and the resin Color ID, used for identifying the resin and determining print settings
  • Quality control document with information about color accuracy

Note:

If you normally order through a Formlabs reseller, you will need to order Color Resin directly from Formlabs in order to select your custom color. Your reseller should provide a purchasing code; please enter it into the Discount Code tab at the end of the checkout process. This code does not apply a discount but helps Formlabs appropriately track orders from customers of our reseller partners.

Tip:

To request a match for a specific Pantone color code, contact Formlabs Sales.

Classic colors

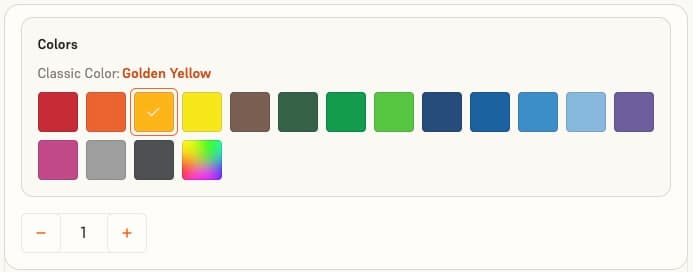
Formlabs also offers 16 preset colors for those who want great looking parts but don’t need a specific match. Select a preset Classic Color icon to choose your color.

Ordering Color Resin V5 in a Classic Color

For reference, the below table lists the color values of the Classic Color options.

ColorHex valueRGB value
Signal Red#C82B34200, 43, 52
Formlabs Orange#EC6230236, 98, 48
Golden Yellow#FCB419252, 180, 25
Cadmium Yellow#F7E71B247, 231, 27
Chocolate Brown#7A5E52122, 94, 82
Forest Green#36624854, 98, 72
Kelly Green#009C4C0, 156, 76
Lime Green#56C54186, 197, 65
Midnight Blue#274C7B39, 76, 123
Cobalt Blue#1B61A127, 97, 161
Azure Blue#3C8FC860, 143, 200
Powder Blue#87B8DE135, 184, 222
Royal Purple#6F5E9D111, 94, 157
Berry Pink#C1498A193, 73, 138
Light Grey#9D9F9E157, 159, 158
Dark Grey#4E505370, 80, 83

Formlabs resin colors

For reference, the below table lists the color values of selected Formlabs resins.

ResinColor (hex value)
Black Resin V5#3B3C3C
Fast Model Resin#818377
Grey Resin V5#676C6D
Precision Model Resin#C4A687
Rigid 4000 Resin#F1FBFE
Rigid 10K Resin#F2F5FE
Tough 1500 Resin V2#434548
Tough 2000 Resin V1.1#54585B
White Resin V5#EAE9CD

Printing with Color Resin

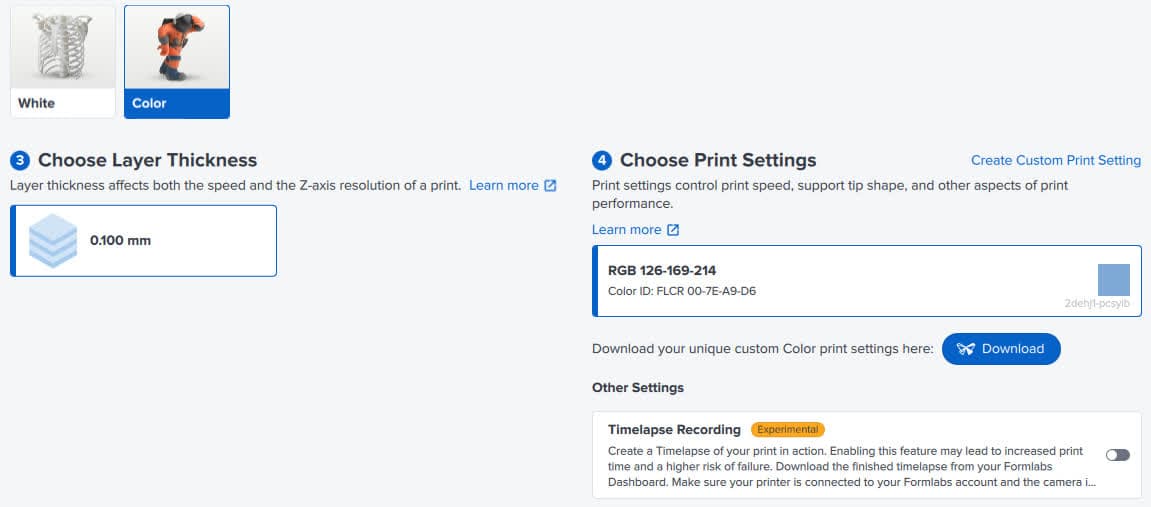
Each possible color of Color Resin uses customized print settings for optimal results. When you receive your resin cartridge, you can use the Color ID on it to generate a Formlabs Print Settings (FPS) file to import into PreForm.

To prepare a model for printing with Color Resin:

  1. Install or update PreForm to the latest version.
  2. Open a model.
  3. Select Color Resin.
  4. Under Choose Print Settings, click Download Your Unique Custom Color Print Settings. A Dashboard screen appears within PreForm.
  5. Log into Dashboard or create an account if you have not already. A Dashboard account is required to download the print settings file.
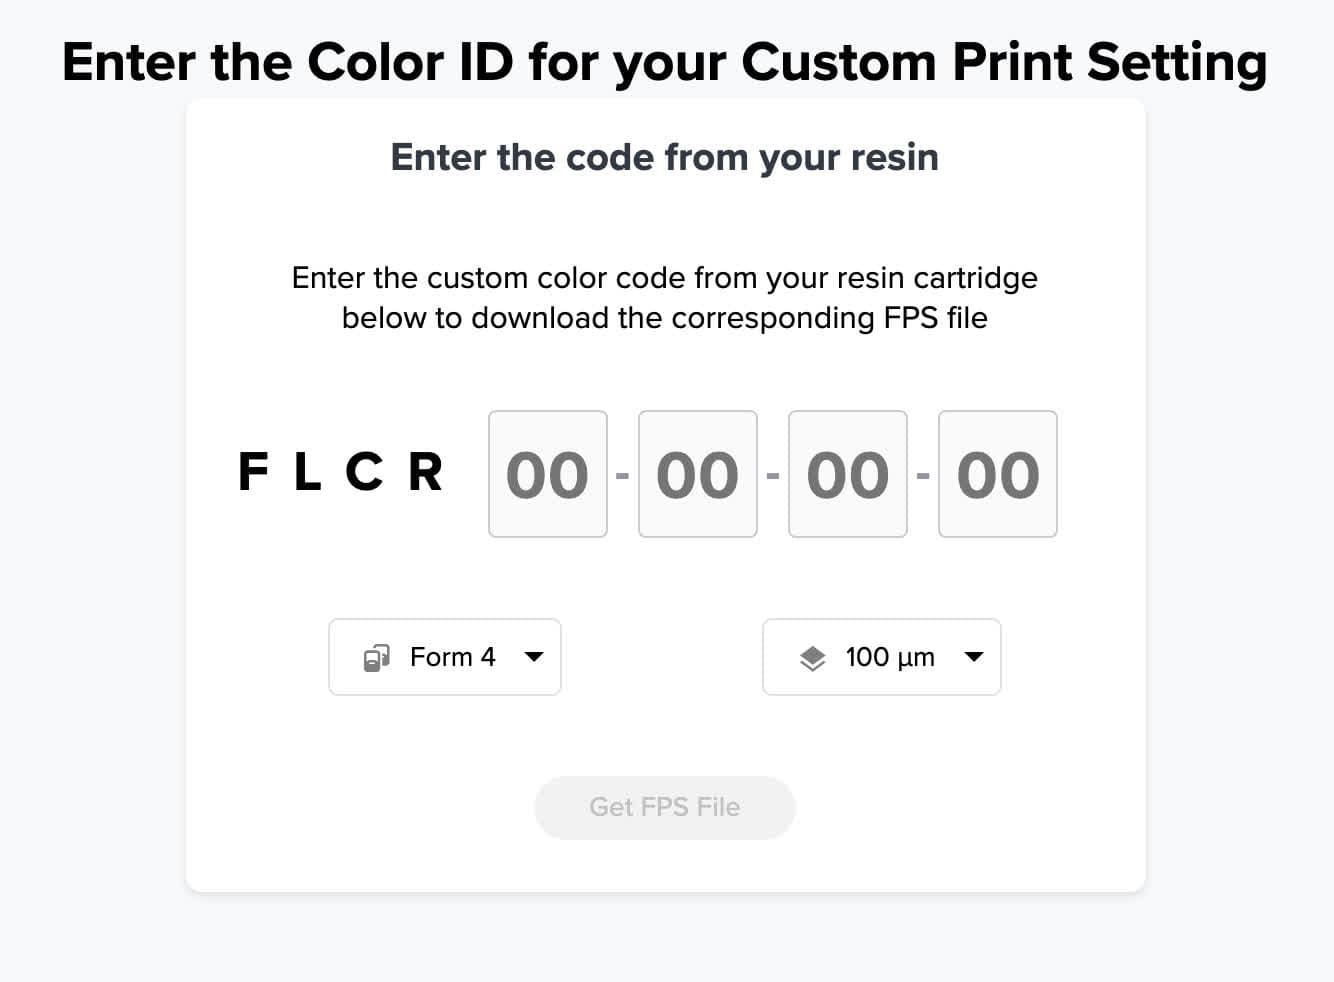
  6. Input the Color ID for your resin color and select your printer type and layer thickness.
    • The Color ID is in the format FLCR xx-xx-xx-xx, where each entry is a hexadecimal digit.
    • You can find the Color ID in your order confirmation email or on the sticker on the resin cartridge.
alttext
alttext
  1. Click Get FPS File. A print settings file is downloaded to your computer.
    • When imported into PreForm, the default Setting Name is the color name (e.g., “RGB 255-0-0” if you selected a color via its RGB value) and the Description is the Color ID.
  2. Import the FPS file into PreForm by doing one of the following:
An imported Color Resin print setting
  1. If you are printing with a layer thickness other than the one supported by the generated FPS file, use those settings to create a new layer thickness.
  2. Orient and support your model as needed.
  3. Insert consumables into your printer. Each color of resin needs its own resin tank.
  4. Confirm that the selected print setting is the correct one for your current color, then send the print job to the printer.

Formlabs SLA printers and Dashboard detect all resin cartridges and resin tanks that contain Color Resin as Color Resin. Printers and Dashboard cannot automatically detect individual color names but do record print settings, which are named for the Color ID by default. For your convenience, each cartridge of Color Resin has a chip adhered to the label showing the color of the resin it contains.

Tip:

  • Change the Setting Name or Description of the print setting to something that is memorable and recognizable to you, especially if you have multiple different colors of Color Resin.
  • Use Dashboard’s material manager to edit the name of each resin cartridge and resin tank with the color name.
  • Label each Color Resin cartridge and resin tank to indicate the specific color, for example, “Apricot.”

Waschen

Wash parts according to the support article Form Wash/Form Wash L time settings. Pay particular attention to information that affects mechanical properties or biocompatibility requirements.

Removing pigment from wash solvent

Over time, the pigments used in Color Resin can build up in your wash solvent. If you print with multiple different colors, you may notice that pigments from darker colors deposit on parts printed in lighter colors. This can happen before the solvent is actually saturated with liquid resin. To prolong the useful lifetime of your wash solvent and prevent color contamination:

  1. Wait for any pigment in the wash solvent to settle.
  2. Decant the solvent in the wash bucket into a suitable clean container, leaving the settled pigment behind. Set the solvent aside to be returned to the wash bucket.
  3. Pump or pour the remaining solvent and pigment into a separate container to be properly disposed of.
  4. Clean the wash bucket with fresh solvent and paper towels or a cleaning cloth.
  5. Return the used solvent to the wash bucket. Add fresh solvent as needed to replenish the amount you disposed of.

Alternatively, maintain two wash buckets and wash your printed parts over two separate cycles.

When the solvent is saturated with dissolved liquid resin, fully replace the solvent.

Nachhärtungsanforderungen

Color Resin V5 should be post-cured with the same time and temperature settings as other Formlabs General Purpose Resins. If there are multiple post-curing settings available for your machine, use the shortest one for best color accuracy. Post-curing Color Resin parts for longer than the recommended amount of time will cause yellowing. Refer to instructions for your particular machine for appropriate recommendations:

Lagerung

Whether printing with one color or maintaining multiple Color Resin cartridges, an organized materials library supports a streamlined workflow and avoids mismatching tanks and cartridges.

To preserve resin lifetime and the integrity of the color, shake the resin cartridge weekly during storage and between uses. Similarly, stir resin that has been stored in a resin tank before printing to ensure even pigment distribution.

Sicherheit

Always consult the SDS as the primary source of information to understand safety and handling of Formlabs materials. After reviewing the SDS, refer to general resin care guidelines for advice on storing, handling, and disposing of resin.

Quality control

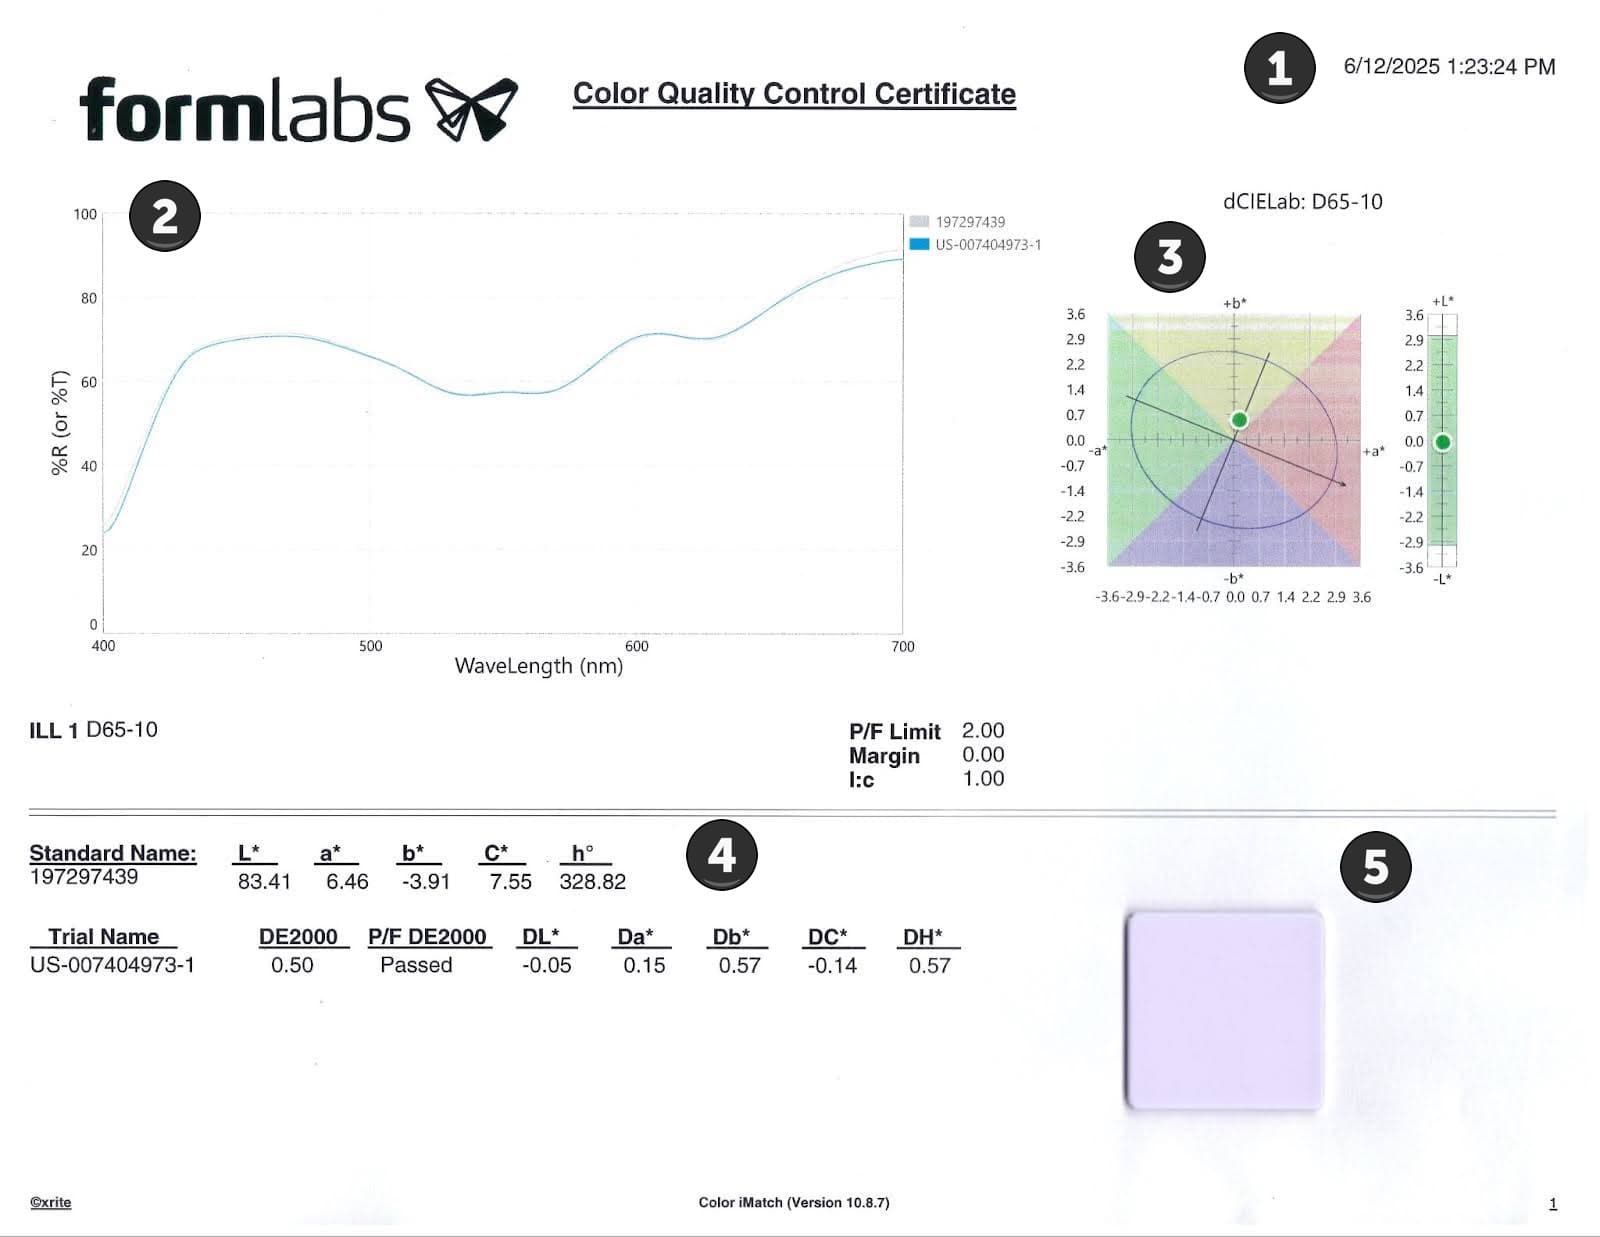
Each Color Resin cartridge comes with a quality control document with information about color accuracy.

Note:

Formlabs may no longer include a quality control statement with each order once the manufacturing process has been streamlined.

An example quality control document is shown below.

Color Resin V5 quality control document

The document contains the following information:

  1. Manufacturing date and time
  2. Spectral graph
    1. Shows the percentage of light reflected by a sample (Y axis) across wavelengths of the visible light spectrum (X axis)
    2. The target color is shown in grey. The measurements from your cartridge are shown in blue.
  3. CIELAB color comparison
    1. Shows color differences plotted in the CIELAB color space
    2. The a* (red-green) and b* (yellow-blue) axes are shown in 2D. The L* (light-dark) axis is shown directly to the right in 1D.
    3. The reference color is centered at the origin and the resin measurement is shown as a green dot.
    4. The ellipse on the a*/b* view is the a* and b* DE2000 tolerance and the green region on the L* axis is the L* DE2000 tolerance.
  4. Colorimetric data
    1. Quantifies the difference between the target color and the color of the resin in the specific resin cartridge
    2. Standard Name: the reference color
      1. L*, a*, b*, C*, and h˚ color values are listed
    3. Trial Name: the resin measurement
      1. DE2000: The calculated Delta E2000 (ΔE) between the target color and the measured sample. This measures the relative difference between two perceived colors. A low ΔE value indicates a small difference between the colors and thus better accuracy. Colors with ΔE < 1 are nearly imperceptibly different to the human eye while colors with ΔE > 5 can be perceptibly different but may be acceptable for prototyping use cases.
      2. P/F DE2000: quality control pass/fail
      3. DL*, Da*, Db*, DC*, and DH*: the difference between the L*, a*, b*, C*, and h˚ values of the sample when compared to the target color
  5. Quality control tile
    1. The unique resin sample that was cast and measured from the resin cartridge

Color matching a physical part (optional)

Achieving a perfect color match is critical for prototyping and production. Selecting a color match on a computer screen can be inaccurate due to differences in digital vs physical colors. Scanning a physical part is a superior method because it measures the actual light reflected from a sample, providing precise spectral data.

While high-end spectrophotometers can be expensive, affordable colorimeters (typically priced between $100–$1,000) are compact, effective tools for measuring and comparing physical color samples for this workflow. You can use one to capture accurate data and output an RGB or hex code for ordering Color Resin V5.

Type of unitUse caseCost rangeExample unit and purchase link
ColorimeterColor comparison and basic color communication 100–1,000 USDColorimeter Pro
Nix Spectro L
Portable spectrophotometerColor comparison, communication, and quality control1,000–6,000 USDX-rite
BYK

Equipment and sample requirements

To achieve the most accurate color match with Formlabs Color Resin V5, prepare your instrument and the physical sample as follows:

  • Geometry: Use a diffused illumination integrating sphere geometry (d/8˚) to negate surface finish effects.
  • Specular component: Set to "Included" (SCI or SPIN) to capture all light reflected from the sample.
  • UV Light: Ensure UV light is excluded from the measurement.
  • Illuminant and observer: Use D65 illuminant (sunlight approximation) and a 10˚ observer.
  • Aperture: Select the aperture size closest to 25 mm.
  • Surface: Ensure the sample is flat and fully covers the instrument aperture.
  • Thickness and opacity: Target a 2 mm thickness and ensure the sample is highly opaque.
  • Background: Always measure samples over a clean, white background.

Standard measurement protocol

Follow these steps to convert a physical object into a digital color code:

  1. Calibrate: Ensure your instrument is calibrated according to manufacturer instructions.
  2. Measure: Place the colorimeter on the sample (ensuring no gaps) and measure the reflectance spectrum.
  3. Record data: Note the CIELab spectral color values (L*, a*, and b*).
  4. Convert: Use an online color conversion tool to translate the CIELab values into sRGB or hex values.
    • Ensure you select the correct data type (CIELab) and measurement conditions (D65/10˚) in the tool.
  5. Order: Input the resulting sRGB or hex code into the Custom Color tab when ordering Color Resin V5.

Example: Matching a blue plastic part

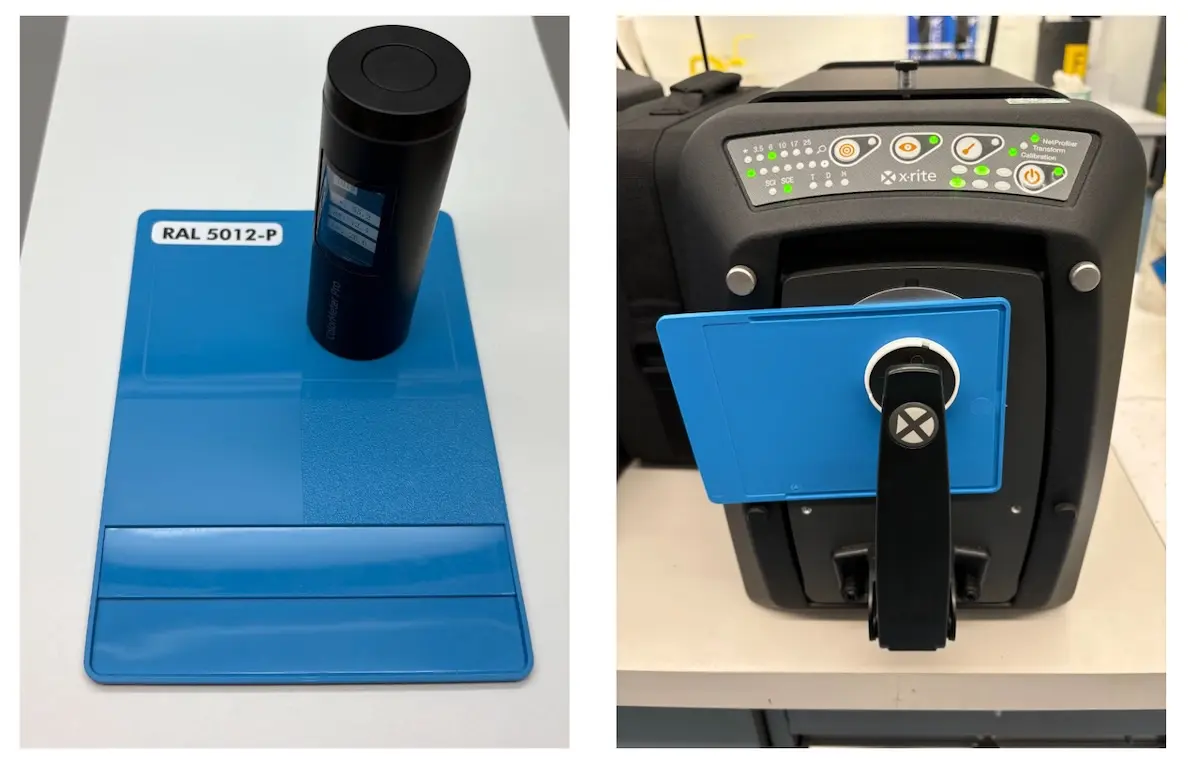
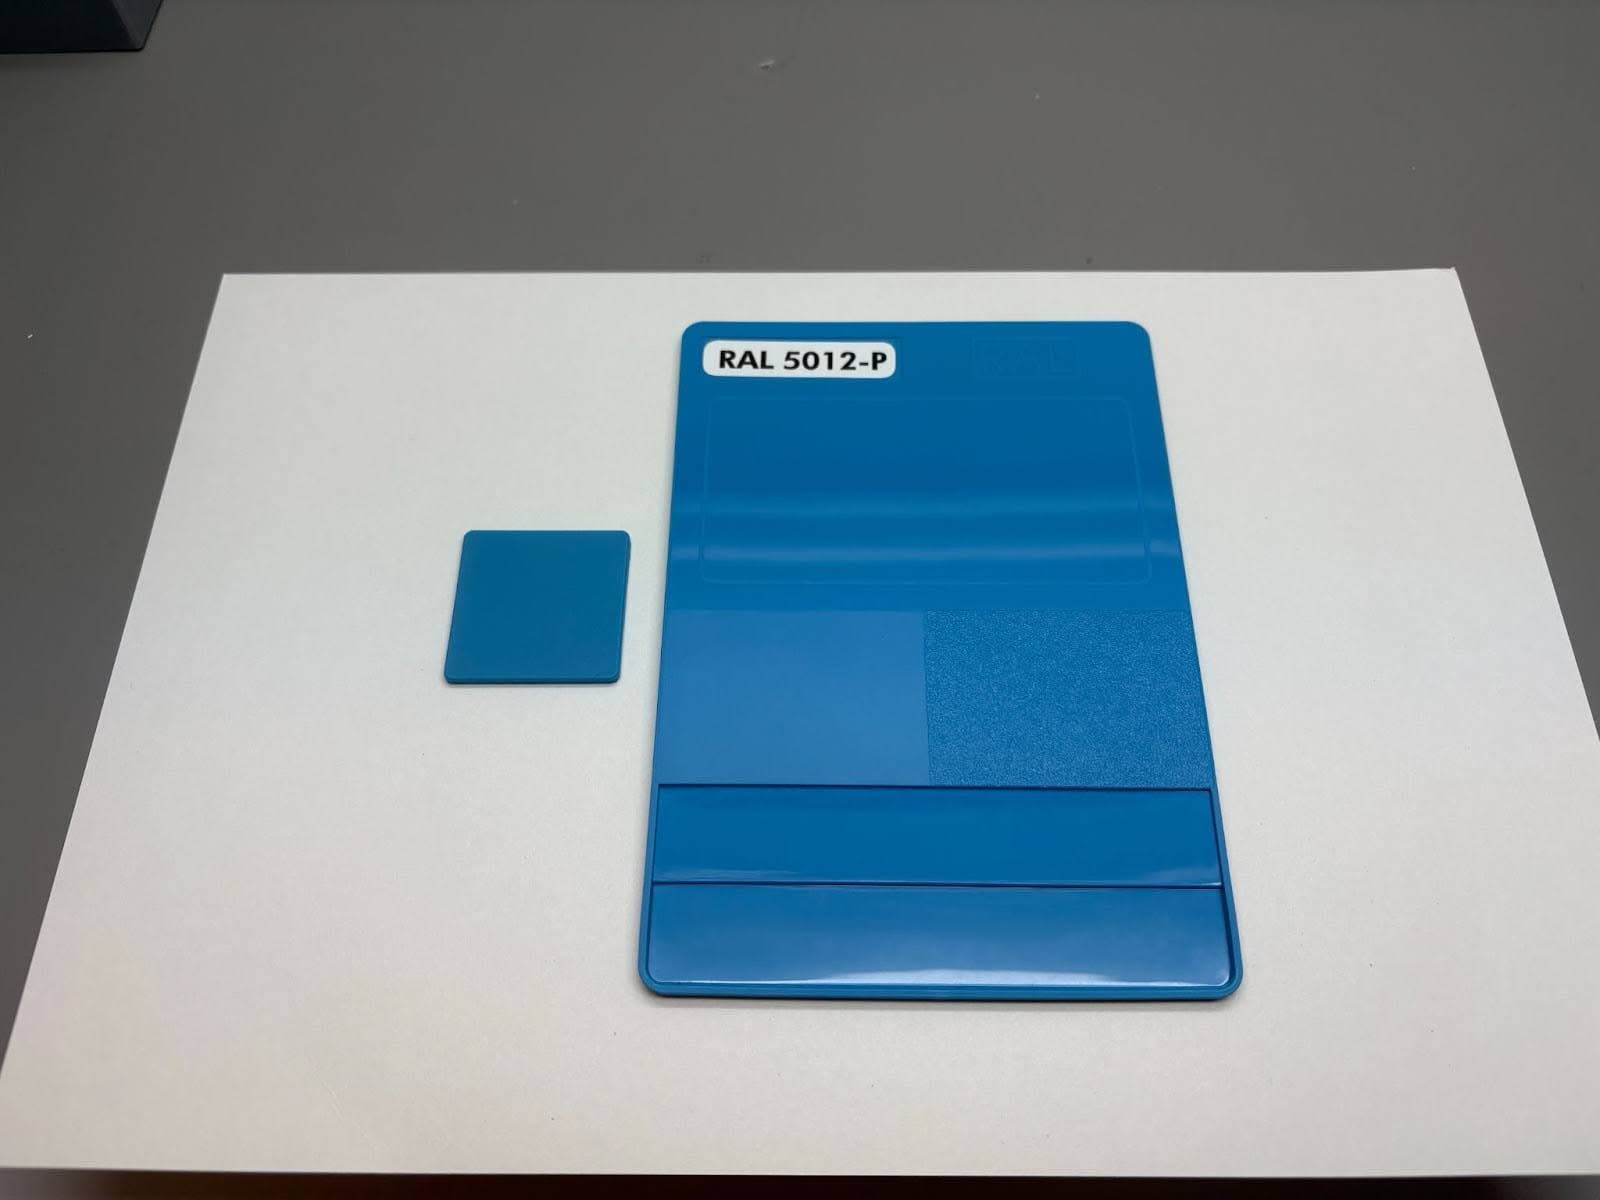
Below is a specific example of this workflow used to match an injection-molded plastic sample with a color labeled in the RAL system as RAL 5012-P.

  1. The sample was placed on a white background, with a handheld colorimeter directly on top.
  2. The device captured the spectral data and displayed the following CIELab values:
    • L:* 55.1
    • a:* -12.1
    • b:* -28.8
Measuring the color of a physical part
Measurements can be made with an inexpensive colorimeter (left) or a benchtop spectrophotometer (right)
  1. Using an online color conversion tool, these CIELab coordinates were converted into a hex code: #398CB4
  2. The code #398CB4 was used to order a custom cartridge of Color Resin V5.
Ordering a custom cartridge of Color Resin V5
Color selected using the Formlabs Color Resin color picker. Note the difference between the Selected and Closest Match colors.
  1. A sample part was printed and compared to the original injection-molded target, showing a successful visual match.
Comparing a printed part and the original target
Resin match (left) and original injection molded target (right)