Nota:
Tocca Ignore (Ignora) per riprogrammare il serbatoio resina in base al tipo di resina necessario per il lavoro di stampa.


Se la Form 4 o la Form 4L riscontrano delle anomalie, sul display touchscreen appaiono messaggi di errore e dettagli al riguardo. Questo articolo illustra i passaggi iniziali di risoluzione dei problemi per risolvere i codici di errore più comuni riscontrati sulle stampanti della generazione Form 4 o previsti durante il normale funzionamento. Se riscontri un codice di errore non presente in questo articolo, consulta i passaggi generali per la risoluzione dei problemi riportati di seguito.
I codici di errore della generazione Form 4 e Form 4L hanno il formato X.YY.ZZ, dove X è il codice macchina, YY è il sottosistema e ZZ è il codice di errore univoco che indica l'avvertenza pertinente. Il codice macchina per le stampanti della generazione Form 4 è 1, quindi il codice di errore completo per tutti gli errori della stampante inizia con 1. Il numero del gruppo di errori descrive il tipo di errore, mentre il sottocodice designa un sottosistema specifico o una modalità di errore. Ad esempio, tutti i sottocodici del gruppo di errori 3 della generazione Form 4 riguardano la temperatura dell'elemento riscaldante e della resina, mentre Error 1.3.1 si riferisce in particolare al mancato raggiungimento della temperatura target da parte della resina.
Passaggi generali per la risoluzione dei problemi
I seguenti passaggi sono consigliati per la maggior parte dei problemi riscontrati sulle stampanti della generazione Form 4 e Form 4L:
Dati di diagnostica
Le stampanti della generazione Form 4 e Form 4L memorizzano alcuni dati di diagnostica per poter fornire informazioni dettagliate sulla funzionalità dell'apparecchio. Quando vorrai contattare l'Assistenza Formlabs o un rivenditore autorizzato, allega i dati di diagnostica e altri dettagli e osservazioni rilevanti per velocizzare la risoluzione del problema.
Per le macchine connesse a Internet tramite una connessione Wi-Fi o Ethernet attiva:tocca l'icona dell'ingranaggio in basso a sinistra nella schermata Home
Per le stampanti non connesse a Internet:
Scopri di più sulle opzioni per le connessioni di rete e altre connessioni.
Errori di controllo (gruppo di errori 1)
Tutti i sottocodici della Form 4 e della Form 4L Gruppo di errori 1 (1-61) riguardano la comunicazione del sottosistema e il controllo del motore nell'apparecchio.
Error 1.1.1: il motore non raggiunge la posizione di riposo
Error 1.1.1 indica che un motore non è riuscito a raggiungere la posizione di riposo. Il motore potrebbe essersi bloccato a causa di residui o l'interruttore di finecorsa utilizzato dalla stampante per determinare la posizione del motore potrebbe essere danneggiato. Controlla e rimuovi eventuali residui nel serbatoio resina o sulla piattaforma di stampa, quindi verifica se la piattaforma di stampa e il miscelatore si muovono normalmente durante la stampa. Questo errore è stato rimosso nella versione 1.4 del firmware. Se questo messaggio di errore compare ripetutamente, aggiorna il firmware della stampante.
Error 1.1.3: errore interno
Error 1.1.3 indica un errore di comunicazione interna tra i sottosistemi della stampante. Per risolvere il problema:
Error 1.1.4: sensore del livello di resina non programmato
Error 1.1.4 indica un problema con la scheda LevelSense della stampante. Per risolvere il problema:
Error 1.1.5: impossibile misurare la resina nel serbatoio
Error 1.1.5 indica un problema con la scheda LevelSense della stampante. Se è in corso una stampa, monitorala per assicurarti che il serbatoio resina non si svuoti. Per risolvere questo problema, segui gli stessi passaggi per la risoluzione dei problemi di Errore 1.1.4: Il sensore del livello di resina non è programmato.
Error 1.1.6: il miscelatore ha rilevato residui
Error 1.1.6 indica che il miscelatore ha urtato dei residui mentre si muoveva nel serbatoio resina. Per risolvere il problema:
Se il miscelatore urta la piattaforma di stampa perché la piattaforma di stampa si è attaccata al serbatoio resina durante la stampa:
Se questo errore si verifica immediatamente all'accensione della stampante o se il miscelatore si muove inaspettatamente quando si utilizza lo strumento Move motors (Sposta motori) (senza serbatoio resina o miscelatore inserito), sostituisci il gruppo di azionamento del miscelatore. Segui le istruzioni delle guide di riparazione Sostituzione del gruppo di azionamento del miscelatore della Form 4 o Sostituzione del gruppo di azionamento del miscelatore della Form 4L. I gruppi di azionamento del miscelatore di ricambio possono essere acquistati nel negozio online di Formlabs.
Error 1.1.7: la piattaforma di stampa ha rilevato residui
Error 1.1.7 indica che la piattaforma di stampa ha incontrato dei residui durante la discesa nel serbatoio resina. Per risolvere il problema:
Error 1.1.17: coperchio protettivo aperto
Error 1.1.17 indica che il coperchio (generazione Form 4) o lo sportello (generazione Form 4L) è stato aperto durante la stampa. Per motivi di sicurezza, la stampa si interrompe ogni volta che il coperchio protettivo o lo sportello sono aperti. Chiudi il coperchio protettivo o lo sportello per continuare.
Se il coperchio protettivo o lo sportello non erano aperti o la loro chiusura non risolve il problema:
Error 1.1.23: comunicazione con la scheda madre non riuscita
Error 1.1.23 indica che la stampante non è riuscita a inviare un messaggio alla scheda madre. Per risolvere il problema:
Error 1.1.31: firmware incompatibile
Error 1.1.31 indica un problema con il firmware installato sulla stampante. Assicurati che il firmware della stampante sia aggiornato. Se il problema persiste e il firmware della stampante è già aggiornato, reinstalla manualmente il pacchetto firmware più recente. Riavvia la stampante e riprova.
Error 1.1.32: problema alla ventola della LPU
Error 1.1.32 indica che la ventola di raffreddamento della Light Processing Unit (LPU) è guasta. Se continui a utilizzare la stampante, rischi di danneggiare la LPU. Per risolvere il problema:
Error 1.1.33: problema alla ventola della retroilluminazione
Error 1.1.33 indica che la ventola di raffreddamento dell'unità di retroilluminazione è guasta. Se continui a utilizzare la stampante, rischi di danneggiare l'unità di retroilluminazione. Per risolvere il problema:
Error 1.1.34: problema alla ventola dell'alimentatore
Error 1.1.34 indica che la ventola di raffreddamento dell'alimentatore è guasta. Se continui a utilizzare la stampante, rischi di danneggiare l'alimentatore. Riavvia la stampante, esegui il reflash del firmware e riprova. Se visualizzi ripetutamente questo messaggio di errore, contatta l'Assistenza Formlabs o un rivenditore autorizzato.
Error 1.1.40: tensione della stampante inferiore a quella prevista
Il messaggioError 1.1.40 indica che l'alimentatore sta fornendo una tensione inferiore a quella prevista. Se le stampe vanno a buon fine, ignora questo messaggio di errore. Tuttavia, la tensione bassa potrebbe avere un impatto sulla stampa, ad esempio impedendo all'unità di retroilluminazione di accendersi. Per risolvere il problema:
Error 1.1.47: impossibile riportare la piattaforma di stampa alla posizione iniziale
Error 1.1.47 indica che la piattaforma di stampa non è riuscita a tornare correttamente alla posizione di riposo.
Error 1.1.48: il miscelatore non raggiunge la posizione di riposo
Error 1.1.48 indica che il miscelatore non è riuscito a tornare correttamente alla posizione di riposo.
Errori elemento riscaldante (gruppo di errori 3)
Tutti i sottocodici del gruppo di errori 3 (1-12) della Form 4 e della Form 4L riguardano l'elemento riscaldante.
Error 1.3.1: impossibile riscaldare la resina
Error 1.3.1 indica che la resina non ha raggiunto la temperatura desiderata dopo un certo periodo di tempo. Per risolvere il problema:
Per ulteriori informazioni, leggi l'articolo di assistenza Mantenimento della resina a temperatura costante.
Error 1.3.3: resina surriscaldata
Error 1.3.3 indica che la resina nel serbatoio ha superato la temperatura prevista. Per risolvere il problema:
Per ulteriori informazioni, leggi l'articolo di assistenza Mantenimento della resina a temperatura costante.
Error 1.3.4: elemento riscaldante surriscaldato
Error 1.3.4 indica che la temperatura dell'elemento riscaldante ha superato l'intervallo operativo sicuro. Interrompi i lavori di stampa in corso, perché continuare potrebbe danneggiare la stampante e causare un errore di stampa. Per risolvere questo problema, segui gli stessi passaggi per la risoluzione dei problemi di Errore 1.3.3: resina surriscaldata.
Per ulteriori informazioni, leggi l'articolo di assistenza Mantenimento della resina a temperatura costante.
Error 1.3.5: elemento riscaldante non collegato
Error 1.3.5 indica che l'elemento riscaldante non è collegato. L'elemento riscaldante è situato nel telaio dell'assemblaggio della LPU.
Error 1.3.6 ed Error 1.3.7: impossibile misurare la temperatura della resina
Error 1.3.6 ed Error 1.3.7 indicano che la stampante non è riuscita a misurare la temperatura corrente della resina nel serbatoio resina e potrebbe essere necessario disattivare l'elemento riscaldante. Per risolvere il problema:
Error 1.3.8 ed Error 1.3.9: impossibile misurare la temperatura dell'elemento riscaldante
Error 1.3.8 ed Error 1.3.9 indicano che la stampante non è riuscita a misurare la temperatura corrente dell'elemento riscaldante. L'elemento riscaldante è situato sotto il telaio dell'assemblaggio della LPU.
Error 1.3.10 ed Error 1.3.11: la corrente dell'elemento riscaldante è troppo alta
Error 1.3.10 ed Error 1.3.11 indicano che l'elemento riscaldante ha riscontrato un problema durante il processo di prestampa o la stampa stessa. L'elemento riscaldante è situato nel telaio dell'assemblaggio della LPU. Per risolvere questo problema, segui la stessa procedura di risoluzione dei problemi per Error 1.3.8 ed Error 1.3.9: impossibile misurare la temperatura dell'elemento riscaldante.
Error 1.3.12: riscaldamento della resina alla temperatura di stampa in corso
La stampante potrebbe visualizzare Error 1.3.12 per informarti che sta riscaldando la resina nel serbatoio. Non è detto che ciò comporti un problema. Se la stampante non riesce a riscaldare la resina dopo un periodo di tempo prolungato, controlla la cartuccia di resina come faresti per un errore relativo all'elemento riscaldante.
Errori dell'accelerometro (gruppo di errori 4)
Tutti i sottocodici del gruppo di errori 4 (1-7) della Form 4 e della Form 4L riguardano l'accelerometro.
Error 1.4.1: stampante non livellata
Le stampanti SLA di Formlabs funzionano al meglio quando sono perfettamente in piano. L'interfaccia touchscreen richiede di livellare la stampante quando necessario, mostrando Error 1.4.1. Tocca Settings (Impostazioni) > Tools (Strumenti) > Printer Levelling (Livellamento stampante) sull'interfaccia touchscreen della stampante per visualizzare lo stato di inclinazione attuale. Segui le istruzioni sull'interfaccia touchscreen e utilizza lo strumento di livellamento per livellare la stampante. Se l'errore persiste, esegui il reflash del firmware della stampante.
Error 1.4.2 ed Error 1.4.3: accelerometro non collegato
Errori 1.4.2 e 1.4.3 indicano un problema con l'accelerometro della stampante. Riavvia la stampante, esegui il reflash del firmware e riprova. Se visualizzi ripetutamente questo messaggio di errore, contatta l'Assistenza Formlabs o un rivenditore autorizzato.
Error 1.4.7: errore di ricalibrazione dell'accelerometro
Error 1.4.7 indica che la routine di calibrazione dell'accelerometro non è riuscita. Per risolvere il problema:
Errore di retroilluminazione (gruppo di errori 5)
Tutti i sottocodici del gruppo di errori 5 (1-11) della Form 4 e della Form 4L riguardano l'unità di retroilluminazione UV.
Error 1.5.1: surriscaldamento della retroilluminazione
Error 1.5.1 indica che l'unità di retroilluminazione si sta surriscaldando. La stampa riprenderà quando l'unità di retroilluminazione si sarà raffreddata. Per risolvere il problema:
Error 1.5.2: unità di retroilluminazione non rilevata
Error 1.5.2 indica che non è stato possibile rilevare l'unità di retroilluminazione. Per risolvere il problema:
In alcuni rari casi, un'unità di retroilluminazione di ricambio della generazione Form 4L può causare la visualizzazione di questo errore immediatamente dopo l'installazione. In questo caso, abilita l'Assistenza remota e contatta l'Assistenza Formlabs.
Error 1.5.5: unità di retroilluminazione non riconosciuta
Error 1.5.5 indica che non è stato possibile riconoscere l'unità di retroilluminazione. Per risolvere questo problema, segui gli stessi passaggi per la risoluzione dei problemi di Errore 1.5.2: retroilluminazione non rilevata.
In alcuni rari casi, un'unità di retroilluminazione di ricambio della generazione Form 4L può causare la visualizzazione di questo errore immediatamente dopo l'installazione. In questo caso, abilita l'Assistenza remota e contatta l'Assistenza Formlabs.
Error 1.5.6: unità di retroilluminazione accesa da troppo tempo
Error 1.5.6 indica che l'unità di retroilluminazione è rimasta accesa per più di cinque minuti, quindi la stampante l'ha spenta come meccanismo di autoprotezione. Per risolvere il problema:
Error 1.5.7: l'unità di retroilluminazione non risponde
Error 1.5.7 indica che l'unità di retroilluminazione non ha risposto a un comando della stampante.Per risolvere questo problema, segui gli stessi passaggi per la risoluzione dei problemi di Errore 1.5.2: retroilluminazione non rilevata.
Error 1.5.9 ed Error 1.5.10: impossibile misurare la temperatura dell'unità di retroilluminazione
Error 1.5.9 ed Error 1.5.10 indicano che la stampante non è riuscita a misurare la temperatura dell'unità di retroilluminazione. Per risolvere questo problema, segui gli stessi passaggi per la risoluzione dei problemi di Errore 1.5.2: retroilluminazione non rilevata.
Error 1.5.11: impossibile accendere l'unità di retroilluminazione
Error 1.5.11 indica che la stampante non è riuscita ad accendere l'unità di retroilluminazione. Per risolvere questo problema, segui gli stessi passaggi per la risoluzione dei problemi di Errore 1.5.2: retroilluminazione non rilevata.
Errori dei materiali di consumo (gruppo di errori 6)
Tutti i sottocodici di Error 6 (1-32) della Form 4 e della Form 4L riguardano problemi con i materiali di consumo (cartuccia di resina, serbatoio resina e piattaforma di stampa).
Error 1.6.2: cartuccia mancante
Se la cartuccia di resina viene rimossa durante la stampa, questa può continuare per un certo periodo di tempo utilizzando la resina immagazzinata nel serbatoio resina. Sulla stampante compare Error 1.6.2 che indica questa situazione. Reinserisci la cartuccia di resina per continuare. Se questo non risolve il problema:
Error 1.6.3: stampa interrotta a causa della cartuccia mancante
Se la cartuccia di resina viene rimossa durante la stampa, questa può continuare per un certo periodo di tempo utilizzando la resina immagazzinata nel serbatoio resina. Dopodiché, la stampa si interrompe. Sulla stampante compare Error 1.6.3 per indicare che la stampa si è interrotta a causa della rimozione della cartuccia di resina. Reinserisci la cartuccia di resina per continuare. Se questo non risolve il problema, segui la stessa procedura di risoluzione dei problemi per Error 1.6.2: Cartridge is missing (Cartuccia mancante).
Errore 1.6.4: mancata corrispondenza della cartuccia sinistra (solo generazione Form 4L)
La stampante controlla il tipo di resina nel serbatoio e nella cartuccia per assicurarsi che corrispondano al lavoro di stampa corrente. Se il tipo di resina nella cartuccia sinistra non corrisponde a quello richiesto per il lavoro di stampa, sulla stampante compare Error 1.6.4 e occorre inserire un serbatoio e una cartuccia che corrispondano alle impostazioni del lavoro di stampa. Assicurati che la resina contenuta nella cartuccia corrisponda al tipo di resina del progetto, con lo stesso numero di versione del materiale. Se questo non risolve il problema:
Error 1.6.5: la cartuccia sinistra ha superato il limite (solo generazione Form 4L)
Ogni cartuccia contiene e può erogare in modo affidabile un litro di resina. Se la cartuccia ha superato la sua vita utile, comparirà Error 1.6.5. Dopo l'erogazione dell'intero litro, smaltisci la cartuccia e continua a stampare con una nuova cartuccia. Riavvia la stampa una volta sostituita la cartuccia esaurita. Se questo errore è inesatto, segui la stessa procedura di risoluzione dei problemi per Error 1.6.4: Left cartridge mismatch (Cartuccia sinistra non corrispondente).
Errore 1.6.6: mancata corrispondenza della cartuccia destra (solo generazione Form 4L)
La stampante controlla il tipo di resina nel serbatoio e nella cartuccia per assicurarsi che corrispondano al lavoro di stampa corrente. Se il tipo di resina nella cartuccia destra non corrisponde a quello richiesto per il lavoro di stampa, sulla stampante compare Error 1.6.6 e occorre inserire un serbatoio e una cartuccia che corrispondano alle impostazioni del lavoro di stampa. Assicurati che la resina contenuta nella cartuccia corrisponda al tipo di resina del progetto, con lo stesso numero di versione del materiale. Se questo non risolve il problema:
Error 1.6.7: la cartuccia destra ha superato il limite (solo generazione Form 4L)
Ogni cartuccia contiene e può erogare in modo affidabile un litro di resina. Se la cartuccia ha superato la sua vita utile, comparirà Error 1.6.7. Dopo l'erogazione dell'intero litro, smaltisci la cartuccia e continua a stampare con una nuova cartuccia. Riavvia la stampa una volta sostituita la cartuccia esaurita. Se questo errore è inesatto, segui la stessa procedura di risoluzione dei problemi per Error 1.6.6: Right cartridge mismatch (Cartuccia destra non corrispondente).
Error 1.6.9: serbatoio mancante
Error 1.6.9 indica che manca il serbatoio resina manca o è stato rimosso durante la stampa. Reinserisci e fissa il serbatoio resina per continuare. Se questo non risolve il problema:
Error 1.6.10: serbatoio inserito in modo errato
Sulla stampante compare Error 1.6.10 quando il tipo di resina nel serbatoio non corrisponde a quello richiesto per il progetto. Rimuovi il serbatoio resina e sostituiscilo con uno che corrisponda al progetto.
Nota:
Tocca Ignore (Ignora) per riprogrammare il serbatoio resina in base al tipo di resina necessario per il lavoro di stampa.
Error 1.6.11: vita utile del serbatoio superata
Error 1.6.11 indica che il serbatoio resina ha superato la vita utile consigliata. Sostituisci il serbatoio resina per garantire la riuscita della stampa.
Error 1.6.12: serbatoio non fissato
Error 1.6.12 indica che il serbatoio resina non è bloccato in posizione con le chiusure del serbatoio. Premi con i pollici sui lati del serbatoio resina e blocca il serbatoio. Se questo non risolve il problema:
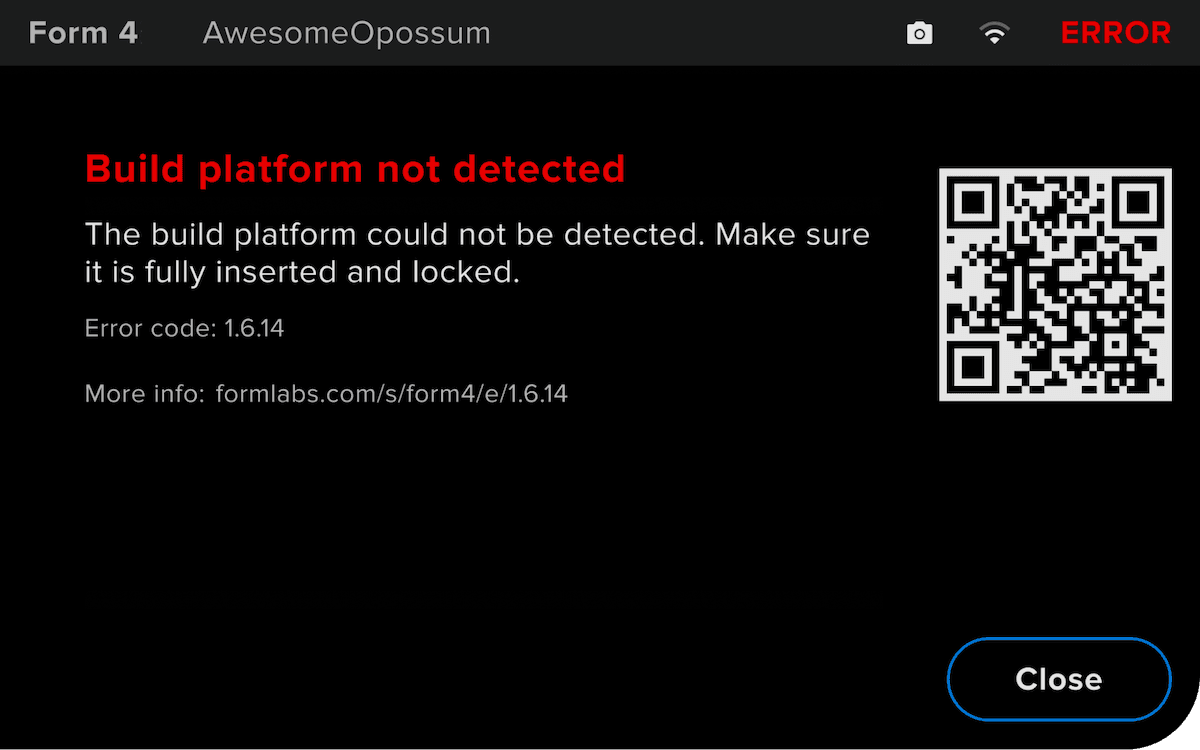
Error 1.6.14: impossibile rilevare la piattaforma di stampa
Error 1.6.14 indica che la stampante non è riuscita a rilevare una piattaforma di stampa. Inserisci e fissa una piattaforma di stampa per continuare. Se sei sicuro che una piattaforma di stampa pulita è inserita nella stampante, puoi anche toccare Ignore (Ignora) per continuare.
Se il problema persiste, apri il coperchio protettivo della stampante, rimuovi la piattaforma di stampa e controlla il perno del pistone nell'angolo in alto a destra dell'attacco della piattaforma di stampa.
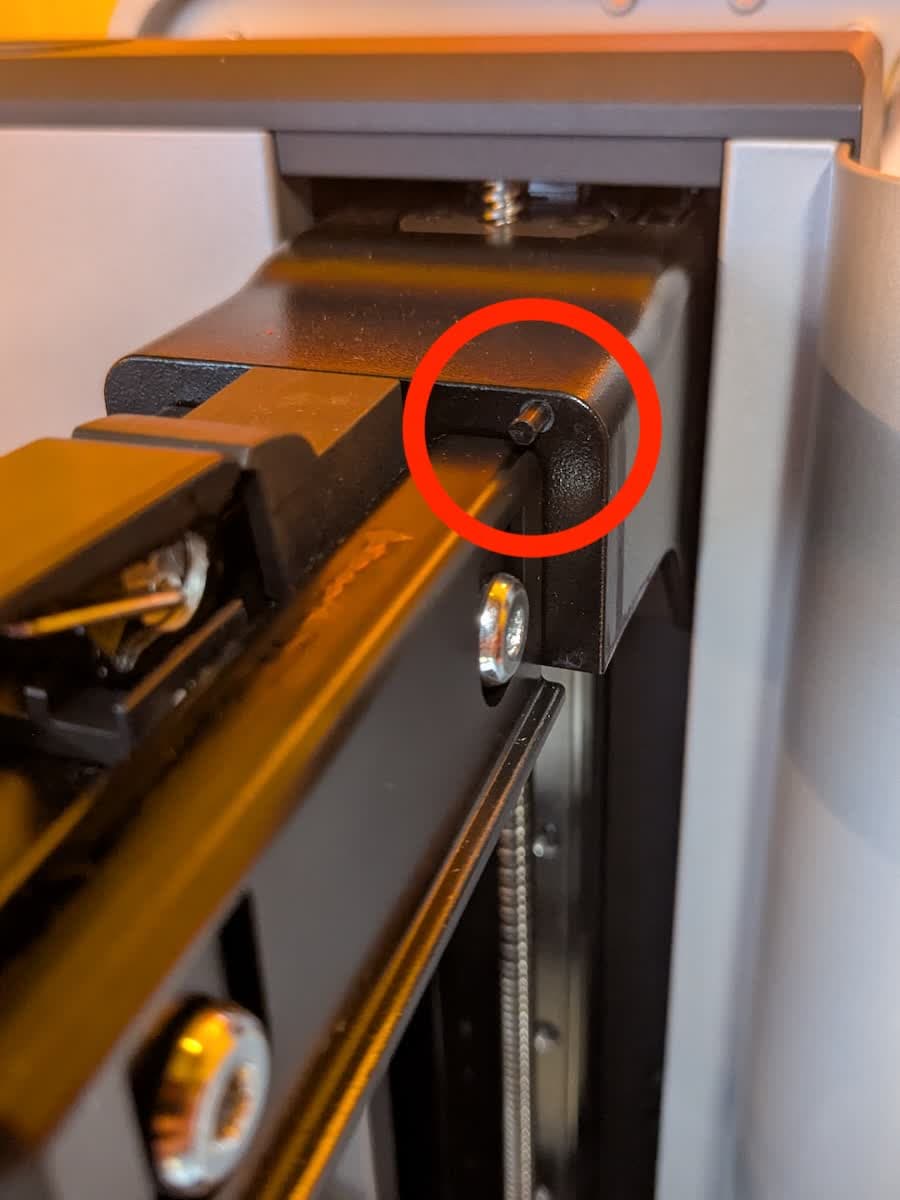
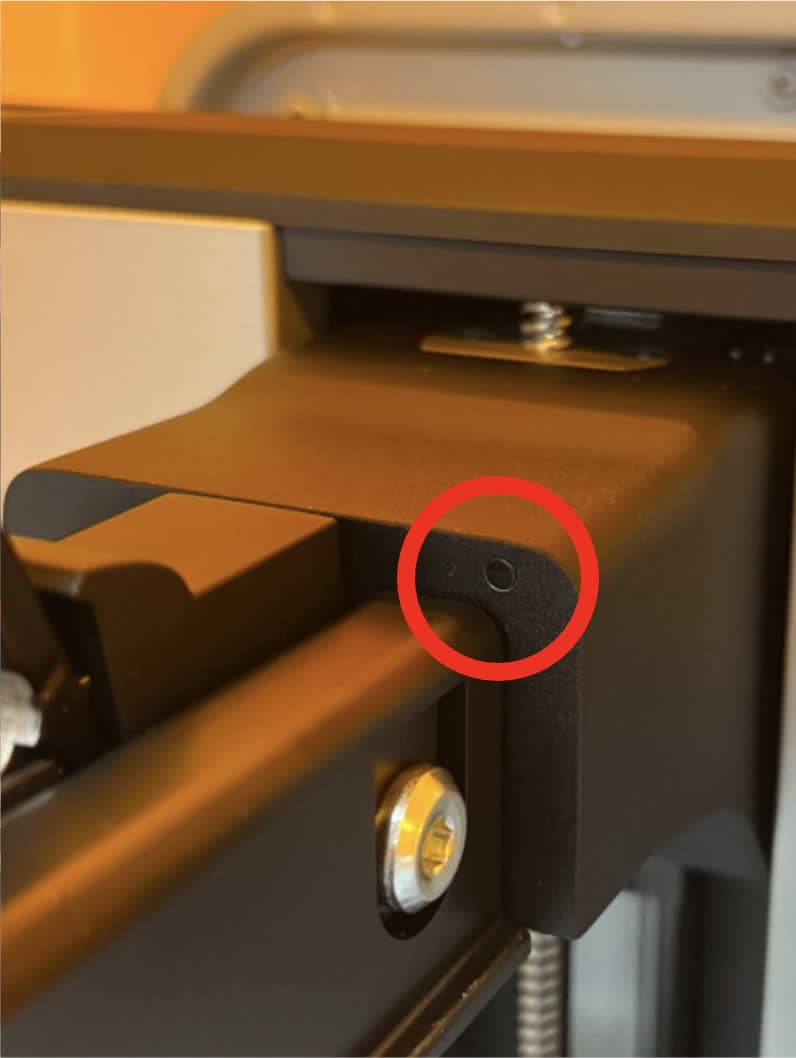
Se lo stantuffo è visibile:
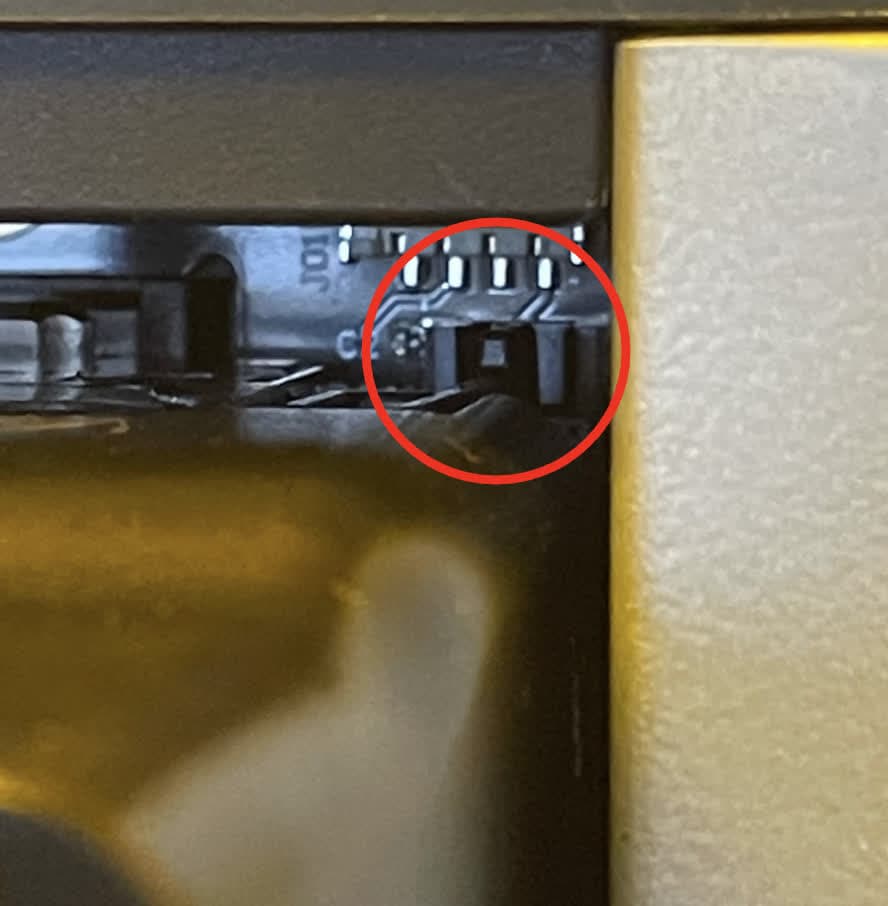
Se lo stantuffo è bloccato all'interno dell'attacco della piattaforma di stampa:
Avviso:
Non tagliare lo stantuffo senza lo strumento di rifinitura. Lo strumento di rifinitura garantisce che la lunghezza sia tagliata correttamente. Un taglio eccessivo impedirà allo stantuffo di interagire con il sensore della piattaforma di stampa, interrompendo in modo permanente il rilevamento della piattaforma di stampa.
Se l'errore persiste, contatta l'Assistenza Formlabs o un rivenditore autorizzato per ricevere assistenza.
Errore 1.6.27: mancata corrispondenza della cartuccia (solo generazione Form 4)
La stampante controlla il tipo di resina nel serbatoio e nella cartuccia per assicurarsi che corrispondano al lavoro di stampa corrente. Se non corrispondono al tipo di resina richiesto per il lavoro di stampa, sulla stampante compare Error 1.6.27 e occorre inserire un serbatoio e una cartuccia che corrispondano alle impostazioni del lavoro di stampa. Assicurati che la resina contenuta nella cartuccia corrisponda al tipo di resina del progetto, con lo stesso numero di versione del materiale. Se questo non risolve il problema:
Error 1.6.28: la cartuccia ha superato il limite (solo generazione Form 4)
Ogni cartuccia contiene e può erogare in modo affidabile un litro di resina. Se la cartuccia ha superato la sua vita utile, comparirà Error 1.6.28. Dopo l'erogazione dell'intero litro, smaltisci la cartuccia e continua a stampare con una nuova cartuccia. Riavvia la stampa una volta sostituita la cartuccia esaurita. Se questo errore è inesatto, segui la stessa procedura di risoluzione dei problemi per Error 1.6.27: Cartridge mismatch (Cartuccia non corrispondente, solo generazione Form 4).
Error 1.6.33: Unrecognized tank inserted (Serbatoio inserito non riconosciuto)
Formlabs presenta diversi tipi di serbatoi resina per le sue stampanti SLA. Error 1.6.33 indica che la stampante non è riuscita a riconoscere il serbatoio resina inserito. Per risolvere il problema:
Errori di rilevamento dei residui (gruppo di errori 7)
Tutti i sottocodici del gruppo di errori 7 (1-7) della Form 4 e della Form 4L si riferiscono al rilevamento da parte della stampante di residui nel serbatoio resina o nella piattaforma di stampa durante la preparazione della stampa.
Error 1.7.2: il miscelatore ha rilevato residui
Error 1.7.2 indica che il miscelatore ha incontrato dei residui durante la raschiatura della piattaforma di stampa pre-stampa. Usa un raschietto per rimuovere eventuale resina polimerizzata dalla piattaforma di stampa e riprova. Se il problema persiste, segui la stessa procedura di risoluzione dei problemi per Error 1.1.6: Mixer detected debris (Il miscelatore ha rilevato residui).
Error 1.7.3: la piattaforma di stampa ha rilevato dei residui
Error 1.7.3 indica che la piattaforma di stampa ha incontrato dei residui mentre si abbassava nel serbatoio resina durante la fase di pre-stampa. Usa un raschietto per rimuovere eventuale resina polimerizzata dalla piattaforma di stampa e riprova. Se il problema persiste, segui la stessa procedura di risoluzione dei problemi per Error 1.1.7: Build platform detected debris (La piattaforma di stampa ha rilevato residui).
Errori del miscelatore (gruppo di errori 8)
Tutti i sottocodici del gruppo di errori 8 (1) della Form 4 e della Form 4L riguardano il miscelatore.
Error 1.8.1: Mixer not detected (Miscelatore non rilevato)
Error 1.8.1 indica che la stampante non ha rilevato il miscelatore. Per risolvere il problema:
Errori di erogazione (gruppo di errori 9)
Tutti i sottocodici del gruppo di errori 9 (1-25) della Form 4 e della Form 4L riguardano il sistema di erogazione della resina.
Error 1.9.4: impossibile misurare il livello di resina
Error 1.9.4 indica che la stampante non è riuscita a misurare la quantità di resina nel serbatoio. Per risolvere il problema:
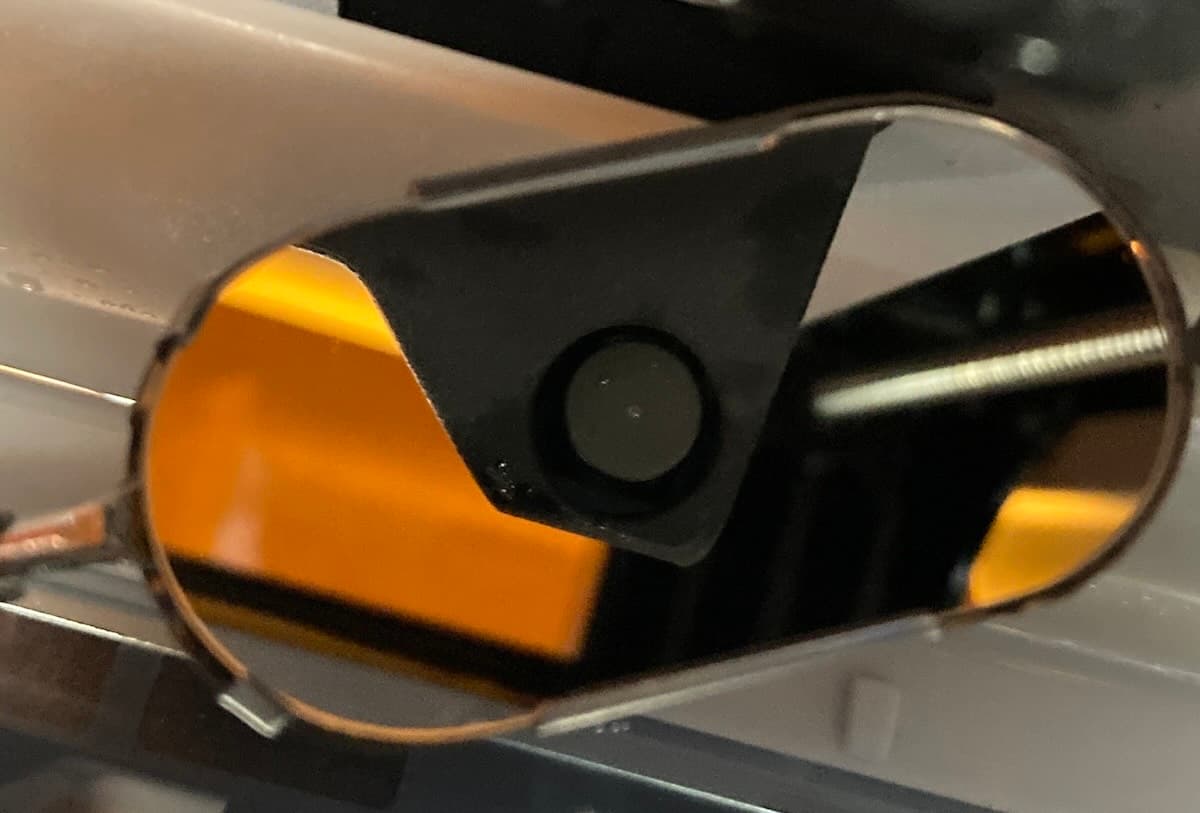
Error 1.9.5: il serbatoio contiene troppa resina
Se il serbatoio resina è troppo pieno, sulla stampante compare Error 1.9.5. Utilizza una siringa o un bicchiere monouso per rimuovere un piccolo quantitativo di resina e versarlo in un altro recipiente. Se la stampante segnala erroneamente un serbatoio resina troppo pieno:
Error 1.9.6: resina insufficiente per terminare la stampa
Error 1.9.6 indica che il lavoro di stampa corrente richiede una quantità di resina superiore a quella disponibile nel serbatoio resina e nella cartuccia di resina. Potrebbe essere necessario sostituire la cartuccia di resina durante la stampa. La stampante si ferma e compare Error 1.9.6 quando la cartuccia è vuota. Per risolvere il problema:
Error 1.9.7: stampa interrotta per mancanza di resina
Le stampanti SLA di Formlabs hanno un componente noto come LevelSense, che misura la quantità di resina nel serbatoio resina durante la stampa. Monitorando il livello di resina, la stampante può erogare automaticamente la resina dalla cartuccia nel serbatoio ogni volta che la resina inizia a esaurirsi. Error 1.9.7 indica che la stampante si è fermata per riempire il serbatoio resina. Se questo messaggio compare ripetutamente:
Error 1.9.9: cartuccia sinistra vuota (solo generazione Form 4L)
La stampante visualizza Error 1.9.9 se non c'è più resina nella cartuccia di sinistra. Ogni cartuccia contiene e può erogare in modo affidabile un litro di resina. Dopo l'erogazione dell'intero litro, smaltisci la cartuccia e continua a stampare con una nuova cartuccia.
Se una cartuccia non è vuota ma la stampante visualizza questo errore:
Error 1.9.10: cartuccia destra vuota (solo generazione Form 4L)
La stampante visualizza Error 1.9.10 se non c'è più resina nella cartuccia di destra. Ogni cartuccia contiene e può erogare in modo affidabile un litro di resina. Dopo l'erogazione dell'intero litro, smaltisci la cartuccia e continua a stampare con una nuova cartuccia.
Se una cartuccia non è vuota ma la stampante visualizza questo errore:
Error 1.9.11: erogazione lenta della cartuccia sinistra (solo generazione Form 4L)
Error 1.9.11 indica che la resina viene erogata dalla cartuccia di resina sinistra a una velocità inferiore a quella prevista. Se una cartuccia non è vuota, ma la stampante non è in grado di erogare la resina, l'erogazione potrebbe essere ostacolata da un problema legato alla cartuccia.
Nota:
La stampante potrebbe erogare la resina lentamente senza mostrare un messaggio di errore. Segui i passaggi di risoluzione dei problemi sopra descritti per risolvere il problema dell'erogazione lenta, a prescindere dal fatto che il messaggio di errore venga visualizzato.
Error 1.9.12: erogazione lenta della cartuccia destra (solo generazione Form 4L)
Error 1.9.12 indica che l'erogazione della resina dalla cartuccia destra è più lenta del previsto. Se una cartuccia non è vuota, ma la stampante non è in grado di erogare la resina, l'erogazione potrebbe essere ostacolata da un problema legato alla cartuccia.
Nota:
La stampante potrebbe erogare la resina lentamente senza mostrare un messaggio di errore. Segui i passaggi di risoluzione dei problemi sopra descritti per risolvere il problema dell'erogazione lenta, a prescindere dal fatto che il messaggio di errore venga visualizzato.
Error 1.9.13, Error 1.9.14, Error 1.9.15 ed Error 1.9.19: errori di distanza durante la ricalibrazione del sensore di livello
Le stampanti SLA di Formlabs hanno un componente noto come LevelSense, che misura la quantità di resina nel serbatoio resina durante la stampa. Nelle stampanti della generazione Form 4 e Form 4L, la stampante misura la distanza tra il sensore LevelSense e la resina liquida. Se la stampante non misura correttamente il livello di resina, ricalibra il LevelSense. Se la stampante non è in grado di misurare questa distanza o non rientra nell'intervallo previsto, compare Error 1.9.13, Error 1.9.14, Error 1.9.15 o Error 1.9.19. Per risolvere questi problemi:
Error 1.9.16, Error 1.9.17, and Error 1.9.18: LevelSense temperature errors
Formlabs SLA printers have a component known as LevelSense that measures the amount of resin in the resin tank during a print. On Form 4 and Form 4L generation printers, the LevelSense system also measures the ambient temperature to accurately measure the resin level. If the printer is incorrectly measuring resin level, recalibrate the LevelSense. During recalibration, if the printer cannot measure the ambient temperature or it is out of the expected range, the printer displays Error 1.9.16, Error 1.9.17, or Error 1.9.18. To resolve these issues:
Error 1.9.20: Filling tank
The printer may show Error 1.9.20 to inform you that it is filling the resin tank. It does not necessarily indicate that there is an issue. If the printer fails to fill the resin tank after a prolonged length of time, check the resin cartridge as you would for a dispense-related error.
Error 1.9.21: Could not determine offset
Error 1.9.21 indicates that the cartridge sensor readings were not stable during cartridge floor load cell calibration. Make sure that nothing is sitting on the cartridge floor(s) and retry the cartridge floor calibration process. If the issue persists:
Error 1.9.22: Cartridge is empty (Form 4 generation only)
The printer displays Error 1.9.22 if there is no more resin in the cartridge. Each cartridge contains and can reliably dispense one liter of resin. After the full liter dispenses, dispose of the cartridge and continue printing with a new cartridge.
If a cartridge is not empty but the printer displays this error:
Nota:
È possibile che la stampante non riesca a erogare la resina senza visualizzare un messaggio di errore. Segui i passaggi di risoluzione dei problemi sopra descritti per risolvere i problemi di erogazione della resina, a prescindere dal fatto che il messaggio di errore venga visualizzato.
Error 1.9.23: erogazione lenta della cartuccia (solo generazione Form 4)
Error 1.9.23 indica che la resina viene erogata dalla cartuccia a una velocità inferiore a quella prevista. Se una cartuccia non è vuota, ma la stampante non è in grado di erogare la resina, l'erogazione potrebbe essere ostacolata da un problema legato alla cartuccia.
Nota:
La stampante potrebbe erogare la resina lentamente senza mostrare un messaggio di errore. Segui i passaggi di risoluzione dei problemi sopra descritti per risolvere il problema dell'erogazione lenta, a prescindere dal fatto che il messaggio di errore venga visualizzato.
Error 1.9.24: stampa interrotta per mancanza di resina
Le stampanti SLA di Formlabs hanno un componente noto come LevelSense, che misura la quantità di resina nel serbatoio resina durante la stampa. Monitorando il livello di resina, la stampante può erogare automaticamente la resina dalla cartuccia nel serbatoio ogni volta che la resina inizia a esaurirsi.
Tuttavia, le stampanti in Open Material Mode non possono erogare automaticamente dalla cartuccia di resina. Error 1.9.24 indica che la stampante si è fermata per permettere all'utente di riempire manualmente il serbatoio resina. Se questo messaggio compare ripetutamente:
Errori della Light Processing Unit (gruppo di errori 10)
Tutti i sottocodici del gruppo di errori 10 (1-9) della Form 4 e della Form 4L riguardano la Light Processing Unit (LPU).
Error 1.10.1 ed Error 1.10.4: LPU non collegata
Error 1.10.1 ed Error 1.10.4 indicano che la LPU non è collegata. Per risolvere questi problemi:
Error 1.10.3: LPU non rilevata
Error 1.10.3 indica che non è stato possibile rilevare la LPU. Per risolvere questo problema, segui gli stessi passaggi per la risoluzione dei problemi di Error 1.10.1 ed Error 1.10.4: LPU is not connected (LPU non collegata).
Error 1.10.5: impossibile caricare il file di stampa
Error 1.10.5 indica un problema con un file del lavoro di stampa caricato. Aggiorna PreForm e il firmware della stampante, quindi ricarica il lavoro di stampa.
Error 1.10.8: vita utile della LPU superata
Error 1.10.8 indica che la Light Processing Unit è stata utilizzata oltre la sua vita utile consigliata. Se continui, potrebbero verificarsi errori di stampa. Sostituisci la LPU. Segui le istruzioni contenute nelle guide di riparazione Sostituzione della Light Processing Unit della Form 4 o Sostituzione della Light Processing Unit della Form 4L. Le LPU di ricambio sono disponibili nel negozio online di Formlabs.
Errori della fotocamera (gruppo di errori 12)
Tutti i sottocodici del gruppo di errori 12 (1-5) della Form 4 e della Form 4L riguardano il sistema della fotocamera.
Error 1.12.2: fotocamera non collegata
Error 1.12.2 indica che la fotocamera, utilizzata per scattare le foto dopo la stampa, non è collegata. Se la fotocamera è stata scollegata o rimossa di proposito, ignora questo messaggio. Per risolvere il problema:
Error 1.12.3: acquisizione foto non riuscita
Error 1.12.3 indica che la fotocamera non è riuscita a scattare una foto. Per risolvere questo problema, segui gli stessi passaggi per la risoluzione dei problemi di Error 1.12.2: Camera is not connected (Fotocamera non collegata).
Errori durante la compressione (gruppo di errori 13)
La fase di compressione degli strati si riferisce alla discesa della piattaforma di stampa nel serbatoio resina. Tutti i sottocodici del gruppo di errori 13 della Form 4 e della Form 4L riguardano le fasi di compressione.
Error 1.13.1: la piattaforma di stampa ha rilevato residui
Error 1.13.1 indica che la stampante ha rilevato residui nel serbatoio resina o sulla piattaforma di stampa durante la fase di schiacciamento. Per risolvere questo problema, segui la stessa procedura di risoluzione dei problemi per Error 1.1.7: Build platform detected debris (La piattaforma di stampa ha rilevato residui).
Errori dello stato di stampa (gruppo di errori 15)
Tutti i sottocodici del gruppo errori 15 (1-6) della Form 4 e Form 4L riguardano un problema con lo stato di stampa.
Error 1.15.1: impossibile caricare il lavoro di stampa
Error 1.15.1 indica un problema con il lavoro di stampa caricato. Aggiorna PreForm e il firmware della stampante, quindi carica nuovamente il lavoro di stampa.
Error 1.15.2: progetto già in stampa
Error 1.15.2 indica che un nuovo lavoro di stampa non è stato avviato perché ce n'era già uno in corso. Attendi il termine della stampa corrente prima di avviarne una nuova. Se non è in corso alcun lavoro, riavvia la stampante, reinstalla il firmware e riprova.
Error 1.15.3: lavoro di stampa non valido
Error 1.15.3 indica un problema con il lavoro di stampa caricato. Potrebbe essere stato generato utilizzando una versione di PreForm incompatibile con il firmware della stampante. Aggiorna PreForm e il firmware della stampante, quindi carica nuovamente il lavoro di stampa.
Error 1.15.5: regolazione dell'aderenza incompatibile
Error 1.15.5 indica che i valori di aderenza della stampante sono stati aggiornati dopo il caricamento di questo lavoro. Per risolvere questo problema, carica nuovamente il lavoro tramite PreForm.
Error 1.15.6: spazio di archiviazione insufficiente per la stampa
Error 1.15.6 indica che non c'è spazio di archiviazione sufficiente sulla stampante per memorizzare i dati di stampa, anche dopo l'eliminazione automatica dei lavori dalla cronologia. Cancella i progetti dalla coda e ricarica i lavori di stampa senza la funzione timelapse tramite PreForm.
Errori del Resin Pumping System (gruppo di errori 20)
Tutti i sottocodici del gruppo di errori 20 (1-15) della Form 4 e della Form 4L riguardano un problema con il Resin Pumping System.
Error 1.20.1: contenitore della resina da controllare
Il Resin Pumping System pompa la resina da un contenitore di 5 L nella stampante. Se il contenitore è vuoto, sostituiscilo per continuare a stampare. Se il contenitore non è vuoto, potrebbe esserci un problema con la scheda resina inserita nella pompa. Contatta l'Assistenza Formlabs o un rivenditore autorizzato per ricevere assistenza.
Error 1.20.4: pompa di resina non collegata
Il Resin Pumping System (Form 4) comunica con le stampanti della generazione Form 4 e Form 4L tramite una connessione USB. Error 1.20.4 indica che la stampante ha riconosciuto una pompa di resina attraverso il sensore RFID della cartuccia di resina ma non è riuscita a comunicare con la pompa attraverso il cavo USB. Per risolvere il problema:
Error 1.20.6: impossibile aggiornare il firmware della pompa di resina
Error 1.20.6 indica che la stampante ha tentato di aggiornare il firmware della pompa di resina, ma non ci è riuscita. Questo può accadere se la pompa viene scollegata durante l'aggiornamento. Per risolvere questo problema, segui gli stessi passaggi per la risoluzione dei problemi di Error 1.20.4: Resin pump is not connected (Pompa di resina non collegata).
Error 1.20.14: problema relativo al collegamento alla pompa di resina
Error 1.20.14 indica un problema di connessione alla pompa di resina. Assicurati che la pompa sia collegata direttamente alla stampante tramite il cavo USB integrato. Non collegare la pompa di resina alla stampante tramite un hub, un adattatore o un altro accessorio USB. Se il problema persiste, segui gli stessi passaggi per la risoluzione dei problemi di Error 1.20.4: Resin pump is not connected (Pompa di resina non collegata).
Error 1.20.15: problema di alimentazione della pompa di resina
Error 1.20.15 indica un problema con l'alimentazione della pompa di resina. Per risolvere questo problema, segui gli stessi passaggi per la risoluzione dei problemi di Error 1.20.4: Resin pump is not connected (Pompa di resina non collegata). Se l'errore persiste, sostituisci la pompa di resina
Errori della Color Resin (Gruppo di errori 22)
Tutti i sottocodici del gruppo di errori 22 (1-4) della Form 4 e della Form 4L riguardano un problema con la Color Resin.
Error 1.22.1: colore del serbatoio non corrispondente
La stampante visualizza Error 1.22.1 quando il colore della resina nel serbatoio non corrisponde a quello richiesto per il lavoro. Rimuovi il serbatoio resina e sostituiscilo con uno che corrisponda al progetto.
Nota:
Tocca Ignore (Ignora) per riprogrammare il serbatoio resina in base al colore della resina necessario per il lavoro di stampa.
Error 1.22.2: colore della cartuccia non corrispondente (solo generazione Form 4)
La stampante visualizza Error 1.22.2 quando il colore della resina nella cartuccia non corrisponde a quello richiesto per il lavoro. Rimuovi la cartuccia e sostituiscila con una che corrisponda al progetto. Se questo non risolve il problema, segui la stessa procedura di risoluzione dei problemi per Error 1.6.27: Cartridge mismatch (Cartuccia non corrispondente, solo generazione Form 4).
Error 1.22.3: colore della cartuccia sinistra non corrispondente (solo generazione Form 4L)
La stampante visualizza Error 1.22.3 quando il colore della resina nella cartuccia sinistra non corrisponde a quello richiesto per il lavoro. Rimuovi la cartuccia sinistra e sostituiscila con una che corrisponda al progetto. Se questo non risolve il problema, segui la stessa procedura di risoluzione dei problemi per Error 1.6.27: Left cartridge mismatch (Cartuccia sinistra non corrispondente, solo generazione Form 4L).
Error 1.22.4: mancata corrispondenza del colore della cartuccia destra (solo generazione Form 4L)
La stampante visualizza Error 1.22.4 quando il colore della resina nella cartuccia destra non corrisponde a quello richiesto per il lavoro. Rimuovi la cartuccia destra e sostituiscila con una che corrisponda al progetto. Se questo non risolve il problema, segui la stessa procedura di risoluzione dei problemi per Error 1.6.6: Right cartridge mismatch (Cartuccia destra non corrispondente, solo generazione Form 4L).
Errori dei materiali di consumo (gruppo di errori 227)
Tutti i sottocodici del gruppo di errori 227 (1-4) della Form 4 e della Form 4L riguardano un problema con una cartuccia di resina inserita.
Error 1.227.1: cartuccia di resina incompatibile (solo generazione Form 4)
La stampante visualizza Error 1.227.1 quando la resina nella cartuccia non è compatibile con la stampante. In particolare, ciò avviene quando una resina per applicazioni biocompatibili viene inserita in una stampante Form 4 e non in una stampante Form 4B. Se hai inserito la cartuccia nel tipo di stampante sbagliato, spostala nella stampante corretta. Altrimenti, segui le istruzioni di configurazione della Form 4B per acquistare una licenza illimitata per i materiali biocompatibili Formlabs per la stampante.
Error 1.227.2: cartuccia di resina destra incompatibile (solo generazione Form 4L)
La stampante visualizza Error 1.227.2 quando la resina nella cartuccia destra non è compatibile con la stampante. In particolare, ciò avviene quando una resina per applicazioni biocompatibili viene inserita in una stampante Form 4L e non in una stampante Form 4BL. Se hai inserito la cartuccia nel tipo di stampante sbagliato, spostala nella stampante corretta. Altrimenti, segui le istruzioni di configurazione della 4BL per acquistare una licenza illimitata per i materiali biocompatibili Formlabs per la stampante.
Error 1.227.3: cartuccia di resina sinistra incompatibile (solo generazione Form 4L)
La stampante visualizza Error 1.227.3 quando la resina nella cartuccia sinistra non è compatibile con la stampante. In particolare, ciò avviene quando una resina per applicazioni biocompatibili viene inserita in una stampante Form 4L e non in una stampante Form 4BL. Se hai inserito la cartuccia nel tipo di stampante sbagliato, spostala nella stampante corretta. Altrimenti, segui le istruzioni di configurazione della 4BL per acquistare una licenza illimitata per i materiali biocompatibili Formlabs per la stampante.
Error 1.227.4: cartucce di resina incompatibili (solo generazione Form 4L)
La stampante visualizza Error 1.227.4 quando la resina in entrambe le cartucce non è compatibile con la stampante. In particolare, ciò avviene quando una resina per applicazioni biocompatibili viene inserita in una stampante Form 4L e non in una stampante Form 4BL. Se hai inserito le cartucce nel tipo di stampante sbagliato, spostale nella stampante corretta. Altrimenti, segui le istruzioni di configurazione della 4BL per acquistare una licenza illimitata per i materiali biocompatibili Formlabs per la stampante.
Error 1.227.5: controllo della cartuccia consigliato
Le resine della famiglia Tough più recenti causano il rigonfiamento della valvola della cartuccia di resina nel tempo. Una valvola della cartuccia gonfia eroga la resina più lentamente, soprattutto verso la fine della vita della cartuccia in questione. In un numero limitato di casi, la valvola della cartuccia di resina può cadere del tutto, causando una fuoriuscita significativa di resina. Sulla stampante compare Error 1.227.5 dopo che la cartuccia di resina ha concluso 50 cicli di erogazione della resina e potrebbe avere prestazioni di erogazione ridotte. Per evitare problemi di erogazione e fuoriuscite di resina:
Error 1.227.6: controllo della cartuccia consigliato (solo generazione Form 4L)
Le resine della famiglia Tough più recenti causano il rigonfiamento della valvola di erogazione della cartuccia di resina nel tempo. Una valvola della cartuccia gonfia eroga la resina più lentamente, soprattutto verso la fine della vita della cartuccia in questione. In un numero limitato di casi, la valvola della cartuccia di resina può cadere del tutto, causando una fuoriuscita significativa di resina. Sulle stampanti della generazione 4L, compare Error 1.227.6 dopo che la cartuccia di resina nella fessura di destra ha concluso 50 cicli di erogazione della resina e potrebbe avere prestazioni di erogazione ridotte. Per evitare problemi di erogazione e fuoriuscite di resina:
La stampante non si inizializza
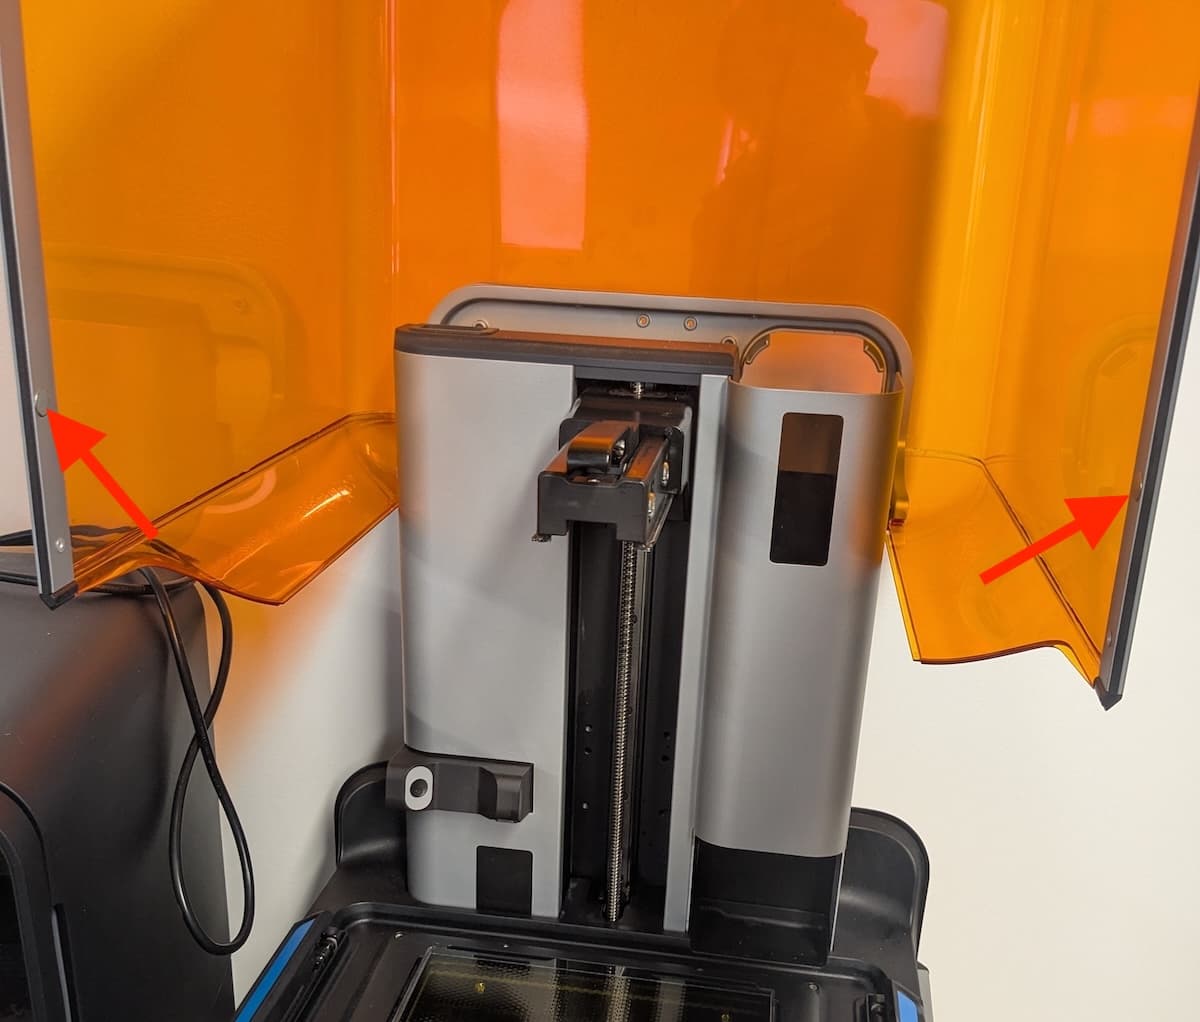
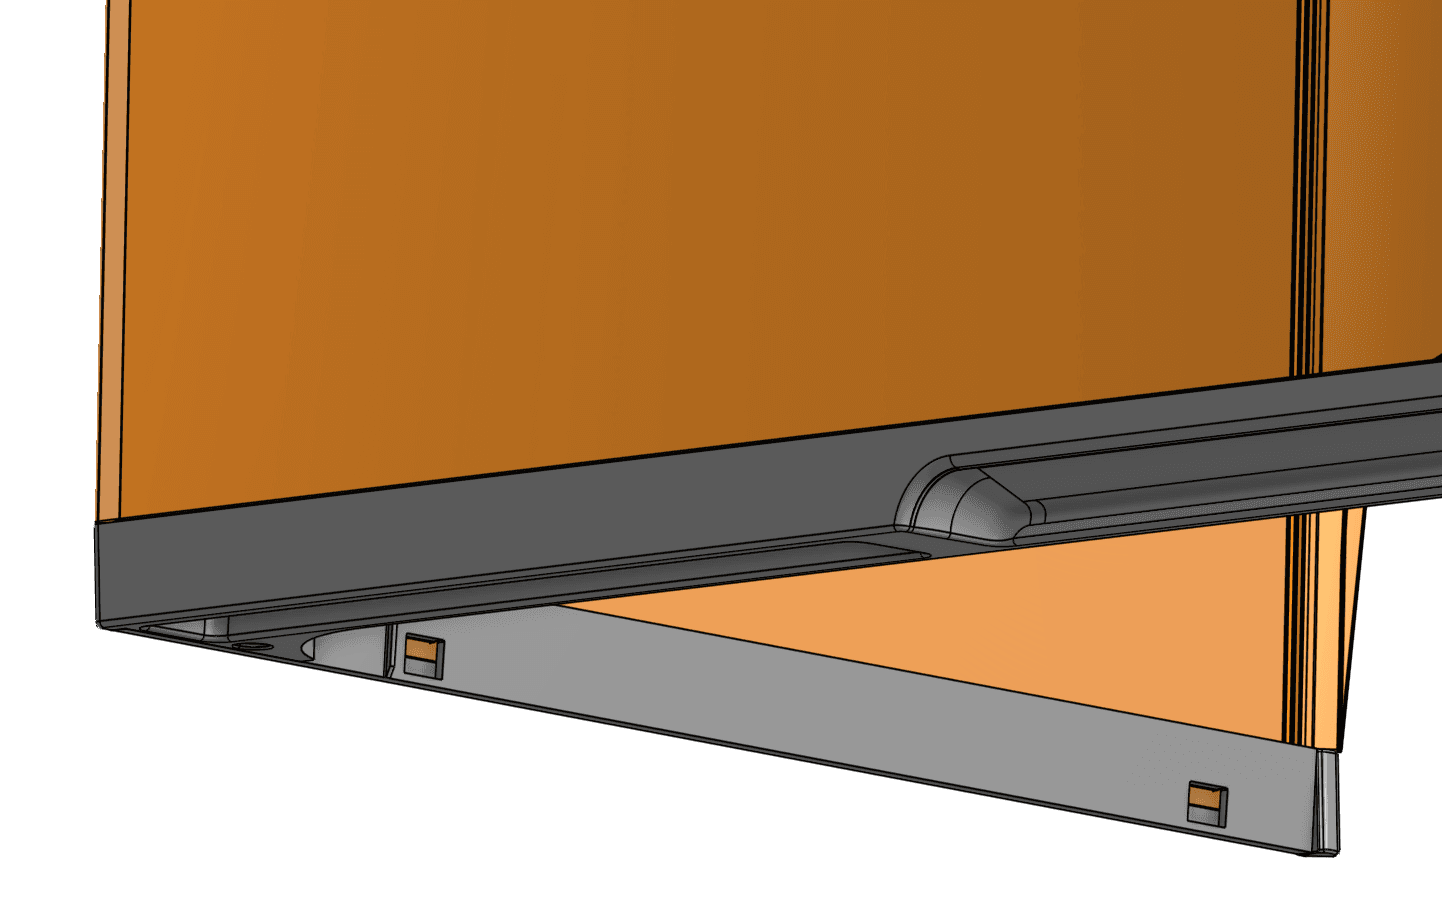
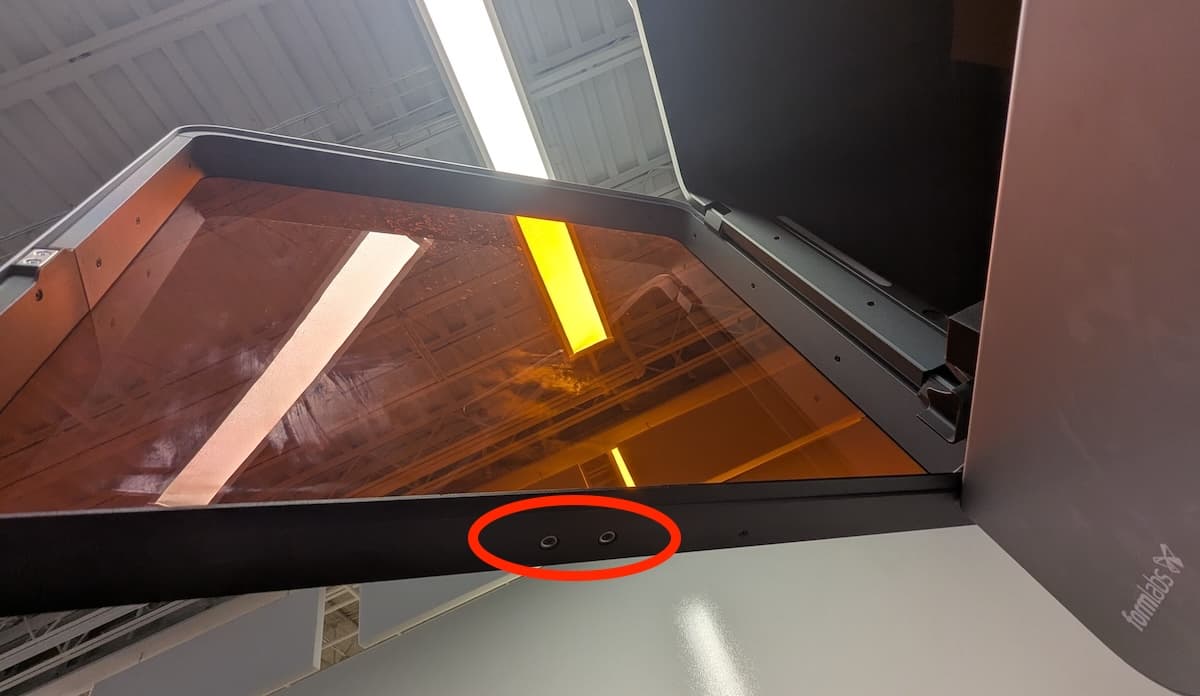
Se la stampante non si inizializza all'accensione, accertati che il coperchio protettivo sia chiuso. Se è chiuso, apri il coperchio e verifica la presenza dei due magneti di sicurezza (interlock) rotondi lungo il bordo inferiore. Se uno dei magneti si è staccato dal coperchio, potrebbe essersi attaccato alla scocca della stampante o essersi incastrato sotto una delle chiusure del serbatoio resina. Fissa il magnete al coperchio con un adesivo forte. Una volta che l'adesivo è asciutto, chiudi il coperchio per continuare.
Se il problema persiste, contatta l'Assistenza Formlabs o un rivenditore autorizzato per ricevere assistenza. Se entrambi i magneti sono presenti, riavvia la stampante, aggiorna il firmware e riprova.
Errori vari e interni
In rare occasioni, la stampante può visualizzare il messaggio Internal error (Errore interno) con un codice di errore associato. Se viene visualizzato un errore interno, carica i dati di diagnostica della stampante e contatta l'Assistenza Formlabs per ricevere linee guida specifiche.
Error 1.23.3
Error 1.23.3 indica che la stampante ha riscontrato un errore di comunicazione interna. Per risolvere il problema:
Error 1.196.3
Error 1.196.3 può essere causato da uno spazio di archiviazione insufficiente sulla stampante. Elimina i vecchi lavori di stampa dalla coda di stampa e riprova a stampare.
Error 1.225.1
Error 1.225.1 indica che la stampante ha riscontrato un errore durante la connessione alla rete Wi-Fi selezionata. Riavvia la stampante e il router Wi-Fi (se possibile) e riprova.
Error 1.226.5: ripristino della stampante durante la stampa
Error 1.226.5 indica che la stampante si è riavviata durante la stampa, molto probabilmente a causa di un problema di alimentazione. Se l'alimentazione della stampante viene interrotta durante un lavoro di stampa, la stampante non riprende il lavoro al riavvio. Per risolvere il problema:
Error 1.240.5
Error 1.240.5 indica che la stampante ha ricevuto un lavoro di stampa danneggiato. Ciò può accadere a causa di eventuali problemi di connessione di rete durante l'invio del lavoro di stampa alla stampante. Ricarica il lavoro di stampa. Se il problema si ripresenta, ricarica tramite una connessione più stabile, per esempio via USB.
assistenza remota
per la risoluzione dei problemiDurante la risoluzione dei problemi, l'Assistenza Formlabs potrebbe aver bisogno di ulteriori informazioni o di accedere alla stampante. Potrebbe richiederti di abilitare l'assistenza remota sulla macchina.
Per preparare la stampante per l'assistenza remota:
Abilitazione di Analytics per la risoluzione dei problemi
Durante la risoluzione dei problemi, l'Assistenza Formlabs potrebbe aver bisogno di ulteriori informazioni o di accedere alla stampante. Potrebbe richiederti di abilitare le informazioni analitiche sulla macchina.
Per preparare la stampante per la connessione a Dashboard:
Ripristino delle impostazioni di fabbrica
In alcuni casi, un ripristino delle impostazioni di fabbrica può correggere il funzionamento anomalo della stampante. Le anomalie possono includere messaggi di errore sconosciuto, aggiornamenti firmware incompleti, interfaccia touchscreen che non risponde ai comandi o problemi di connessione a PreForm. Un ripristino delle impostazioni di fabbrica cancella le impostazioni personalizzate, comprese le stampe salvate nella coda e le connessioni di rete.
Avviso:
Il ripristino delle impostazioni di fabbrica cancella tutte le informazioni sui lavori di stampa, le impostazioni personalizzate e i dati di diagnostica. Carica i dati di diagnostica prima di effettuare il ripristino delle impostazioni di fabbrica.
Per eseguire il ripristino delle impostazioni di fabbrica:
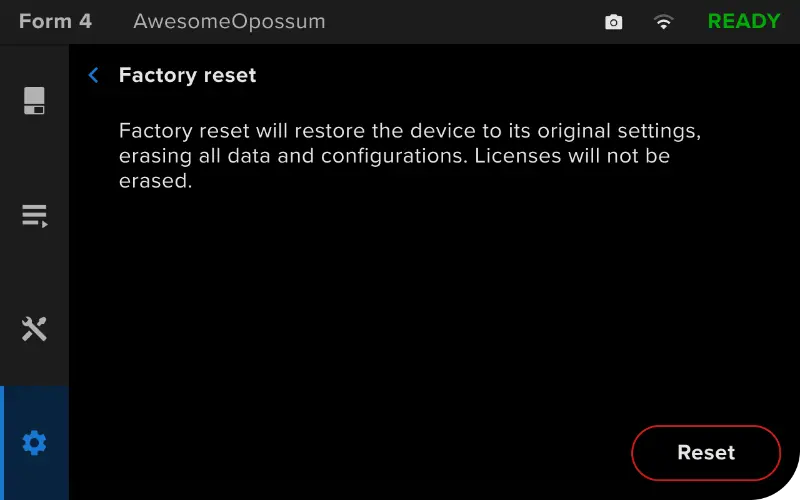
Se non è possibile eseguire un ripristino delle impostazioni di fabbrica con l'interfaccia touchscreen, utilizza il pulsante fisico sul retro dell'apparecchio:
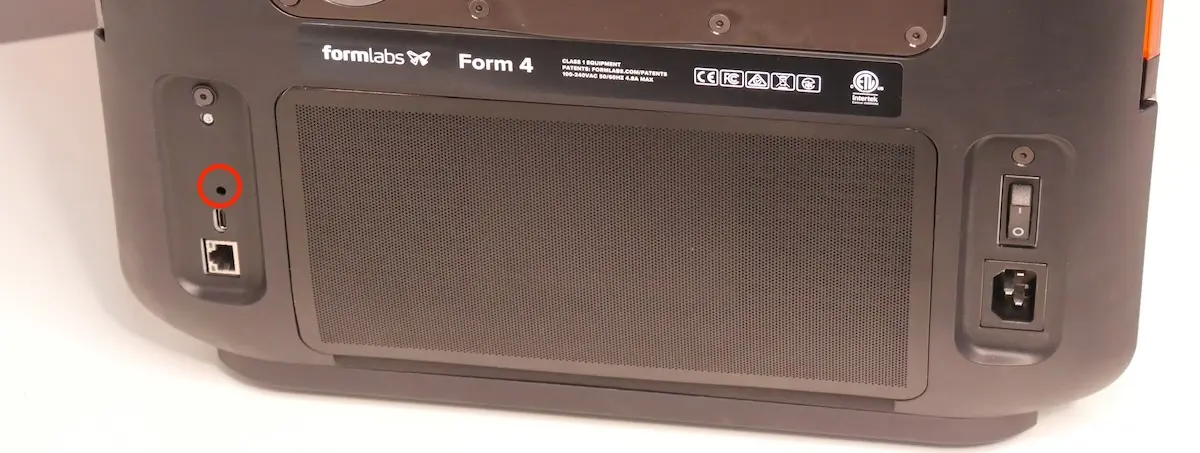
Per confermare un ripristino alle impostazioni di fabbrica andato a buon fine, tocca Queue (Coda) sull'interfaccia touchscreen della stampante. Dopo un ripristino andato a buon fine, la coda di stampa è vuota. Se il ripristino non risolve il problema, contatta l'Assistenza Formlabs o un rivenditore autorizzato.