Cleaning and maintaining the Form Wash L

The Form Wash L requires regular maintenance and care. The standard maintenance cycle for cleaning the machine is every three months of use, or as indicated on the touchscreen. Some resins are abrasive and may require you to replace the wash bucket after extended use.

Schedule of maintenance

Follow the cleaning schedule to inspect, clean, and maintain your Form Wash L on a regular basis.

ProcedureFrequency
Update the firmwareWhen indicated by Formlabs
Measuring the resin concentration of solventWhen washed parts have tacky surfaces
Replace used solventWhen indicated by solvent monitor
Dispose of used Isopropyl alcohol (IPA)

Dispose of used Tripropylene glycol monomethyl ether (TPM)
When replacing used solvent
Inspect the wash bucketWhen replacing used solvent or cleaning the wash bucket
Clean the wash bucket
  • When replacing solvent, or every three months
  • If you notice significant deposits of resin in the wash bucket
Inspect the impellersWhen inspecting or cleaning the wash bucket
Replace the wash bucket
  • If you see gouges in the wash bucket underneath the impellers
  • If you notice gray or metallic residue deposited on washed parts

Measuring resin concentration

As more parts are cleaned, the solvent gradually becomes more concentrated with liquid resin and reduces the effectiveness of the Form Wash L. Replace solvent when indicated on the touchscreen or when the wash is no longer effective and when parts have tacky surfaces after washing.

  • For isopropyl alcohol (IPA), replace the used solvent when the resin concentration reaches 10%.
  • For tripropylene glycol monomethyl ether (TPM), replace the used solvent when the resin concentration reaches 30–32% or when the specific gravity is above 1.0.
  • For Formlabs Resin Washing Solution, replace the used solvent when the specific gravity is above 0.975. The hydrometer packaged with the Form Wash does not measure the correct range of specific gravity for use with Formlabs Resin Washing Solution. A hydrometer that can measure a specific gravity of 0.900–1.000 should be used instead.

Tip:

Prolong the lifetime of the solvent by implementing a preliminary rinse with a small volume of solvent prior to inserting printed parts into the Form Wash L.

To measure the resin concentration of solvent with the solvent monitor:

  1. If you are currently viewing a submenu on the touchscreen, tap the < arrow until you return to the home screen. The home screen lists the current wash settings and the status of the Form Wash L.
  2. The current solvent type and resin concentration are listed under Solvent.

Replacing solvent

The level of resin concentration in the solvent in the Form Wash L increases gradually as more parts are cleaned, reducing the effectiveness of the wash. Replace the solvent when indicated on the touchscreen. Transfer solvent from the Form Wash L into a chemical resistant container that is safely designated for highly-resin-concentrated solvent and to refill the wash bucket with fresh solvent.
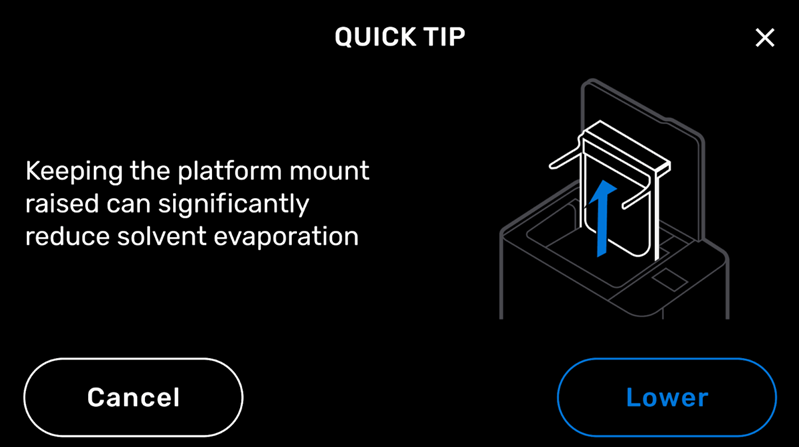
Tip:

Leave the platform mount in the raised position between uses to reduce the evaporation rate of your wash solvent. Tap Cancel on the Quick Tip screen to leave the platform mount raised.


Supplies:

  • 43 L (11.4 US gal) of fresh solvent (IPA, TPM, or water)
  • Electric siphon pump (included with the Form Wash L)
  • Empty container, suitable for storing up to 43 L (11.4 US gal) of solvent
  • Non-reactive nitrile gloves
  • Safety glasses

To replace solvent:

  1. Put on a clean pair of nitrile gloves.
  2. On the touchscreen, tap Solvent. The Solvent screen appears.
  3. Tap Replace Solvent. Follow the on-screen instructions to empty and refill the wash bucket.
  4. Using the electric siphon pump, pump the solvent out of the wash bucket into an appropriate container:
    1. Place the pump intake into the wash bucket.
    2. Securely place the flexible pump hose into the solvent container.
    3. Press and hold the pump switch to pump solvent into the solvent container.
  5. If necessary, clean the wash bucket.
  6. On the touchscreen, select the solvent type.
  7. Using the electric siphon pump, fill the wash bucket with fresh solvent to the indicated fill line:
    1. Place the pump intake into the solvent container.
    2. Securely place the flexible pump hose into the wash bucket.
    3. Press and hold the pump switch to pump solvent into the wash bucket.
  8. Dispose of used solvent according to local regulations:
    1. Isopropyl alcohol (IPA)
    2. Tripropylene glycol monomethyl ether (TPM)

Cleaning the wash bucket

Over time, dissolved resin accumulates on the walls of the wash bucket. Periodically, clean out the wash bucket to remove these resin deposits. Rinse the wash bucket with fresh solvent and wipe with a paper towel.

Supplies:

  • 2.5 mm hex driver
  • 43 L (11.4 US gal) of fresh solvent (IPA, TPM, or water)
  • Electric siphon pump, included with the Form Wash L
  • Empty container, suitable for storing up to 43 L (11.4 US gal) of solvent
  • Non-reactive nitrile gloves
  • Safety glasses

To clean the wash bucket:

  1. Using the electric siphon pump, pump all solvent out of the wash bucket and into a container appropriate for your solvent of choice.
    1. Place the pump intake into the wash bucket.
    2. Securely place the flexible pump hose into the solvent container.
    3. Press and hold the pump switch to pump solvent into the solvent container.
  2. Remove the wash bucket.
    1. Tap Raise. The platform mount rises out of the wash bucket.
    2. Open the Form Wash L door.
    3. Disconnect the solvent monitor from the Form Wash L. Twist the plug collar counterclockwise and pull the plug away from the machine.
    4. Gently pull the wash bucket towards yourself to remove it from the Form Wash L.
    5. Unclip the solvent monitor bracket from the front edge of the wash bucket. Lift the solvent monitor bracket (with the solvent monitor attached) out of the wash bucket and set it aside on a paper towel or other absorbent surface.
    6. Lift the inner lid off of the wash bucket. Set it aside.
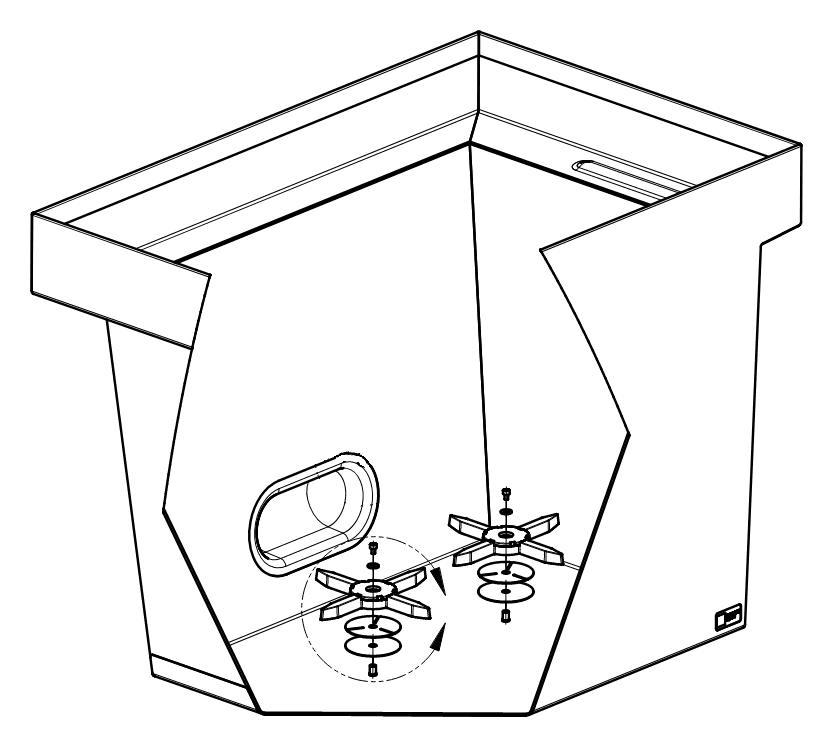
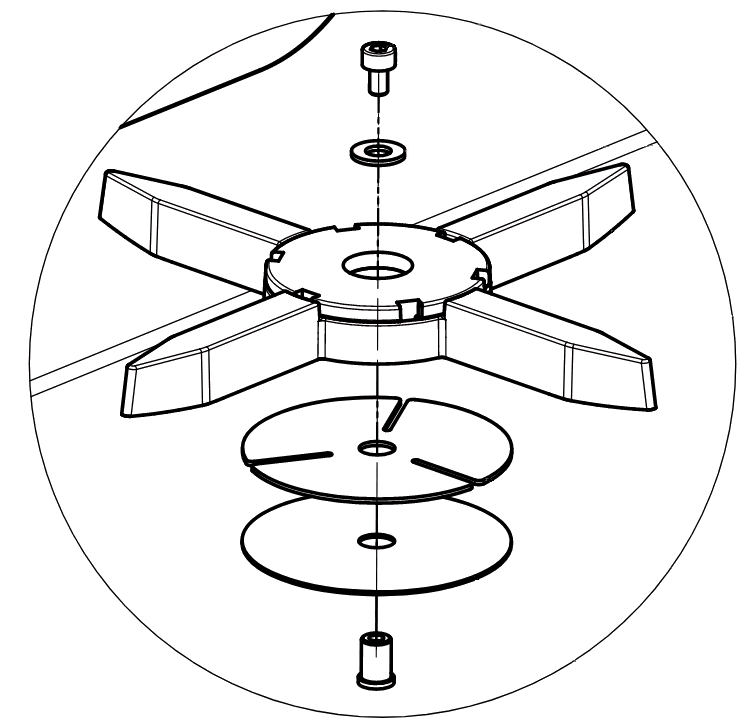
  1. There are two circular impellers located at the bottom of the wash bucket. Using a 2.5 mm hex driver, loosen and remove the screw holding each impeller in place. Set the screws and impellers aside.
  1. Inspect the impellers and their washers for signs of wear.
  2. Inspect the area underneath the impellers for signs of wear. Visible gouges are a sign that a wash bucket failure is imminent and the wash bucket must be replaced before continuing use.
  3. Rinse the wash bucket and solvent monitor with IPA or water and wipe with a paper towel.
  4. Reseat the impellers in the wash bucket. Thread one screw into each of the impellers. Using a 2.5 mm hex driver, tighten the impeller screws until finger tight.
  1. Reinstall the wash bucket.
    1. Clip the solvent monitor bracket (with the solvent monitor attached) onto the front edge of the wash bucket.
    2. Place the inner lid back on the wash bucket.
    3. Reinsert the wash bucket into the Form Wash L. Push the wash bucket in until it reaches the back wall of the unit.
    4. Plug the solvent monitor into the socket on the front of the unit.
  2. Fill the wash bucket with solvent and select the solvent type on the touchscreen.

Inspecting the impellers

Each impeller sits on a washer at the bottom of the wash bucket. The bearing surface of the impeller becomes rippled or torn after long-term use, especially over the magnets. When the washer splits, this indicates that both the washer and its associated impeller must be replaced.

Indications for replacement

A washer sits underneath each impeller. An undamaged washer consists of a central hub connecting three equally-sized lobes. As the washer wears down, the lobes eventually detach from the hub, indicating that the washer and impeller must be replaced.

Check each washer for the following indications that it should be replaced:
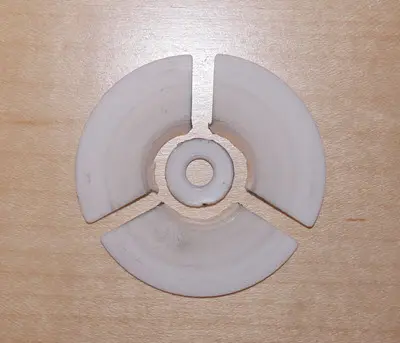
  • Cracks in the connectors between the hub and each lobe
  • Separation of the hub from its lobes
A broken washer is shown split into four pieces.
A cracked washer is sitting atop an impeller.

Check each impeller for the following indications that it should be replaced:
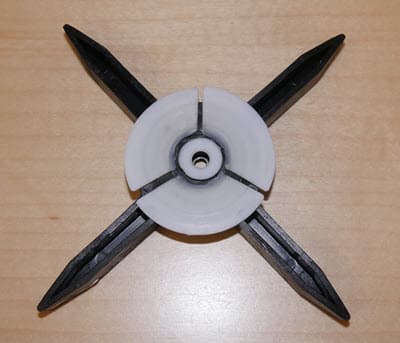
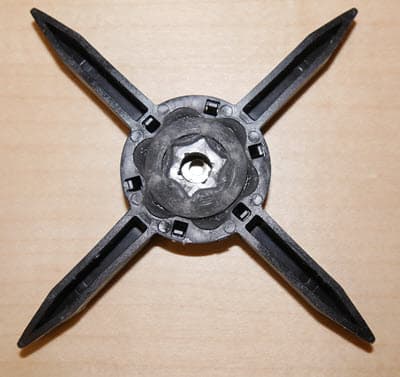
  • Wear to the sockets and grooves
  • Merging of the O-ring and impeller
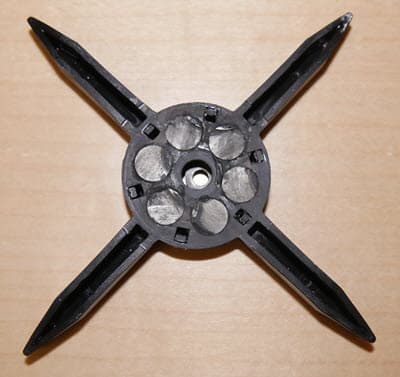
  • Exposure of the impeller magnets
A worn impeller is shown with the O-ring merged into the grooves of the impeller.
A damaged impeller is shown with the embedded magnets completely exposed.

Replacing the impellers

If the impeller or washer shows signs of needing replacement, please contact Formlabs Support or an authorized reseller with pictures of the damage to receive your replacement.

Replacing the wash bucket

Over time, resin can abrade the inner surface of the wash bucket and the impeller mounts. Replace the wash bucket if you see gouges in the wash bucket underneath the impellers or if you notice gray or metallic residue deposited on washed parts, whichever comes first.

To replace the wash bucket:

  1. Lift the Form Wash L lid.
  2. Using the electric siphon pump, pump all solvent out of the wash bucket and into a container appropriate for your solvent of choice.
    1. Place the pump intake into the wash bucket.
    2. Securely place the flexible pump hose into the solvent container.
    3. Press and hold the pump switch to pump solvent into the solvent container.
  3. Remove the wash bucket.
    1. Tap Raise. The platform mount rises out of the wash bucket.
    2. Open the Form Wash L door.
    3. Disconnect the solvent monitor from the Form Wash L. Twist the plug collar counterclockwise and pull the plug away from the machine.
    4. Gently pull the wash bucket towards yourself to remove it from the Form Wash L.
    5. Unclip the solvent monitor bracket from the front edge of the wash bucket. Lift the solvent monitor bracket (with the solvent monitor attached) out of the wash bucket and set it aside on a paper towel or other absorbent surface.
    6. Lift the inner lid off of the wash bucket. Set it aside.
  1. Insert the new wash bucket.
    1. Clip the solvent monitor bracket (with the solvent monitor attached) onto the front edge of the wash bucket.
    2. Place the inner lid back on the wash bucket.
    3. Reinsert the wash bucket into the Form Wash L. Push the wash bucket in until it reaches the back wall of the unit.
    4. Plug the solvent monitor into the socket on the front of the unit.
  2. Fill the wash bucket with solvent and select the solvent type on the touchscreen.