Anmerkung:
Tippen Sie auf Ignore (Ignorieren), um den Harztank umzuprogrammieren, damit er dem Harztyp des Druckauftrags entspricht.


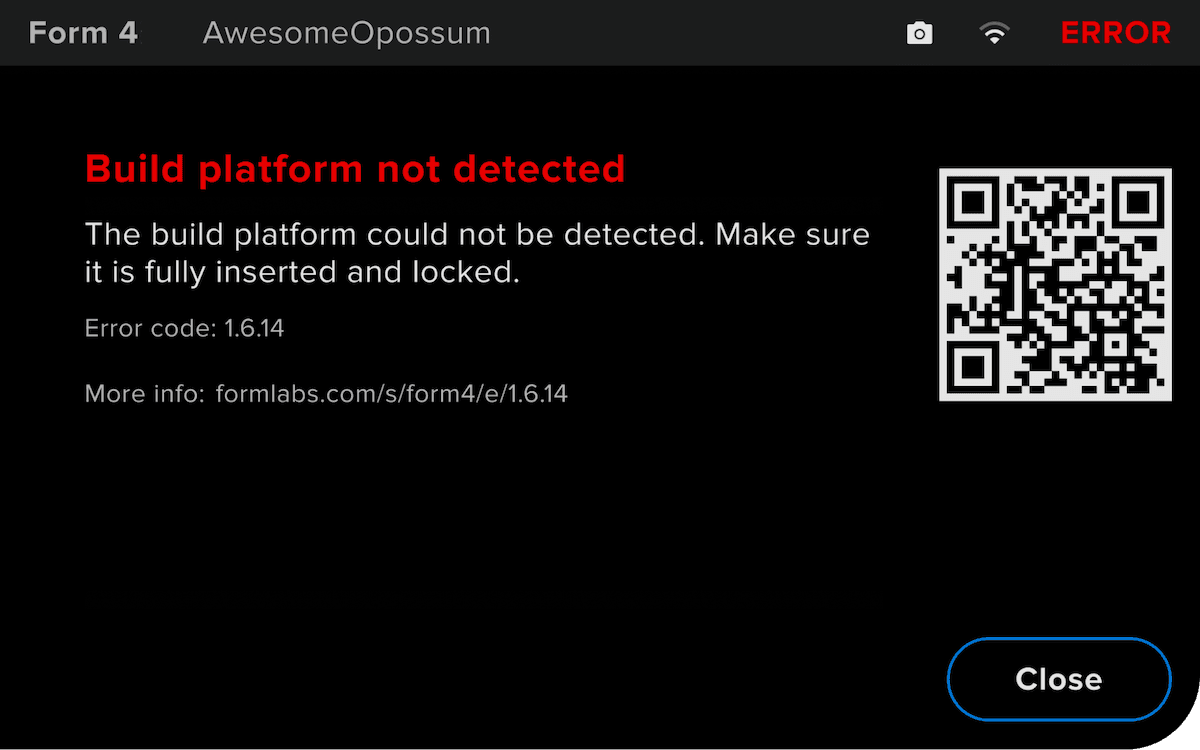
Wenn der Form 4 oder Form 4L Unregelmäßigkeiten feststellt, werden auf dem Touchscreen Fehlermeldungen und weitere Details zum Fehler angezeigt. In diesem Artikel werden erste Schritte zur Fehlerbehebung beschrieben, um häufige Fehlercodes zu beheben, die bei Druckern der Generation Form 4 auftreten oder während des normalen Betriebs erwartet werden können. Wenn Sie einen Fehlercode finden, der nicht in diesem Artikel aufgeführt ist, beachten Sie die allgemeinen Schritte zur Fehlerbehebung weiter unten.
Die Fehlercodes der Generation Form 4 und Form 4L haben das Format X.YY.ZZ, wobei X der Gerätecode, YY das Subsystem und ZZ der eindeutige Fehlercode ist, der die entsprechende Warnung kennzeichnet. Der Gerätecode für Drucker der Generation Form 4 ist „1“, daher beginnt der vollständige Fehlercode für alle derartigen Druckerfehler mit 1. Die Fehlergruppennummer beschreibt die Art des Fehlers, während der Untercode ein bestimmtes Teilsystem oder einen Fehlermodus bezeichnet. So beziehen sich beispielsweise alle Untercodes der Fehlergruppe 3 der Generation Form 4 auf die Heizelement- und Harztemperatur, während sich Error 1.3.1 (Fehler 1.3.1) insbesondere auf das Unterschreiten der Zieltemperatur des Harzes bezieht.
Allgemeine Schritte zur Fehlerbehebung
Die folgenden Schritte werden für die meisten Probleme empfohlen, die bei Druckern der Generation Form 4 und Form 4L auftreten:
Diagnoseprotokolle
Die Drucker der Generationen Form 4 und Form 4L legen Diagnoseprotokolle an, die detaillierte Informationen über die Funktionstüchtigkeit des Geräts liefern. Fügen Sie neben anderen relevanten Beobachtungen und Details auch die Diagnoseprotokolle bei, wenn Sie den Formlabs-Kundenservice oder Ihren autorisierten Vertriebspartner kontaktieren. So können Probleme schneller behoben werden.
Für Geräte, die über eine aktive WLAN- oder Ethernet-Verbindung mit dem Internet verbunden sind:
Für Drucker, die nicht mit dem Internet verbunden sind:
Erfahren Sie mehr über die Optionen mit und ohne Netzwerkverbindung.
Steuerungsfehler (Fehlergruppe 1)
Alle Untercodes der Fehlergruppe 1 (1–61) des Form 4 und Form 4L beziehen sich auf die Subsystemkommunikation und die Motorsteuerung des Geräts.
Fehler 1.1.1: Motor konnte nicht gestartet werden
Fehler 1.1.1 zeigt an, dass ein Motor seine Ausgangsposition nicht erreicht hat. Möglicherweise ist der Motor aufgrund von Ablagerungen oder des Grenzschalters, mit dem der Drucker die Position des Motors bestimmt, zum Stillstand gekommen. Prüfen Sie, ob sich Ablagerungen im Harztank oder auf der Konstruktionsplattform befindet, und entfernen Sie sie. Prüfen Sie dann, ob sich die Konstruktionsplattform und der Mischer während eines Druckvorgangs normal bewegen. Dieser Fehler wurde in der Firmwareversion 1.4 entfernt. Wenn diese Fehlermeldung wiederholt auftritt, aktualisieren Sie die Firmware des Druckers.
Fehler 1.1.3: Interner Fehler
Fehler 1.1.3 zeigt einen internen Kommunikationsfehler zwischen den Subsystemen des Druckers an. So beheben Sie diesen Fehler:
Fehler 1.1.4: Harzpegelsensor ist nicht programmiert
Fehler 1.1.4 weist auf ein Problem mit der LevelSense-Platte im Drucker hin. So beheben Sie diesen Fehler:
Fehler 1.1.5: Harz im Tank konnte nicht gemessen werden
Fehler 1.1.5 weist auf ein Problem mit der LevelSense-Platte im Drucker hin. Sollte gerade ein Druck ausgeführt werden, müssen Sie sicherstellen, dass dem Harztank nicht das Harz ausgeht. Um dieses Problem zu beheben, befolgen Sie die gleichen Schritte zur Fehlerbehebung für Fehler 1.1.4: Harzpegelsensor ist nicht programmiert.
Fehler 1.1.6: Mischer hat Ablagerungen erkannt
Fehler 1.1.6 zeigt an, dass der Mischer auf Ablagerungen trifft, während er sich über den Harztank bewegt. So beheben Sie diesen Fehler:
Wenn der Mischer mit der Konstruktionsplattform kollidiert ist, weil die Konstruktionsplattform während des Drucks am Harztank kleben geblieben ist:
Wenn dieser Fehler sofort beim Einschalten des Druckers auftritt oder sich der Mischer unerwartet bewegt, wenn das Werkzeug Motoren bewegen verwendet wird (ohne dass ein Harztank oder Mischer eingesetzt ist), ersetzen Sie die Mischerantriebsbaugruppe. Befolgen Sie die Anweisungen im Reparaturleitfaden Ersetzen der Mischerantriebsbaugruppe beim Form 4 oder Ersetzen der Mischerantriebsbaugruppe beim Form 4L. Ersatzmischer-Antriebsbaugruppen können im Formlabs Shop erworben werden.
Fehler 1.1.7: Konstruktionsplattform hat Ablagerungen erkannt
Fehler 1.1.7 zeigt an, dass die Konstruktionsplattform beim Absenken in den Harztank auf Ablagerungen gestoßen ist. So beheben Sie diesen Fehler:
Fehler 1.1.17: Abdeckung geöffnet
Fehler 1.1.17 zeigt an, dass die Abdeckung (Generation Form 4) oder die Tür (Generation Form 4L) während des Druckvorgangs geöffnet wurde. Aus Sicherheitsgründen wird der Druckvorgang angehalten, wenn die Abdeckung oder die Tür geöffnet ist. Schließen Sie die Abdeckung oder Tür, um fortzufahren.
Wenn die Abdeckung oder Tür nicht geöffnet war oder das Schließen das Problem nicht löst:
Fehler 1.1.23: Kommunikation mit der Hauptplatine fehlgeschlagen
Fehler 1.1.23 zeigt an, dass der Drucker keine Meldung an die Hauptplatine senden konnte. So beheben Sie diesen Fehler:
Fehler 1.1.31: Inkompatible Firmware
Fehler 1.1.31 weist auf ein Problem mit der auf dem Drucker installierten Firmware hin. Stellen Sie sicher, dass die Firmware Ihres Druckers auf dem neuesten Stand ist. Wenn das Problem weiterhin besteht und die Drucker-Firmware bereits auf dem neuesten Stand ist, installieren Sie das neueste Firmware-Paket manuell neu. Starten Sie den Drucker neu und versuchen Sie es noch einmal.
Fehler 1.1.32: LPU-Lüfter ausgefallen
Fehler 1.1.32 zeigt an, dass der Lüfter der Light Processing Unit (LPU) ausgefallen ist. Die weitere Verwendung des Druckers kann zu Schäden an der LPU führen. So beheben Sie diesen Fehler:
Fehler 1.1.33: Lüfter der Beleuchtungseinheit ausgefallen
Fehler 1.1.33 zeigt an, dass der Lüfter der Beleuchtungseinheit ausgefallen ist. Die weitere Verwendung des Druckers kann zu Schäden an der Beleuchtungseinheit führen. So beheben Sie diesen Fehler:
Fehler 1.1.34: Netzteillüfter ausgefallen
Fehler 1.1.34 zeigt an, dass der Netzteillüfter ausgefallen ist. Die weitere Verwendung des Druckers kann zu Schäden an der Stromversorgung führen. Starten Sie den Drucker neu, flashen Sie die Firmware neu und versuchen Sie es noch einmal. Tritt der Fehler wiederholt auf, kontaktieren Sie den Formlabs-Kundenservice oder Ihren autorisierten Vertriebspartner.
Fehler 1.1.40: Druckerspannung niedriger als vorgesehen
Fehler 1.1.40 zeigt an, dass das Netzteil eine niedrigere Spannung als erwartet ausgibt. Wenn Ihre Drucke erfolgreich sind, ignorieren Sie diese Fehlermeldung. Eine niedrige Spannung kann sich jedoch auf den Druck auswirken und unter anderem verhindern, dass die Beleuchtungseinheit aufleuchtet. So beheben Sie diesen Fehler:
Fehler 1.1.47: Konstruktionsplattform konnte nicht in Ausgangsposition gebracht werden
Fehler 1.1.47 zeigt an, dass die Konstruktionsplattform nicht ordnungsgemäß in ihre Ausgangsposition zurückkehren konnte.
Fehler 1.1.48: Mischer konnte nicht in Ausgangsposition gebracht werden
Fehler 1.1.48 zeigt an, dass der Mischer nicht ordnungsgemäß in seine Ausgangsposition zurückgekehrt ist.
Heizelementfehler (Fehlergruppe 3)
Alle Untercodes der Fehlergruppe 3 (1–12) des Form 4 und Form 4L beziehen sich auf das Heizelement.
Fehler 1.3.1: Harz konnte nicht erhitzt werden
Fehler 1.3.1 zeigt an, dass das Harz seine Solltemperatur nach einer gewissen Zeit nicht erreicht hat. So beheben Sie diesen Fehler:
Weitere Informationen finden Sie im Supportartikel Aufrechterhaltung der Harztemperatur.
Fehler 1.3.3: Harz ist überhitzt
Fehler 1.3.3 zeigt an, dass das Harz im Harztank seine Zieltemperatur überschritten hat. So beheben Sie diesen Fehler:
Weitere Informationen finden Sie im Supportartikel Aufrechterhaltung der Harztemperatur.
Fehler 1.3.4: Heizelement ist überhitzt
Fehler 1.3.4 zeigt an, dass die Heizelementtemperatur ihren sicheren Betriebsbereich überschritten hat. Stoppen Sie alle aktuellen Druckaufträge, da die Fortsetzung Ihren Drucker beschädigen und zu einem Fehldruck führen kann. Um dieses Problem zu beheben, befolgen Sie die gleichen Schritte zur Fehlerbehebung wie für Fehler 1.3.3: Harz ist überhitzt.
Weitere Informationen finden Sie im Supportartikel Aufrechterhaltung der Harztemperatur.
Fehler 1.3.5: Heizelement ist nicht verbunden
Fehler 1.3.5 zeigt an, dass das Heizelement möglicherweise nicht angeschlossen ist. Das Heizelement befindet sich im Rahmen der LPU-Baugruppe.
Fehler 1.3.6 und Fehler 1.3.7: Harztemperatur konnte nicht gemessen werden
Fehler 1.3.6 und Fehler 1.3.7 zeigen an, dass der Drucker die aktuelle Temperatur des Harzes im Harztank nicht messen konnte und möglicherweise das Heizelement deaktivieren muss. So beheben Sie diesen Fehler:
Fehler 1.3.8 und Fehler 1.3.9: Heizelementtemperatur konnte nicht gemessen werden
Fehler 1.3.8 und Fehler 1.3.9 zeigen an, dass der Drucker die aktuelle Temperatur des Heizelements nicht messen konnte. Das Heizelement befindet sich unter dem Rahmen der LPU-Baugruppe.
Fehler 1.3.10 und Fehler 1.3.11: Die Stromaufnahme des Heizelements ist zu hoch
Fehler 1.3.10 und Fehler 1.3.11 zeigen an, dass das Heizelement während des Druckvorbereitungsprozesses oder des Drucks selbst auf ein Problem gestoßen ist. Das Heizelement befindet sich im Rahmen der LPU-Baugruppe. Um dieses Problem zu beheben, befolgen Sie die gleichen Schritte zur Fehlerbehebung wie für Fehler 1.3.8 und Fehler 1.3.9: Heizelementtemperatur konnte nicht gemessen werden.
Fehler 1.3.12: Erhitzen des Harzes auf Drucktemperatur
Der Drucker zeigt möglicherweise den Fehler Fehler 1.3.12 an, um Sie darüber zu informieren, dass er das Harz im Harzbehälter erhitzt. Dies deutet nicht unbedingt auf ein Problem hin. Wenn der Drucker das Harz auch nach längerer Zeit nicht erhitzt, überprüfen Sie die Harzkartusche wie bei einem Fehler im Zusammenhang mit dem Heizelement.
Fehler im Beschleunigungsmesser (Fehlergruppe 4)
Alle Untercodes der Fehlergruppe 4 (1–7) des Form 4 und Form 4L beziehen sich auf den Beschleunigungsmesser.
Fehler 1.4.1: Drucker nicht nivelliert
Die SLA-Drucker von Formlabs funktionieren am besten, wenn sie vollständig eben stehen. Auf dem Touchscreen werden Sie bei Bedarf aufgefordert, den Drucker zu nivellieren, und es wird der Fehler Fehler 1.4.1 angezeigt. Tippen Sie auf dem Touchscreen des Druckers auf Settings > Tools > Level printer (Einstellungen > Werkzeuge > Drucker nivellieren), um den Nivellierungsstatus anzuzeigen. Halten Sie sich an die Anweisungen auf dem Touchscreen und verwenden Sie das Nivellierungswerkzeug, um den Drucker zu nivellieren. Wenn der Fehler weiterhin besteht, flashen Sie die Firmware Ihres Druckers neu.
Fehler 1.4.2 und Fehler 1.4.3: Beschleunigungsmesser ist nicht angeschlossen
Fehler 1.4.2 und Fehler 1.4.3 zeigen ein Problem mit dem Beschleunigungsmesser im Drucker an. Starten Sie den Drucker neu, flashen Sie die Firmware neu und versuchen Sie es noch einmal. Tritt der Fehler wiederholt auf, kontaktieren Sie den Formlabs-Kundenservice oder Ihren autorisierten Vertriebspartner.
Fehler 1.4.7: Beschleunigungsmesser-Neukalibrierung fehlgeschlagen
Fehler 1.4.7 zeigt an, dass die Kalibrierungsroutine des Beschleunigungsmessers fehlgeschlagen ist. So beheben Sie diesen Fehler:
Fehler der Beleuchtungseinheit (Fehlergruppe 5)
Alle Untercodes der Fehlergruppe 5 (1–11) des Form 4 und Form 4L beziehen sich auf die UV-Beleuchtungseinheit.
Fehler 1.5.1: Überhitzung der Beleuchtungseinheit
Fehler 1.5.1 zeigt an, dass die Beleuchtungseinheit überhitzt ist. Der Druck wird fortgesetzt, wenn die Beleuchtungseinheit abgekühlt ist. So beheben Sie diesen Fehler:
Fehler 1.5.2: Beleuchtungseinheit nicht gefunden
Fehler 1.5.2 zeigt an, dass die Beleuchtungseinheit nicht gefunden werden konnte. So beheben Sie diesen Fehler:
In einigen seltenen Fällen kann eine Ersatzbeleuchtungseinheit der Generation Form 4L dazu führen, dass Ihr Drucker diesen Fehler unmittelbar nach der Installation anzeigt. Falls dies geschieht, aktivieren Sie die Fernunterstützung und wenden Sie sich an den Formlabs-Kundenservice.
Fehler 1.5.5: Beleuchtungseinheit wird nicht erkannt
Fehler 1.5.5 zeigt an, dass die Beleuchtungseinheit nicht erkannt werden konnte. Um dieses Problem zu beheben, befolgen Sie die gleichen Schritte zur Fehlerbehebung wie bei Fehler 1.5.2: Beleuchtungseinheit nicht gefunden.
In einigen seltenen Fällen kann eine Ersatzbeleuchtungseinheit der Generation Form 4L dazu führen, dass Ihr Drucker diesen Fehler unmittelbar nach der Installation anzeigt. Sollte dies der Fall sein, aktivieren Sie die Fernunterstützung und wenden Sie sich an den Formlabs-Kundenservice.
Fehler 1.5.6: Die Beleuchtungseinheit ist zu lange eingeschaltet
Fehler 1.5.6 zeigt an, dass die Beleuchtungseinheit länger als fünf Minuten eingeschaltet war, sodass der Drucker sie als Selbstschutzmechanismus abgeschaltet hat So beheben Sie diesen Fehler:
Fehler 1.5.7: Die Beleuchtungseinheit reagiert nicht
Fehler 1.5.7 zeigt an, dass die Beleuchtungseinheit nicht auf einen Befehl des Druckers reagiert hat. Um dieses Problem zu beheben, befolgen Sie die gleichen Schritte zur Fehlerbehebung wie bei Fehler 1.5.2: Hintergrundbeleuchtung nicht gefunden.
Fehler 1.5.9 und Fehler 1.5.10: Die Temperatur der Beleuchtungseinheit konnte nicht gemessen werden
Fehler 1.5.9 und Fehler 1.5.10 zeigen an, dass der Drucker die Temperatur der Beleuchtungseinheit nicht messen konnte. Um dieses Problem zu beheben, befolgen Sie die gleichen Schritte zur Fehlerbehebung wie bei Fehler 1.5.2: Hintergrundbeleuchtung nicht gefunden.
Fehler 1.5.11: Die Beleuchtungseinheit konnte nicht eingeschaltet werden
Fehler 1.5.11 zeigt an, dass der Drucker die Beleuchtungseinheit nicht einschalten konnte. Um dieses Problem zu beheben, befolgen Sie die gleichen Schritte zur Fehlerbehebung wie bei Fehler 1.5.2: Hintergrundbeleuchtung nicht gefunden.
Verbrauchsmaterialfehler (Fehlergruppe 6)
Alle Untercodes des Fehlers Fehler 6 (1–32) des Form 4 und Form 4L beziehen sich auf Probleme mit Verbrauchsmaterialien (Harzkartusche, Harztank und Konstruktionsplattform).
Fehler 1.6.2: Die Kartusche fehlt
Wenn die Harzkartusche während des Drucks entfernt wird, kann der Druck unter Verwendung des im Harztank aufbewahrten Harzes noch für einen bestimmten Zeitraum fortgesetzt werden. Der Drucker zeigt Fehler 1.6.2 an, um dies zu signalisieren. Setzen Sie die Harzkartusche wieder ein, um fortzufahren. Wenn das Problem dadurch nicht gelöst wird:
Fehler 1.6.3: Druck pausiert wegen fehlender Kartusche
Wenn die Harzkartusche während des Drucks entfernt wird, kann der Druck unter Verwendung des im Harztank aufbewahrten Harzes noch für einen bestimmten Zeitraum fortgesetzt werden. Danach wird der Druck angehalten. Der Drucker zeigt den Fehler Fehler 1.6.3 an, um zu signalisieren, dass der Druck aufgrund des Entfernens der Harzkartusche angehalten wurde. Setzen Sie die Harzkartusche wieder ein, um fortzufahren. Wenn sich das Problem dadurch nicht beheben lässt, befolgen Sie dieselben Schritte zur Fehlerbehebung wie bei Fehler 1.6.2: Die Kartusche fehlt.
Fehler 1.6.4: Linke Kartusche nicht übereinstimmend (nur Generation Form 4L)
Der Drucker überprüft den Harztyp im Tank und in der Kartusche, um sicherzustellen, dass er mit dem aktuellen Druckauftrag übereinstimmt. Wenn der Harz-Typ in der linken Harzkartusche nicht mit dem im Druckauftrag angegebenen Harz-Typ übereinstimmt, zeigt der Drucker Fehler 1.6.4 an und fordert Sie auf, eine Harzkartusche einzufügen, die mit den Druckeinstellungen übereinstimmt. Stellen Sie sicher, dass das Harz in der Harzkartusche mit dem Harztyp des Auftrags übereinstimmt, und die Materialversionsnummer die gleiche ist. Wenn das Problem dadurch nicht gelöst wird:
Fehler 1.6.5: Die linke Kartusche hat den Grenzwert überschritten (nur bei der Generation Form 4L)
Jede Kartusche enthält einen Liter Harz und kann diesen zuverlässig abgeben. Wenn die Kartusche ihre Lebensdauer überschritten hat, zeigt der Drucker Fehler 1.6.5 an. Nachdem der gesamte Liter ausgegeben wurde: Entsorgen Sie die Kartusche und setzen Sie den Druck mit einer neuen Kartusche fort. Starten Sie den Druck neu, sobald die leere Kartusche ausgetauscht wurde. Wenn dieser Fehler fälschlicherweise ausgelöst wird, führen Sie die gleichen Schritte zur Fehlerbehebung aus wie bei Fehler 1.6.4: Linke Kartusche nicht übereinstimmend.
Fehler 1.6.6: Rechte Kartusche nicht übereinstimmend (nur Generation Form 4L)
Der Drucker überprüft den Harztyp im Tank und in der Kartusche, um sicherzustellen, dass er mit dem aktuellen Druckauftrag übereinstimmt. Wenn der Harz-Typ in der rechten Harzkartusche nicht mit dem im Druckauftrag angegebenen Harz-Typ übereinstimmt, zeigt der Drucker Fehler 1.6.6 an und fordert Sie auf, eine Harzkartusche einzufügen, die mit den Druckeinstellungen übereinstimmt. Stellen Sie sicher, dass das Harz in der Harzkartusche mit dem Harztyp des Auftrags übereinstimmt, und die Materialversionsnummer die gleiche ist. Wenn das Problem dadurch nicht gelöst wird:
Fehler 1.6.7: Die rechte Kartusche hat den Grenzwert überschritten (nur bei der Generation Form 4L)
Jede Kartusche enthält einen Liter Harz und kann diesen zuverlässig abgeben. Wenn die Kartusche ihre Lebensdauer überschritten hat, zeigt der Drucker Fehler 1.6.7 an. Nachdem der gesamte Liter ausgegeben wurde: Entsorgen Sie die Kartusche und setzen Sie den Druck mit einer neuen Kartusche fort. Starten Sie den Druck neu, sobald die leere Kartusche ausgetauscht wurde. Wenn dieser Fehler fälschlicherweise ausgelöst wird, befolgen Sie die gleichen Schritte zur Fehlerbehebung wie bei Fehler 1.6.6: Rechte Kartusche nicht übereinstimmend.
Fehler 1.6.9: Tank fehlt
Fehler 1.6.9 zeigt an, dass der Harztank fehlt oder während des Drucks entfernt wurde. Setzen Sie den Harztank wieder ein und arretieren Sie ihn, um fortzufahren. Wenn das Problem dadurch nicht gelöst wird:
Fehler 1.6.10: Falscher Tank eingesetzt
Der Drucker zeigt Fehler 1.6.10 an, wenn der Harztyp im Tank nicht mit dem für den Auftrag erforderlichen Harztyp übereinstimmt. Nehmen Sie den Harztank heraus und ersetzen Sie ihn durch einen Tank, der dem Auftrag entspricht.
Anmerkung:
Tippen Sie auf Ignore (Ignorieren), um den Harztank umzuprogrammieren, damit er dem Harztyp des Druckauftrags entspricht.
Fehler 1.6.11: Der Tank hat seine Standzeit überschritten
Fehler 1.6.11 zeigt an, dass die empfohlene Lebensdauer des Harztanks überschritten wurde. Erwägen Sie, Ihren Harztank auszutauschen, um einen erfolgreichen Druck zu gewährleisten.
Fehler 1.6.12: Tank ist nicht arretiert
Fehler 1.6.12 zeigt an, dass der Harztank nicht mit den Tankriegeln verriegelt ist. Drücken Sie mit Ihren Daumen auf die Seiten des Harztanks und schließen Sie die Riegel, um den Tank zu fixieren. Wenn das Problem dadurch nicht gelöst wird:
Fehler 1.6.14: Konstruktionsplattform konnte nicht erkannt werden
Fehler 1.6.14 zeigt an, dass der Drucker eine Konstruktionsplattform nicht erkennen konnte. Setzen Sie eine Konstruktionsplattform ein und sichern Sie sie, um fortzufahren. Wenn Sie sicher sind, dass eine saubere Konstruktionsplattform im Drucker eingesetzt ist, können Sie auch auf Ignore (Ignorieren) tippen, um fortzufahren.
Wenn das Problem dadurch nicht behoben wird, öffnen Sie die Druckerabdeckung, entfernen Sie die Konstruktionsplattform und überprüfen Sie den Stößelstift in der oberen rechten Ecke der Konstruktionsplattformhalterung.
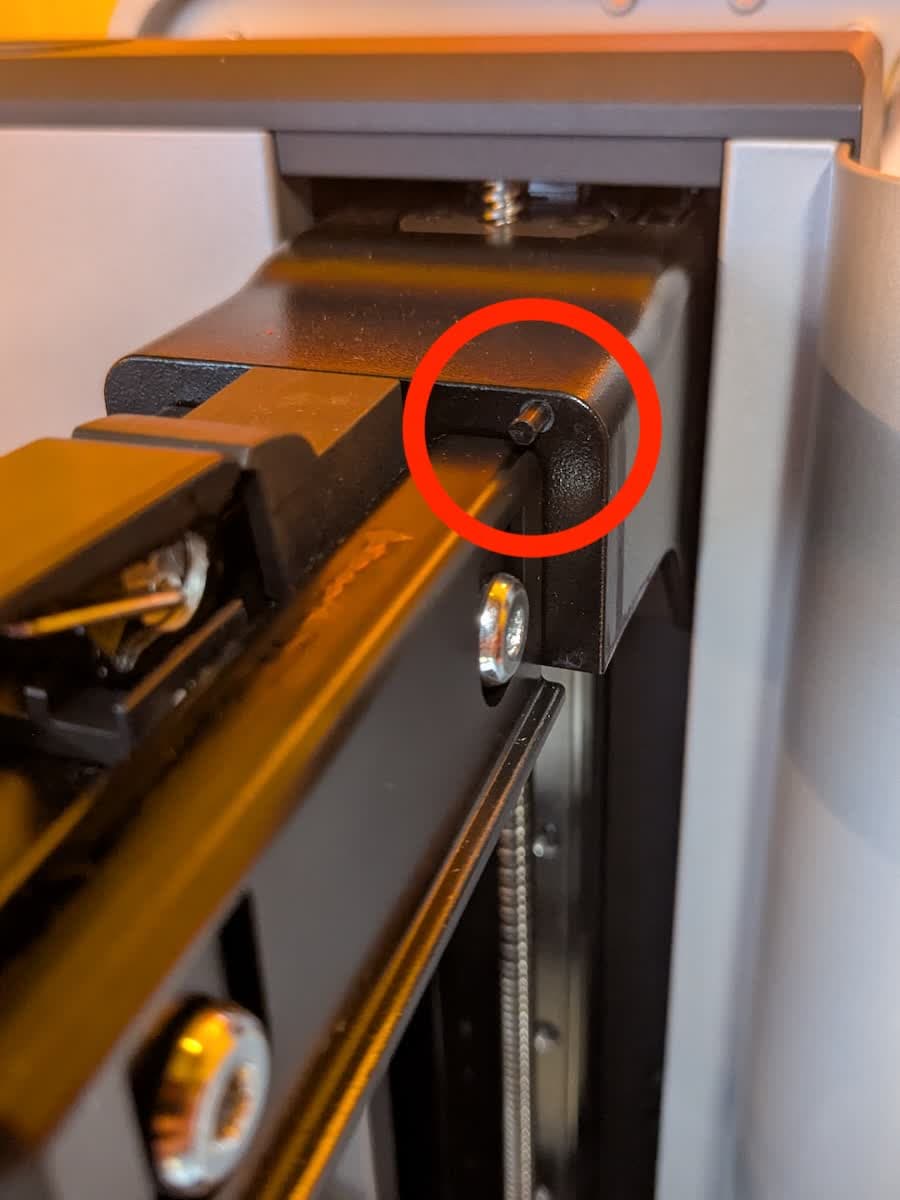
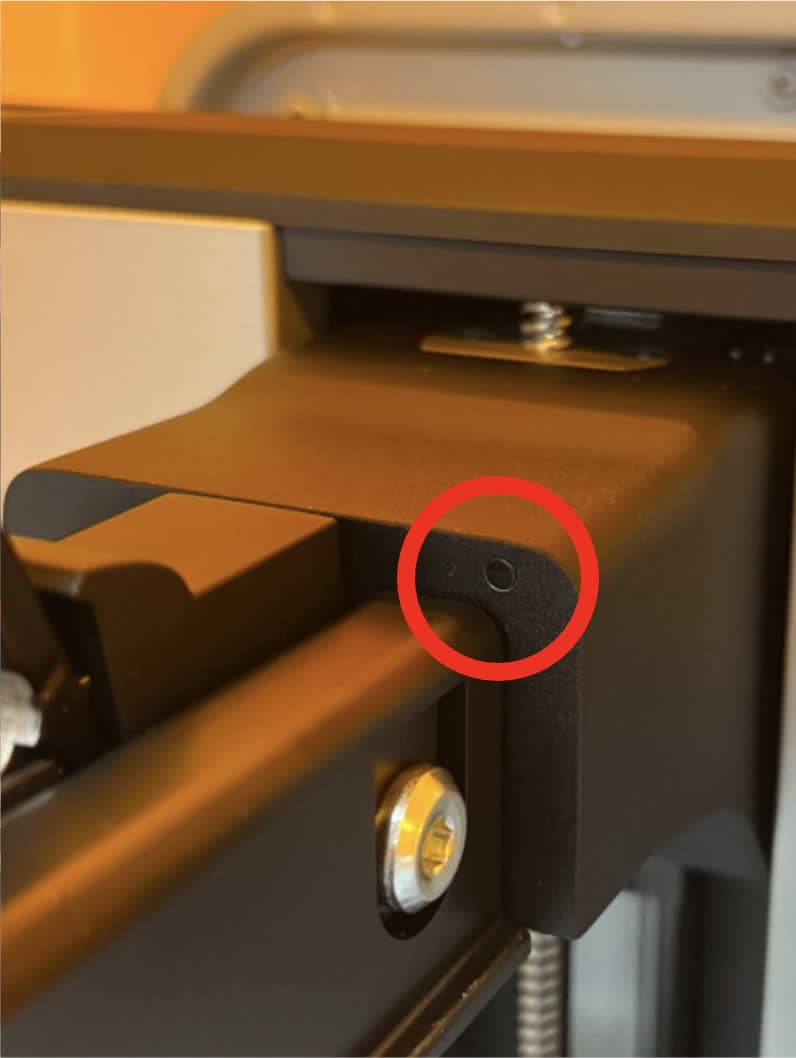
Wenn der Kolben sichtbar ist:
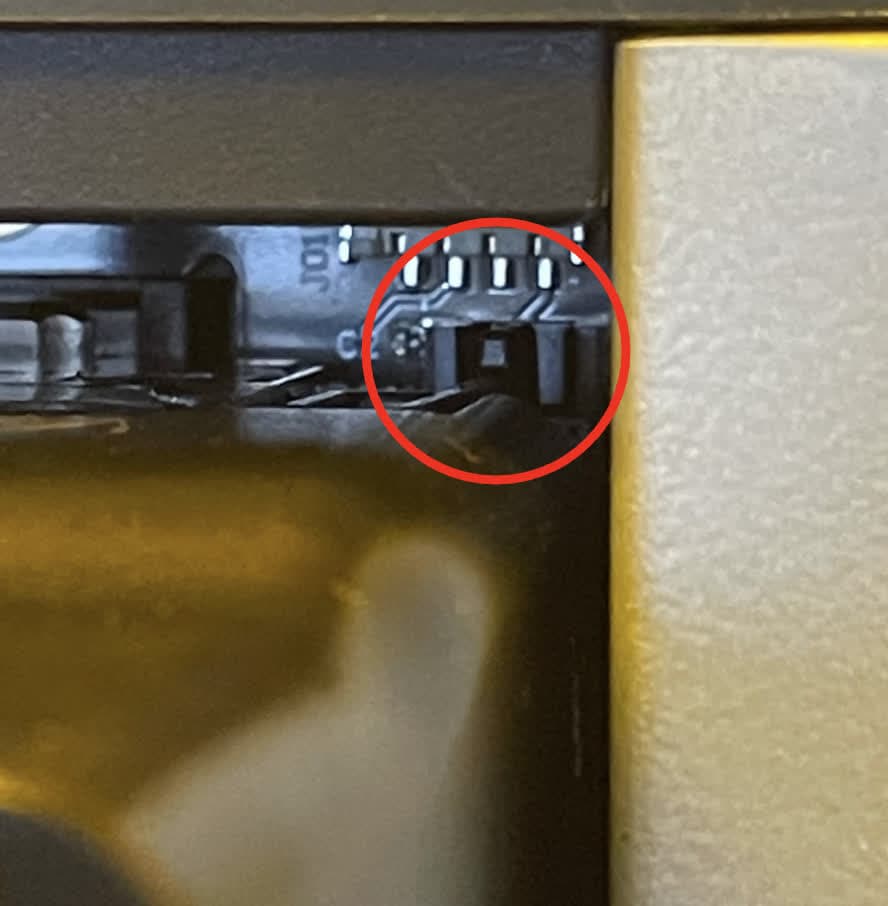
Wenn der Kolben in der Konstruktionsplattformhalterung feststeckt:
Hinweis:
Schneiden Sie den Kolben nicht ohne das Trimmwerkzeug ab. Das Trimmwerkzeug sorgt dafür, dass die richtige Länge abgeschnitten wird. Wenn Sie zu viel abschneiden, kann der Stempel nicht mehr mit dem Sensor der Konstruktionsplattform interagieren, wodurch die Erkennung der Konstruktionsplattform dauerhaft unterbrochen wird.
Wenn der Fehler weiterhin besteht, wenden Sie sich an den Formlabs-Kundenservice oder an Ihren autorisierten Vertriebspartner.
Fehler 1.6.27: Kartusche stimmt nicht überein (nur Generation Form 4)
Der Drucker prüft den Harztyp des Harztanks und der Kartusche auf Übereinstimmung mit dem aktuellen Druckauftrag. Wenn diese nicht mit dem im Druckauftrag identifizierten Harztyp übereinstimmen, zeigt der Drucker den Fehler Error 1.6.27 an und fordert Sie auf, eine Harzkartusche einzusetzen, die den Druckauftragseinstellungen entspricht. Stellen Sie sicher, dass das Harz in der Harzkartusche mit dem Harztyp des Auftrags übereinstimmt, und die Materialversionsnummer die gleiche ist. Wenn das Problem dadurch nicht gelöst wird:
Fehler 1.6.28: Kartusche hat Grenzwert überschritten (nur Generation Form 4)
Jede Kartusche enthält einen Liter Harz und kann diesen zuverlässig abgeben. Wenn die Kartusche ihre Lebensdauer überschritten hat, zeigt der Drucker Fehler 1.6.28 an. Nachdem der gesamte Liter ausgegeben wurde: Entsorgen Sie die Kartusche und setzen Sie den Druck mit einer neuen Kartusche fort. Starten Sie den Druck neu, sobald die leere Kartusche ausgetauscht wurde. Wenn dieser Fehler fälschlicherweise ausgelöst wird, befolgen Sie die gleichen Schritte zur Fehlerbehebung wie bei Fehler 1.6.27: Kartusche stimmt nicht überein (nur Generation Form 4).
Fehler 1.6.33: Unbekannter Tank eingefügt
Formlabs bietet verschiedene Harztanks für seine SLA-Drucker an. Fehler 1.6.33 zeigt an, dass der Drucker den eingefügten Harztank nicht erkennen konnte. So beheben Sie diesen Fehler:
Fehler bei Erkennung von Ablagerungen (Fehlergruppe 7)
Alle Untercodes der Fehlergruppe 7 (1–7) des Form 4 und Form 4L beziehen sich auf das Erkennen von Ablagerungen im Harztank oder auf der Konstruktionsplattform durch den Drucker bei der Druckvorbereitung.
Fehler 1.7.2: Mischer hat Ablagerungen erkannt
Fehler 1.7.2 zeigt an, dass der Mischer während des Preprint-Konstruktionsplattform-Kratzvorgangs auf Ablagerungen gestoßen ist. Entfernen Sie das ausgehärtete Harz mit einem Spachtel von der Konstruktionsplattform und versuchen Sie es erneut. Wenn das Problem weiterhin besteht, befolgen Sie die gleichen Schritte zur Fehlerbehebung wie für Fehler 1.1.6: Mischer hat Ablagerungen erkannt.
Fehler 1.7.3: Erkennung von Ablagerungen auf der Konstruktionsplattform
Fehler 1.7.3 zeigt an, dass die Konstruktionsplattform während des Vordrucks auf Ablagerungen gestoßen ist, als sie in den Harztank abgesenkt wurde. Entfernen Sie das ausgehärtete Harz mit einem Spachtel von der Konstruktionsplattform und versuchen Sie es erneut. Wenn das Problem weiterhin besteht, befolgen Sie die gleichen Schritte zur Fehlerbehebung wie für Fehler 1.1.7: Konstruktionsplattform hat Ablagerungen erkannt.
Mischerfehler (Fehlergruppe 8)
Alle Untercodes der Fehler Gruppe 8 (1) des Form 4 und Form 4L beziehen sich auf den Mischer.
Fehler 1.8.1: Mischer nicht erkannt
Fehler 1.8.1 zeigt an, dass der Drucker den Mischer nicht erkannt hat. So beheben Sie diesen Fehler:
Dosierfehler (Fehlergruppe 9)
Alle Untercodes der Fehlergruppe 9 (1–25) des Form 4 und Form 4L beziehen sich auf das Harzabgabesystem.
Fehler 1.9.4: Harzpegel konnte nicht gemessen werden
Fehler 1.9.4 zeigt an, dass der Drucker die Harzmenge im Harztank nicht messen konnte. So beheben Sie diesen Fehler:
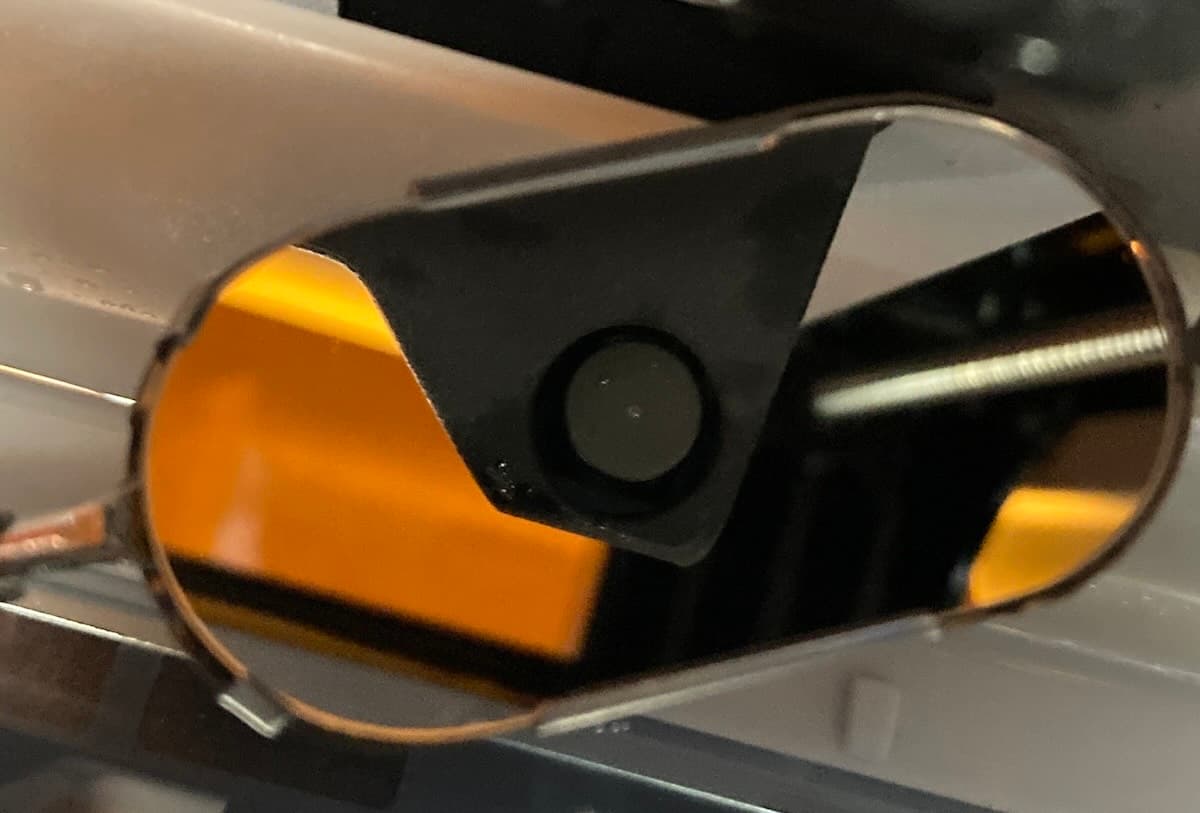
Fehler 1.9.5: Tank ist mit Harz überfüllt
Wenn der Harztank überfüllt ist, zeigt der Drucker Fehler 1.9.5 an. Verwenden Sie eine Spritze oder einen kleinen Einwegbecher, um kleine Mengen an Harz zu entfernen. Gießen Sie dieses in einen separaten Behälter. Wenn der Drucker fälschlicherweise vor einer Überfüllung des Harztanks warnt:
Fehler 1.9.6: Nicht genug Harz, um den Druck abzuschließen
Fehler 1.9.6 zeigt an, dass der aktuelle Druckauftrag mehr Harz benötigt, als im Harztank und in der Harzkartusche verfügbar ist. Möglicherweise müssen Sie die Harzkartusche während des Drucks austauschen. Der Drucker hält an und zeigt Fehler 1.9.6 an, wenn die Kartusche leer ist. So beheben Sie diesen Fehler:
Fehler 1.9.7: Druck pausiert wegen zu niedriger Harzmenge
Formlabs-SLA-Drucker verfügen über eine Komponente namens LevelSense, die die Menge des Harzes im Harztank während eines Drucks misst. Durch Überwachung des Harzniveaus kann der Drucker automatisch Harz aus der Kartusche in den Tank abgeben, wenn der Harzpegel im Tank zu sinken beginnt. Fehler 1.9.7zeigt an, dass der Drucker pausiert, um den Harztank nachzufüllen. Wenn diese Meldung wiederholt erscheint:
Fehler 1.9.9: Linke Kartusche ist leer (nur Generation Form 4L)
Der Drucker zeigt Fehler 1.9.9 an, wenn sich in der linken Kartusche kein Harz mehr befindet. Jede Kartusche enthält einen Liter Harz und kann diesen zuverlässig abgeben. Nachdem der gesamte Liter ausgegeben wurde: Entsorgen Sie die Kartusche und setzen Sie den Druck mit einer neuen Kartusche fort.
Wenn eine Kartusche nicht leer ist, der Drucker aber diesen Fehler anzeigt:
Fehler 1.9.10: Rechte Kartusche ist leer (nur Generation Form 4L)
Der Drucker zeigt Fehler 1.9.10 an, wenn sich in der rechten Kartusche kein Harz mehr befindet. Jede Kartusche enthält einen Liter Harz und kann diesen zuverlässig abgeben. Nachdem der gesamte Liter ausgegeben wurde: Entsorgen Sie die Kartusche und setzen Sie den Druck mit einer neuen Kartusche fort.
Wenn eine Kartusche nicht leer ist, der Drucker aber diesen Fehler anzeigt:
Fehler 1.9.11: Die linke Kartusche gibt Harz nur langsam ab (nur Generation Form 4L)
Fehler 1.9.11 zeigt an, dass die Harzabgabe aus der linken Harzkartusche langsamer als erwartet erfolgt. Wenn der Drucker kein Harz abgeben kann, obwohl eine Kartusche nicht leer ist, könnte ein Kartuschenfehler die Ursache dafür sein:
Anmerkung:
Der Drucker gibt möglicherweise Harz langsam ab, ohne eine Fehlermeldung anzuzeigen. Befolgen Sie die oben genannten Schritte zur Fehlerbehebung, um eine langsame Harzabgabe zu beheben (unabhängig davon, ob Sie eine Fehlermeldung sehen oder nicht).
Fehler 1.9.12: Die rechte Kartusche gibt Harz nur langsam ab (nur Generation Form 4L)
Fehler 1.9.12 zeigt an, dass die Harzabgabe aus der rechten Harzkartusche langsamer als erwartet erfolgt. Wenn der Drucker kein Harz abgeben kann, obwohl eine Kartusche nicht leer ist, könnte ein Kartuschenfehler die Ursache dafür sein:
Anmerkung:
Der Drucker gibt möglicherweise Harz langsam ab, ohne eine Fehlermeldung anzuzeigen. Befolgen Sie die oben genannten Schritte zur Fehlerbehebung, um eine langsame Harzabgabe zu beheben (unabhängig davon, ob Sie eine Fehlermeldung sehen oder nicht).
Fehler 1.9.13, Fehler 1.9.14, Fehler 1.9.15 und Fehler 1.9.19: LevelSense-Neukalibrierungsabstandsfehler
Formlabs-SLA-Drucker verfügen über eine Komponente namens LevelSense, die die Menge des Harzes im Harztank während eines Drucks misst. Bei den Druckern der Generationen Form 4 und Form 4L erfolgt dies durch Abmessung des Abstands zwischen dem LevelSense-Sensor und dem flüssigen Kunstharz. Wenn der Drucker den Füllstand des Harzes nicht korrekt misst, kalibrieren Sie LevelSense neu. Wenn der Drucker diesen Abstand nicht messen kann oder dieser außerhalb des erwarteten Bereichs liegt, zeigt der Drucker Fehler 1.9.13, Fehler 1.9.14, Fehler 1.9.15 oder Fehler 1.9.19 an. So lösen Sie diese Probleme:
Error 1.9.16, Error 1.9.17, and Error 1.9.18: LevelSense temperature errors
Formlabs SLA printers have a component known as LevelSense that measures the amount of resin in the resin tank during a print. On Form 4 and Form 4L generation printers, the LevelSense system also measures the ambient temperature to accurately measure the resin level. If the printer is incorrectly measuring resin level, recalibrate the LevelSense. During recalibration, if the printer cannot measure the ambient temperature or it is out of the expected range, the printer displays Error 1.9.16, Error 1.9.17, or Error 1.9.18. To resolve these issues:
Error 1.9.20: Filling tank
The printer may show Error 1.9.20 to inform you that it is filling the resin tank. It does not necessarily indicate that there is an issue. If the printer fails to fill the resin tank after a prolonged length of time, check the resin cartridge as you would for a dispense-related error.
Error 1.9.21: Could not determine offset
Error 1.9.21 indicates that the cartridge sensor readings were not stable during cartridge floor load cell calibration. Make sure that nothing is sitting on the cartridge floor(s) and retry the cartridge floor calibration process. If the issue persists:
Error 1.9.22: Cartridge is empty (Form 4 generation only)
The printer displays Error 1.9.22 if there is no more resin in the cartridge. Each cartridge contains and can reliably dispense one liter of resin. After the full liter dispenses, dispose of the cartridge and continue printing with a new cartridge.
If a cartridge is not empty but the printer displays this error:
Anmerkung:
Es kann vorkommen, dass der Drucker kein Harz abgibt, ohne dass eine Fehlermeldung angezeigt wird. Befolgen Sie die oben genannten Schritte zur Fehlerbehebung, um Probleme bei der Harzabgabe zu beheben, unabhängig davon, ob Sie eine Fehlermeldung sehen oder nicht.
Fehler 1.9.23: Kartusche gibt langsam ab (nur Generation Form 4)
Fehler 1.9.23 zeigt an, dass die Harzabgabe aus der Harzkartusche langsamer als erwartet erfolgt. Wenn der Drucker kein Harz abgeben kann, obwohl eine Kartusche nicht leer ist, könnte ein Kartuschenfehler die Ursache dafür sein:
Anmerkung:
Der Drucker gibt möglicherweise Harz langsam ab, ohne eine Fehlermeldung anzuzeigen. Befolgen Sie die oben genannten Schritte zur Fehlerbehebung, um eine langsame Harzabgabe zu beheben (unabhängig davon, ob Sie eine Fehlermeldung sehen oder nicht).
Fehler 1.9.24: Druck pausiert wegen zu niedriger Harzmenge
Formlabs-SLA-Drucker verfügen über eine Komponente namens LevelSense, die die Menge des Harzes im Harztank während eines Drucks misst. Durch Überwachung des Harzniveaus kann der Drucker automatisch Harz aus der Kartusche in den Tank abgeben, wenn der Harzpegel im Tank zu sinken beginnt.
Drucker im Open Material Mode können jedoch nicht automatisch Harz aus der Kartusche abgeben. Fehler 1.9.24 zeigt an, dass der Drucker angehalten hat, damit der Nutzer den Harz-Tank manuell auffüllen kann. Wenn diese Meldung wiederholt erscheint:
Fehler in der Light Processing Unit (Fehlergruppe 10)
Alle Untercodes der Fehlergruppe 10 (1–9) des Form 4 und Form 4L beziehen sich auf die Light Processing Unit (LPU).
Fehler 1.10.1 und Fehler 1.10.4: LPU ist nicht angeschlossen
Fehler 1.10.1 und Fehler 1.10.4 zeigen an, dass die Light Processing Unit (LPU) nicht angeschlossen ist. So lösen Sie diese Probleme:
Fehler 1.10.3: LPU wird nicht erkannt
Fehler 1.10.3 zeigt an, dass die Light Processing Unit (LPU) nicht erkannt werden konnte. Um dieses Problem zu beheben, folgen Sie denselben Schritten zur Fehlerbehebung für Fehler 1.10.1 und Fehler 1.10.4: LPU ist nicht verbunden.
Fehler 1.10.5: Druckdatei konnte nicht geladen werden
Fehler 1.10.5 weist auf ein Problem mit einer Datei in dem hochgeladenen Druckauftrag hin. Aktualisieren Sie PreForm und die Firmware des Druckers und laden Sie den Druckauftrag dann erneut hoch.
Fehler 1.10.8: LPU hat Lebensdauer überschritten
Fehler 1.10.8 zeigt an, dass die Light Processing Unit über ihre empfohlene Lebensdauer hinaus benutzt wurde. Mit dem Druck fortzufahren kann Fehldrucke zur Folge haben. Ersetzen Sie die LPU. Befolgen Sie die Anweisungen in den Reparaturleitfäden Ersetzen der Light Processing Unit des Form 4 oder Ersetzen der Light Processing Unit des Form 4L. Ersatz-LPUs sind im Formlabs Shop erhältlich.
Kamerafehler (Fehlergruppe 12)
Alle Untercodes der Fehlergruppe 12 (1–5) des Form 4 und Form 4L beziehen sich auf das Kamerasystem.
Fehler 1.12.2: Kamera ist nicht verbunden
Fehler 1.12.2 zeigt an, dass die Kamera zur Aufnahme von Fotos nach Druckabschluss nicht angeschlossen ist. Wenn Sie die Kamera absichtlich getrennt oder entfernt haben, ignorieren Sie diese Meldung. So beheben Sie diesen Fehler:
Fehler 1.12.3: Fotoaufnahme fehlgeschlagen
Fehler 1.12.3 zeigt an, dass die Kamera kein Foto aufgenommen hat. Um dieses Problem zu beheben, befolgen Sie die gleichen Schritte zur Fehlerbehebung für Fehler 1.12.2: Kamera ist nicht verbunden.
Fehler bei der Eintauchphase (Fehlergruppe 13)
Die Eintauchphase jeder Schicht bezieht sich auf das Absenken der Konstruktionsplattform in den Harztank. Alle Untercodes der Fehlergruppe 13 des von Form 4 und Form 4L beziehen sich auf die Eintauchphasen.
Fehler 1.13.1: Konstruktionsplattform hat Ablagerungen erkannt
Error 1.13.1 zeigt an, dass der Drucker während der Quetschphase Ablagerungen im Harztank oder auf der Konstruktionsplattform festgestellt hat. Um dieses Problem zu beheben, befolgen Sie dieselben Schritte zur Fehlerbehebung wie bei Fehler 1.1.7: Erkennung von Ablagerungen auf der Konstruktionsplattform.
Druckstatusfehler (Fehlergruppe 15)
Alle Untercodes der Fehlergruppe 15 (1–6) des Form 4 und Form 4L beziehen sich auf ein Problem mit dem Druckstatus.
Fehler 1.15.1: Druckauftrag konnte nicht geladen werden
Fehler 1.15.1 zeigt ein Problem mit dem hochgeladenen Druckauftrag an. Aktualisieren Sie PreForm und die Firmware des Druckers und laden Sie den Druckauftrag erneut hoch.
Error 1.15.2: Auftrag wird bereits gedruckt
Fehler 1.15.2 zeigt an, dass ein neuer Druckauftrag nicht gestartet wurde, weil bereits ein anderer Druckauftrag in Bearbeitung ist. Warten Sie, bis der aktuelle Druckvorgang abgeschlossen ist, bevor Sie einen neuen starten. Wenn derzeit kein Auftrag ausgeführt wird, starten Sie Ihren Drucker neu, flashen Sie die Firmware neu und versuchen Sie es erneut.
Fehler 1.15.3: Druckauftrag ist ungültig
Fehler 1.15.3 zeigt ein Problem mit dem hochgeladenen Druckauftrag an. Möglicherweise wurde es mit einer PreForm-Version generiert, die mit der Firmware des Druckers nicht kompatibel ist. Aktualisieren Sie PreForm und die Firmware des Druckers und laden Sie den Druckauftrag erneut hoch.
Fehler 1.15.5: Passgenauigkeitsabstimmung nicht kompatibel
Fehler 1.15.5 zeigt an, dass die Fit Tuning-Werte des Druckers aktualisiert wurden, nachdem dieser Auftrag hochgeladen wurde. Um dieses Problem zu beheben, laden Sie den Auftrag erneut über PreForm hoch.
Fehler 1.15.6: Nicht genügend Speicherplatz zum Drucken
Fehler 1.15.6 zeigt an, dass nicht genügend Speicherplatz auf dem Drucker vorhanden ist, um Druckdaten zu speichern, selbst nachdem Druckaufträge aus dem Verlauf automatisch gelöscht wurden. Löschen Sie Aufträge aus der Warteschlange und laden Sie den Auftrag ohne die Zeitrafferfunktion über PreForm erneut hoch.
Fehler im Resin Pumping System (Fehlergruppe 20)
Alle Untercodes der Fehlergruppe 20 (1–15) des Form 4 und Form 4L beziehen sich auf das Resin Pumping System.
Fehler 1.20.1: Harzbehälter prüfen
Das Resin Pumping System pumpt Harz aus einem 5-Liter-Behälter in den Drucker. Ersetzen Sie den Behälter, wenn er leer ist, um den Druckvorgang fortzusetzen. Wenn der Behälter nicht leer ist, liegt möglicherweise ein Problem mit der in die Pumpe eingesetzten Harzkarte vor. Wenden Sie sich an den Formlabs-Kundenservice oder Ihren autorisierten Vertriebspartner, um Hilfe zu erhalten.
Fehler 1.20.4: Resin Pump ist nicht verbunden
Das Resin Pumping System (Form 4) kommuniziert mit Druckern der Generationen Form 4 und Form 4L über einen USB-Anschluss. Fehler 1.20.4 zeigt an, dass der Drucker eine Resin Pump über den RFID-Sensor der Kartusche erkannt hat, aber nicht in der Lage war, über das USB-Kabel mit der Pumpe zu kommunizieren. So beheben Sie diesen Fehler:
Fehler 1.20.6: Firmware der Resin Pump konnte nicht aktualisiert werden
Error 1.20.6 zeigt an, dass der Drucker versucht hat, die Firmware der Resin Pump zu aktualisieren, dies aber nicht gelungen ist. Dies kann passieren, wenn die Pumpe während der Aktualisierung getrennt wird. Um dieses Problem zu beheben, befolgen Sie die gleichen Schritte zur Fehlerbehebung für Fehler 1.20.4: Resin Pump ist nicht verbunden.
Fehler 1.20.14: Verbindungsproblem mit der Resin Pump
Fehler 1.20.14 zeigt an, dass ein Problem mit der Verbindung zur Resin Pump vorliegt. Stellen Sie sicher, dass die Pumpe über das integrierte USB-Kabel direkt mit dem Drucker verbunden ist. Verbinden Sie die Resin Pump nicht über einen USB-Hub, einen Adapter oder anderes USB-Zubehör mit dem Drucker. Wenn der Fehler weiterhin besteht, führen Sie die gleichen Schritte zur Fehlerbehebung durch wie bei Fehler 1.20.4: Harzpumpe ist nicht verbunden.
Fehler 1.20.15: Problem mit der Stromversorgung der Resin Pump
Fehler 1.20.15 zeigt ein Problem mit der Stromversorgung der Harzpumpe an. Um dieses Problem zu beheben, befolgen Sie die gleichen Schritte zur Fehlerbehebung für Fehler 1.20.4: Harzpumpe ist nicht verbunden. Wenn der Fehler weiterhin besteht, ersetzen Sie die Harz-Pumpe.
Color Resin Fehler (Fehlergruppe 22)
Alle Untercodes der Fehlergruppe 22 (1–4) des Form 4 und Form 4L beziehen sich auf ein Problem mit Color Resin.
Fehler 1.22.1: Tankfarbe stimmt nicht überein
Der Drucker zeigt Fehler 1.22.1 an, wenn die Harzfarbe im Tank nicht mit der für den Auftrag erforderlichen Farbe übereinstimmt. Nehmen Sie den Harztank heraus und ersetzen Sie ihn durch einen Tank, der dem Auftrag entspricht.
Anmerkung:
Tippen Sie auf Ignore (Ignorieren), um den Harztank umzuprogrammieren, damit er der Farbe des Druckauftrags entspricht.
Fehler 1.22.2: Kartuschenfarbe stimmt nicht überein (nur Generation Form 4)
Der Drucker zeigt Fehler 1.22.2 an, wenn die Harzfarbe in der Kartusche nicht mit der für den Auftrag erforderlichen Farbe übereinstimmt. Entfernen Sie die Kartusche und ersetzen Sie sie durch eine, die dem Auftrag entspricht. Wenn sich das Problem dadurch nicht beheben lässt, befolgen Sie die gleichen Schritte zur Fehlerbehebung wie bei Fehler 1.6.27: Kartusche nicht übereinstimmend (nur Generation Form 4).
Fehler 1.22.3: Linke Kartusche falsche Farbe (nur Generation Form 4L)
Der Drucker zeigt Fehler 1.22.3 an, wenn die Harzfarbe in der linken Kartusche nicht mit der für den Auftrag erforderlichen Farbe übereinstimmt. Entfernen Sie die linke Kartusche und ersetzen Sie sie durch eine, die dem Auftrag entspricht. Wenn das Problem dadurch nicht behoben werden kann, führen Sie die gleichen Schritte zur Fehlerbehebung aus wie bei Fehler 1.6.4: Linke Kartuschenfarbe unstimmig (nur Generation Form 4L).
Fehler 1.22.4: Farbabweichung der rechten Kartusche (nur Generation Form 4L)
Der Drucker zeigt Fehler 1.22.4 an, wenn die Harzfarbe in der rechten Kartusche nicht mit der für den Auftrag erforderlichen Farbe übereinstimmt. Entfernen Sie die rechte Kartusche und ersetzen Sie sie durch eine, die dem Auftrag entspricht. Wenn sich das Problem dadurch nicht beheben lässt, befolgen Sie die gleichen Schritte zur Fehlerbehebung wie bei Fehler 1.6.6: Rechte Kartuschenfarbe unstimmig (nur Generation Form 4).
Verbrauchsmaterialfehler (Fehlergruppe 227)
Alle Untercodes von Fehlergruppe 227 (1–4) des Form 4 und Form 4L beziehen sich auf ein Problem mit einer eingefügten Harzkartusche.
Fehler 1.227.1: Harzkartusche ist nicht kompatibel (nur Generation Form 4)
Der Drucker zeigt Fehler 1.227.1 an, wenn das Harz in der Kartusche nicht mit dem Drucker kompatibel ist. Dies ist insbesondere dann der Fall, wenn ein Harz für biokompatible Anwendungen in einen Form-4-Drucker und nicht in einen Form-4B-Drucker eingefügt wird. Wenn Sie die Kartusche in den falschen Druckertyp eingefügt haben, setzen Sie sie in den richtigen Drucker ein. Andernfalls befolgen Sie die Anweisungen zum Einrichten des Form 4B, um eine lebenslange Lizenz für biokompatible Materialien von Formlabs beim Drucker anzumelden.
Fehler 1.227.2: Rechte Harzkartusche ist inkompatibel (nur Generation Form 4L)
Der Drucker zeigt Fehler 1.227.2 an, wenn das Harz in der rechten Kartusche nicht mit dem Drucker kompatibel ist. Dies ist insbesondere dann der Fall, wenn ein Harz für biokompatible Anwendungen in einen Form-4L-Drucker und nicht in einen Form-4BL-Drucker eingefügt wird. Wenn Sie die Kartusche in den falschen Druckertyp eingefügt haben, setzen Sie sie in den richtigen Drucker ein. Andernfalls folgen Sie den Anweisungen zum Einrichten des Form 4BL, um eine lebenslange Lizenz für biokompatible Materialien von Formlabs beim Drucker anzumelden.
Fehler 1.227.3: Linke Harzkartusche ist inkompatibel (nur Generation Form 4L)
Der Drucker zeigt Fehler 1.227.3 an, wenn das Harz in der linken Kartusche nicht mit dem Drucker kompatibel ist. Dies ist insbesondere dann der Fall, wenn ein Harz für biokompatible Anwendungen in einen Form-4L-Drucker und nicht in einen Form-4BL-Drucker eingefügt wird. Wenn Sie die Kartusche in den falschen Druckertyp eingefügt haben, setzen Sie sie in den richtigen Drucker ein. Andernfalls folgen Sie den Anweisungen zum Einrichten des Form 4BL, um eine lebenslange Lizenz für biokompatible Materialien von Formlabs beim Drucker anzumelden.
Fehler 1.227.4: Harzkartuschen sind nicht kompatibel (nur Generation Form 4L)
Der Drucker zeigt Fehler 1.227.4 an, wenn das Harz in beiden Kartuschen nicht mit dem Drucker kompatibel ist. Dies ist insbesondere dann der Fall, wenn ein Harz für biokompatible Anwendungen in einen Form-4L-Drucker und nicht in einen Form-4BL-Drucker eingefügt wird. Wenn Sie die Kartuschen in den falschen Druckertyp eingefügt haben, setzen Sie sie in den richtigen Drucker ein. Andernfalls folgen Sie den Anweisungen zum Einrichten des Form 4BL, um eine lebenslange Lizenz für biokompatible Materialien von Formlabs beim Drucker anzumelden.
Fehler 1.227.5: Kartuschenprüfung empfohlen
Die neueste Tough-Familie von Harzen führt dazu, dass das Beißventil der Harzkartusche mit der Zeit anschwillt. Ein geschwollenes Beißventil gibt das Harz langsamer ab, vor allem gegen Ende der Lebensdauer einer Kartusche. In vereinzelten Fällen kann das Beißventil vollständig von der Harzkartusche abfallen, was zu einem erheblichen Auslaufen von Kunstharz führen kann. Der Drucker zeigt Fehler 1.227.5 an, nachdem die Harzkartusche 50 Abgabezyklen durchlaufen hat und möglicherweise eine verringerte Leistung bei der Harzabgabe aufweist. Um Abgabeprobleme und Harzverschüttungen zu vermeiden:
Fehler 1.227.6: Kartuschenprüfung empfohlen (nur Generation Form 4L)
Die neueste Tough-Familie von Harzen führt dazu, dass das Beißventil der Harzkartusche mit der Zeit anschwillt. Ein geschwollenes Beißventil gibt das Harz langsamer ab, vor allem gegen Ende der Lebensdauer einer Kartusche. In vereinzelten Fällen kann das Beißventil vollständig von der Harzkartusche abfallen, was zu einem erheblichen Auslaufen von Kunstharz führen kann. Bei Druckern der Generation Form 4L zeigt der Drucker den Fehler Error 1.227.6 an, nachdem die Harzkartusche in der rechten Kartuschennute 50 Abgabezyklen durchlaufen hat und möglicherweise eine verringerte Leistung bei der Harzabgabe aufweist. So verhindern Sie Probleme mit der Harzabgabe und das Auslaufen von Harz:
Drucker wird nicht initialisiert
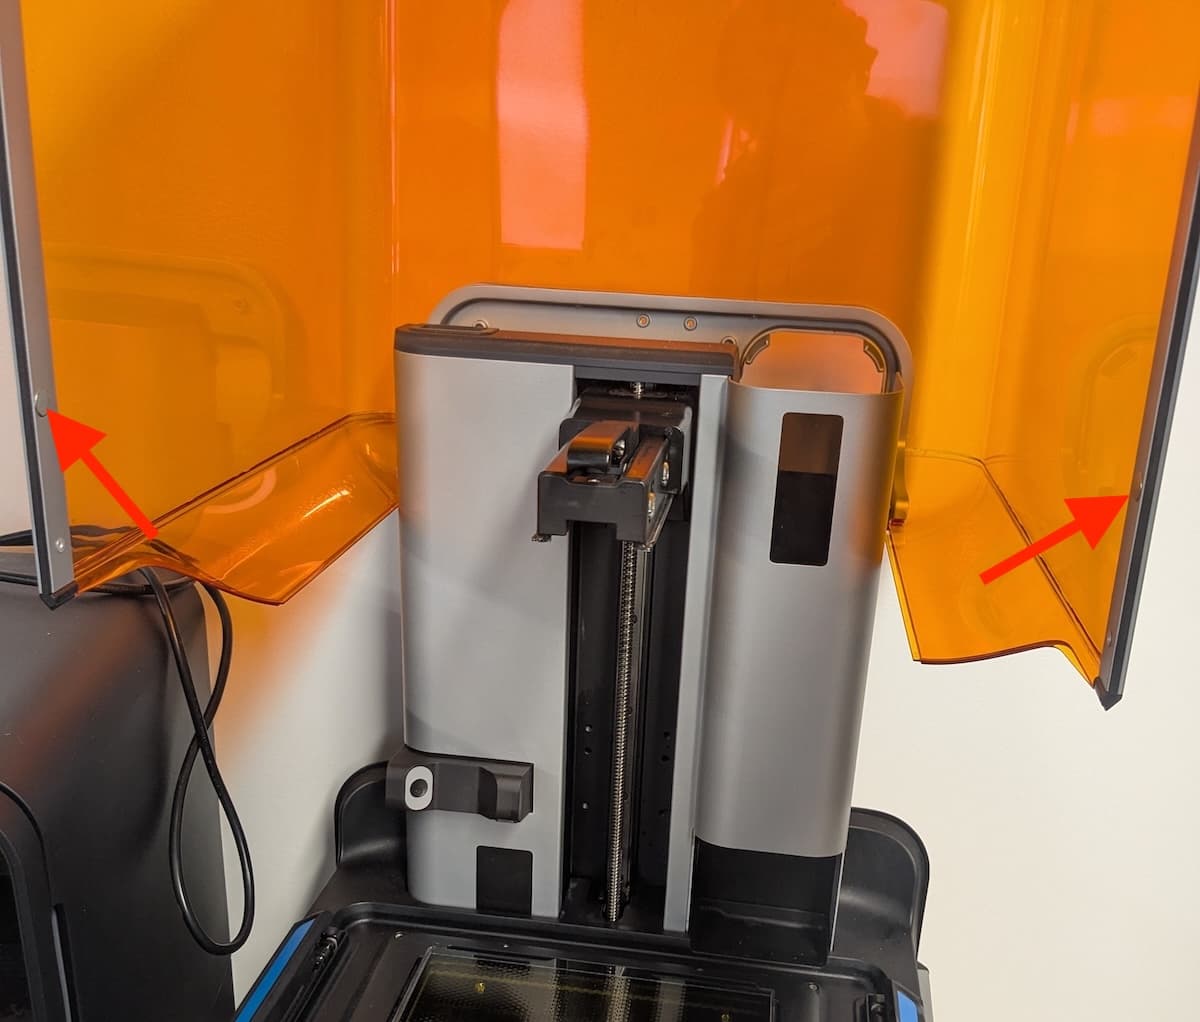
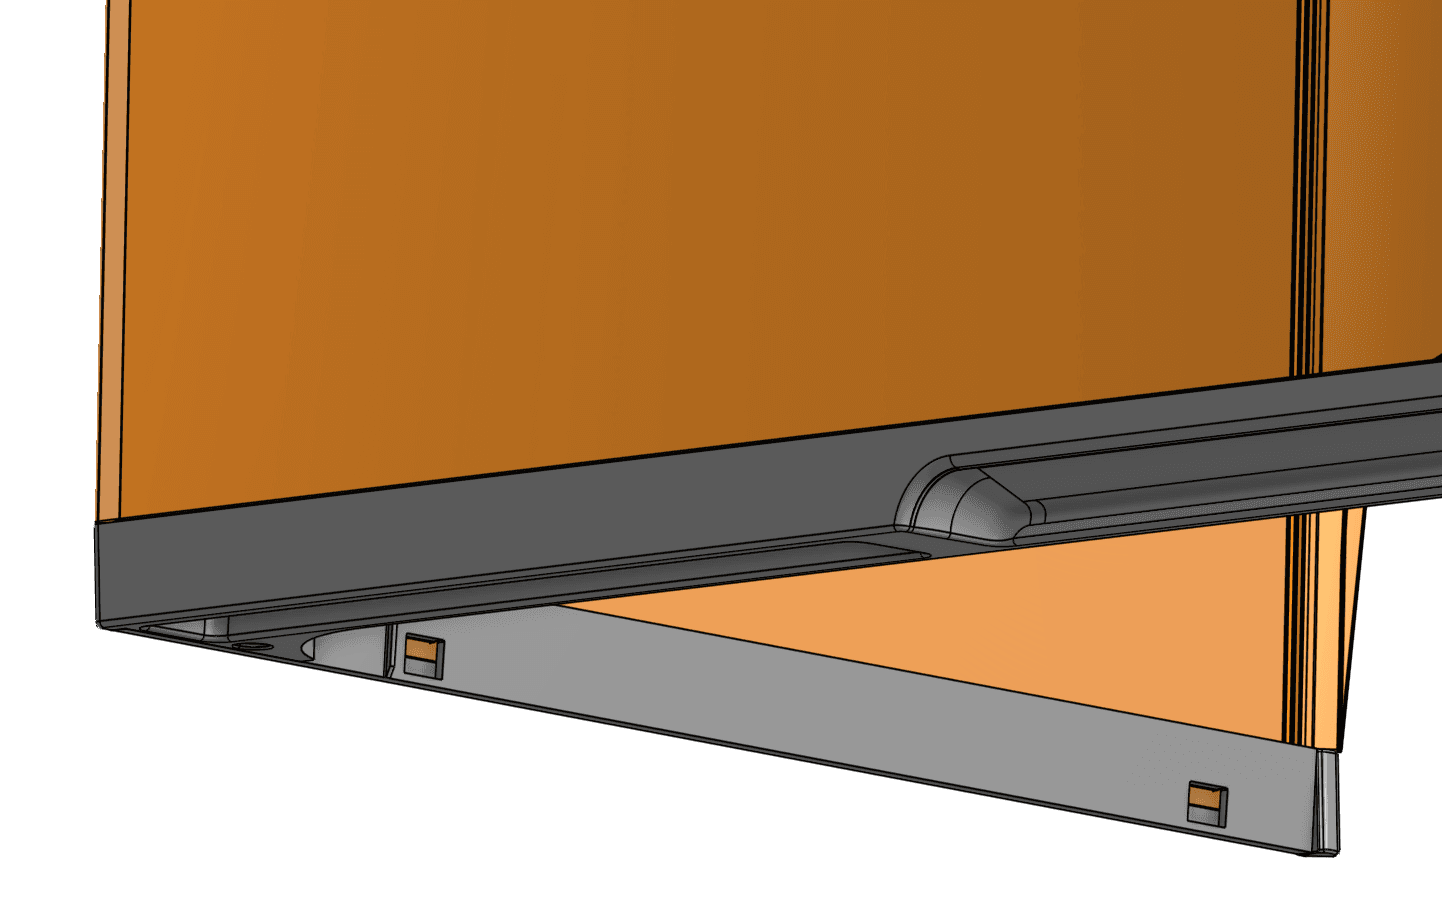
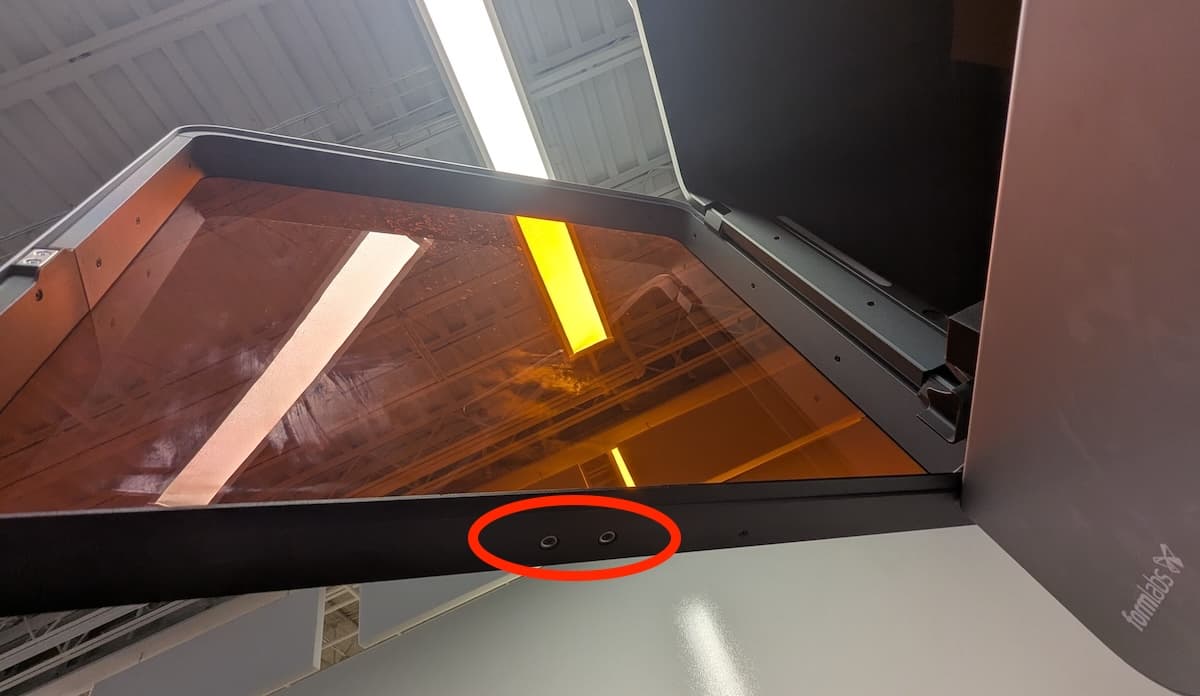
Wenn der Drucker beim Einschalten nicht initialisiert wird, stellen Sie sicher, dass die Abdeckung geschlossen ist. Wenn sie geschlossen ist, öffnen Sie die Abdeckung und überprüfen Sie, ob sich die beiden runden Verriegelungsmagnete an der unteren Kante der Abdeckung befinden. Wenn sich einer der Magnete von der Abdeckung gelöst hat, kann er sich an der Druckergehäuse befestigt haben oder sich unter einer den Riegeln des Harztanks befinden. Bringen Sie den Magneten mit einem starken Klebstoff an der Abdeckung an. Sobald der Klebstoff trocken ist, schließen Sie die Abdeckung, um fortzufahren.
Wenn das Problem weiterhin besteht, wenden Sie sich an den Formlabs-Kundenservice oder Ihren autorisierten Vertriebspartner. Wenn beide Magnete vorhanden sind, starten Sie Ihren Drucker neu, aktualisieren Sie die Firmware und versuchen Sie es erneut.
Verschiedene und interne Fehler
In seltenen Fällen kann es vorkommen, dass der Drucker einen internen Fehler mit einem entsprechenden Fehlercode anzeigt. Wenn ein interner Fehler auftritt, laden Sie die Diagnoseprotokolle Ihres Druckers hoch und wenden Sie sich an den Formlabs-Kundenservice, um eine spezielle Anleitung zu erhalten.
Fehler 1.23.3
Error 1.23.3 zeigt an, dass der Drucker einen internen Kommunikationsfehler festgestellt hat. So beheben Sie diesen Fehler:
Fehler 1.196.3
Fehler 1.196.3 kann durch unzureichenden freien Speicherplatz auf dem Drucker verursacht werden. Löschen Sie alte Druckaufträge aus der Warteschlange und versuchen Sie den Druck erneut.
Fehler 1.225.1
Error 1.225.1 zeigt an, dass der Drucker einen Fehler bei der Verbindung mit dem ausgewählten WLAN-Netzwerk festgestellt hat. Starten Sie den Drucker und den WLAN-Router (falls möglich) neu und versuchen Sie es erneut.
Fehler 1.226.5: Drucker während des Druckvorgangs zurückgesetzt
Fehler 1.226.5 zeigt an, dass der Drucker während des Drucks neu gestartet wurde, höchstwahrscheinlich aufgrund eines Stromproblems. Wird die Stromversorgung des Druckers während eines Druckauftrags unterbrochen, setzt der Drucker den Druckauftrag beim Neustart nicht fort. So beheben Sie diesen Fehler:
Fehler 1.240.5
Fehler 1.240.5 zeigt an, dass der Drucker einen beschädigten Druckauftrag erhalten hat. Dies kann passieren, wenn beim Senden des Druckauftrags an den Drucker Probleme mit Ihrer Netzwerkverbindung aufgetreten sind. Laden Sie den Druckauftrag erneut hoch. Wenn das Problem erneut auftritt, laden Sie die Daten erneut über eine stabilere Verbindung, z. B. USB, hoch.
Aktivieren der Fernunterstützung für die Fehlerbehebung
Während der Fehlerbehebung benötigt der Formlabs-Kundenservice möglicherweise zusätzliche Informationen von Ihrem Drucker oder Zugang zu diesem. Sie werden möglicherweise aufgefordert, die Fernunterstützung auf Ihrem Gerät zu aktivieren.
So bereiten Sie Ihren Drucker für die Fernunterstützung vor:
Aktivieren von Analysen für die Fehlerbehebung
Während der Fehlerbehebung benötigt der Formlabs-Kundenservice möglicherweise zusätzliche Informationen von Ihrem Drucker oder Zugang zu diesem. Sie werden möglicherweise aufgefordert, die Analyse auf Ihrem Gerät zu aktivieren.
So bereiten Sie Ihren Drucker für die Dashboard-Protokollierung vor:
Anweisungen zum Zurücksetzen auf Werkseinstellungen
In manchen Fällen kann ein Zurücksetzen auf Werkseinstellungen die Unregelmäßigkeiten korrigieren. Zu den Unregelmäßigkeiten zählen unbekannte Fehler, unvollständige Firmwareupdates, Funktionseinschränkungen des Touchscreens oder Probleme bei der Verbindung mit PreForm. Beim Zurücksetzen auf Werkseinstellungen werden alle benutzerdefinierten Einstellungen wie Druckaufträge in der Warteschlange und Netzwerkverbindungen gelöscht.
Hinweis:
Beim Zurücksetzen auf Werkseinstellungen werden alle Druckauftragsinformationen, benutzerdefinierten Einstellungen und Diagnoseprotokolle gelöscht. Laden Sie die Diagnoseprotokolle hoch, bevor Sie auf die Werkseinstellungen zurücksetzen.
So werden die Werkseinstellungen wiederhergestellt:
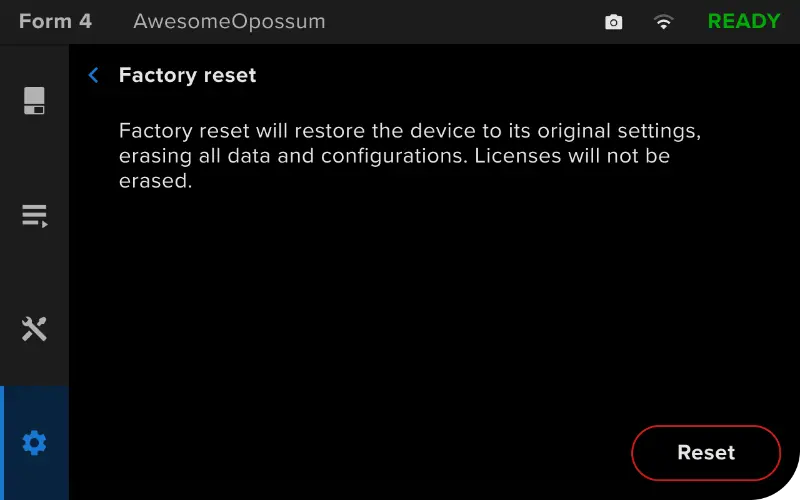
Wenn Sie das Zurücksetzen auf die Werkseinstellungen nicht über den Touchscreen durchführen können, verwenden Sie die physische Taste auf der Rückseite des Geräts:
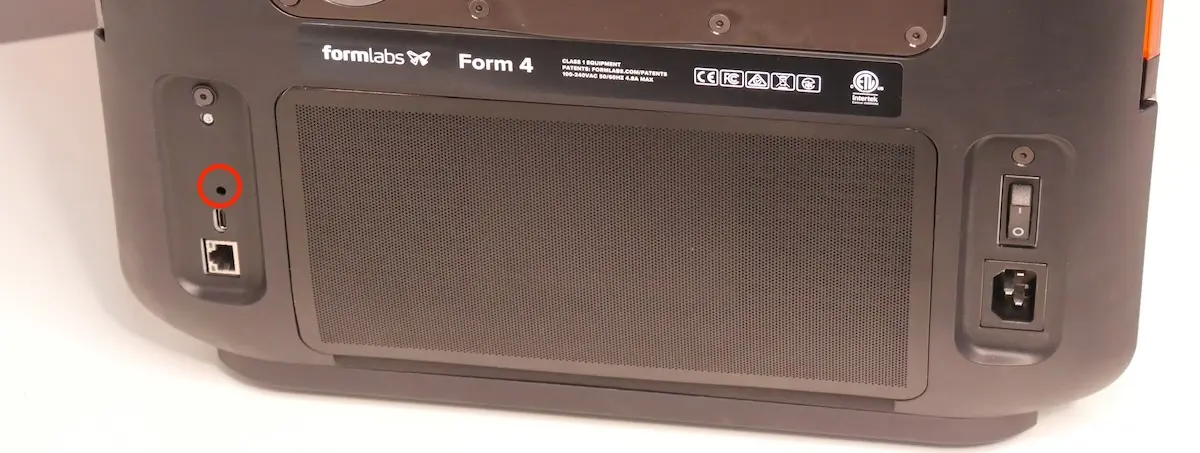
Tippen Sie auf dem Touchscreen des Druckers auf Queue (Warteschlange), um das erfolgreiche Zurücksetzen auf Werkseinstellungen zu prüfen. Bei erfolgreich wiederhergestellten Werkseinstellungen ist die Druckerwarteschlange leer. Sollte das Zurücksetzen das ungewünschte Verhalten nicht beheben, wenden Sie sich an den Formlabs-Kundenservice oder Ihren autorisierten Vertriebspartner.