
必要な備品:
Formlabs:
- LPU(レーザーユニット)
- LPUリボンケーブル
- 2mm六角ドライバー
- 3mm六角ドライバー
- ガラスクリーニングワイプ
他社製:
- ニトリル手袋
- ペーパータオル
- 純度90%以上のイソプロピルアルコール(IPA)

Light Processing Unit(LPU)は、プリンタのレーザダイオード、検流計ならびにプリントの各レイヤに照射されるレーザ光線の方向を定める複数のミラーとレンズで構成されています。LPUは、レジンタンクの下で左右に動くようにプリンタ本体に組み込まれているLPUの筐体の中に置かれています。LPUが異常をきたすと、プリンタが正常にプリントできなくなります。
このガイドは、Form 3のLight Processing Unitを交換する時にご使用ください。
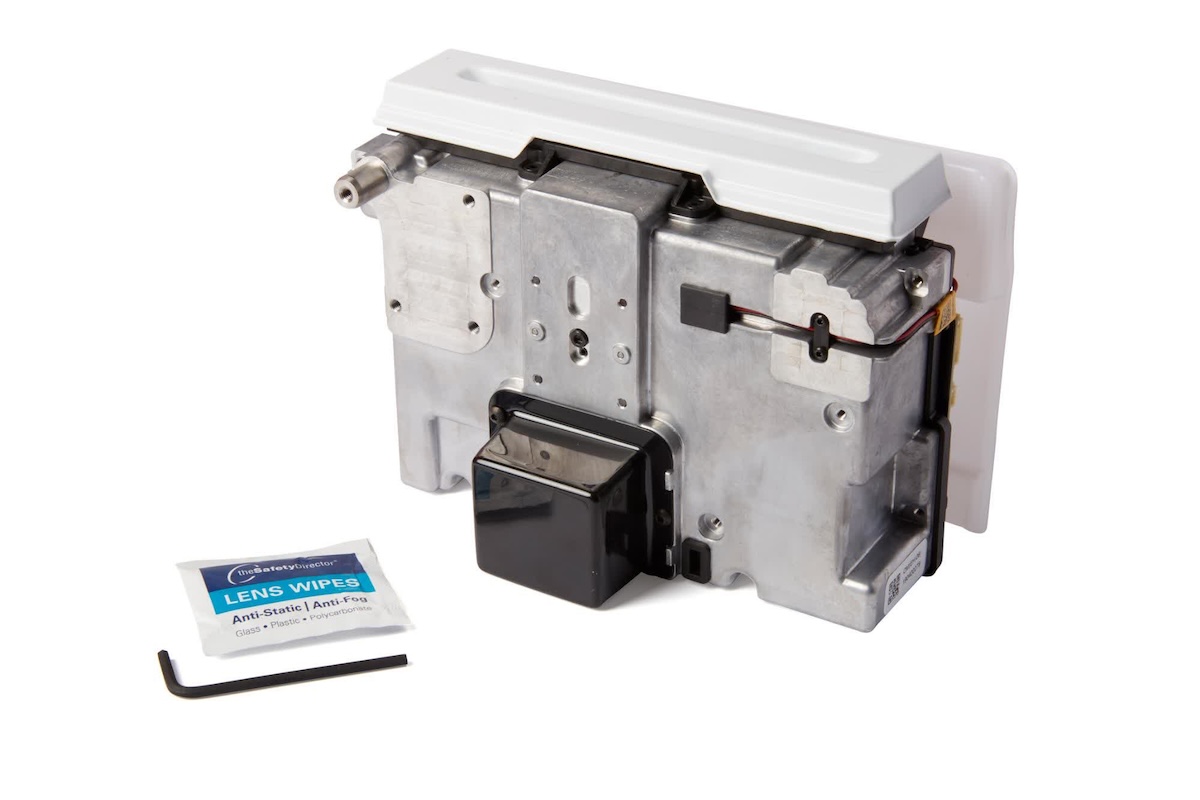
必要な備品:
Formlabs:
他社製:
所要時間(目安): 20~30分
作業スペースを用意する
概要: LPUを交換するために、Form 3と埃のない作業スペースを準備します。
注意:
LPU、ローラー、オプティカルウィンドウは、埃や汚れに敏感です。指示があるまで、LPUを梱包箱から取り出さないでください。メンテナンス作業中は、LPUの筐体の上に位置するローラーと光学窓には触れないでください。
ステップ1:ビルドプラットフォームを取り外す
ビルドプラットフォームを取り外し、レジンがLPUやプリンターのキャビティに垂れないようにします。
ステップ2:レジンカートリッジを取り外す
レジンカートリッジを取り外し、ベントキャップを閉じて、バイトバルブからレジンが滴り落ちてプリンターに入り込まないようにします。
レジンタンクを取り外し
、レジンタンクケースに入れ、蓋をします。ケースとタンクを清潔で平坦な台に置きます。
注意:
手袋をはめ、レジンタンクの底に汚れまたは傷が付かないよう、タンクの側面にあるグリップを掴んで、タンクを持ち上げます。
ステップ4:作業スペースを準備する
プリンターの周囲に作業スペースを確保します。作業スペースはよく換気された埃のない場所に確保してください。
ステップ5:プリンターのキャビティをクリーニングする
警告:
レジンが肌に触れると、皮膚炎またはアレルギー性皮膚反応の原因になる恐れがあります。液体レジンまたはレジンが付着した表面に触れる際は、必ず手袋を着用してください。レジンが皮膚に付着したら、石鹸と水で念入りに洗い流してください。
プリンターのカバーを開きます。プリンター庫内の底面や壁面等にレジンが付着している場合、ペーパータオルですべて拭き取ってください。レジンがこびり付いている場合は、必要に応じてイソプロピルアルコール(IPA)で湿らせたペーパータオルでこびり付いたレジンを溶かしながら拭き取ってください。
危険:
火災ハザード:IPAは可燃性の溶剤です。容器は必ず蓋が閉じた状態で、お子様の手が届かないところで保管してください。
ステップ6:LPUをメンテナンス位置に移動する
プリンターの電源を入れた状態で、歯車のアイコンをタップしてSettings(設定)メニューに入り、Calibration(較正)、LPU Replacement(LPUの交換)の順にタップします。スクリーンに表示される指示に従います。LPUの筐体がプリンタ右側の保管位置からメンテナンス位置に移動します。
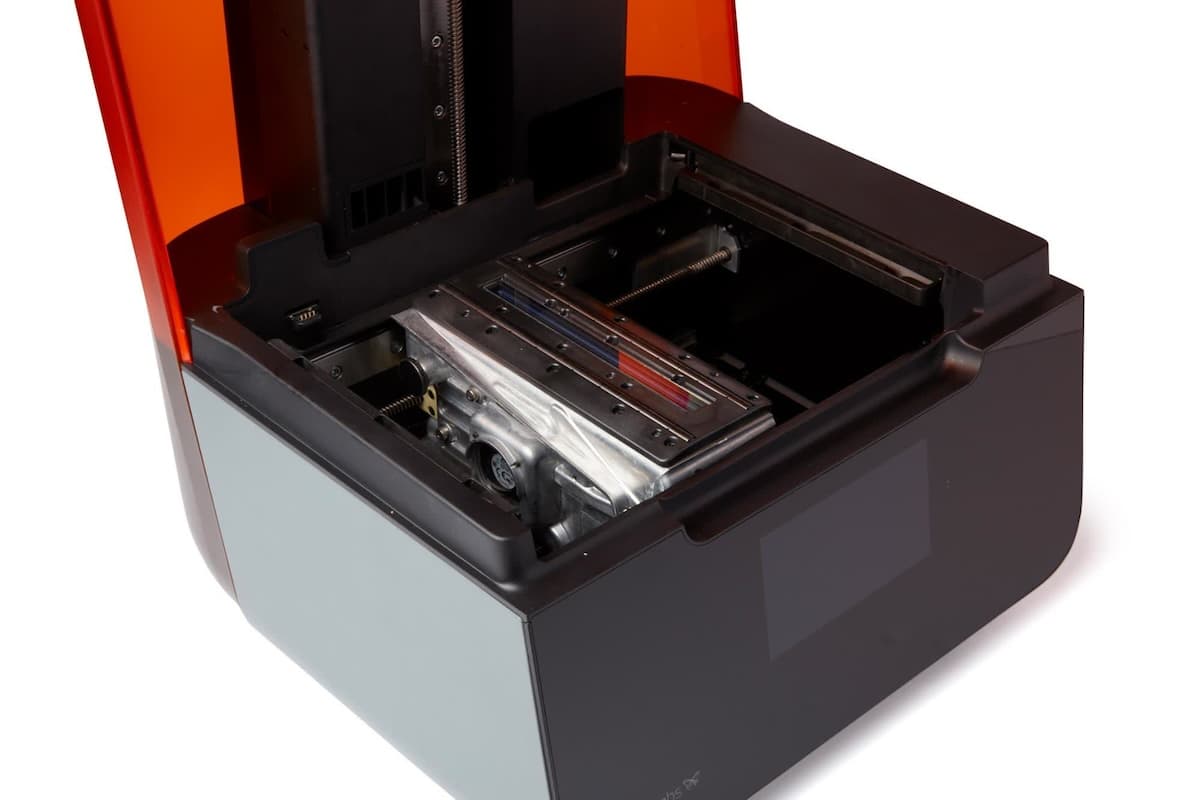
備考:
LPUの交換ではなく、ケーブルの再装着のためにLPUを動かす場合は、タッチスクリーンのMotor Moves(モーター動作)ツールを使用してください。Settings(設定)> Maintenance(メンテナンス)> Motor Moves(モーター動作)の順にタップし、必要に応じてLPUを移動します。実際にLPUを交換しない場合は、LPU Replacement(LPUの交換)ツールを使用しないでください。エラーの原因となります。
ステップ7:プリンターの電源を切る
タッチスクリーンに表示されたら、メンテナンスを続行する前に電源ケーブルを抜きます。プリンターの電源ケーブルを電源に接続したままで作業を実施しないでください。プリンタの電源ケーブルをコンセントに差し込んだまま、LPUを交換すると、プリンタが故障し、修理不能になります。
警告:
部品や送りネジが緩んでいると、押しつぶされたり、もつれたりする原因になり、危険です。LPUを取り扱う時は、その前に必ずプリンタの電源ケーブルをコンセントから抜き、プリンタの電源を切っておいてください。
ステップ8:LPUハウジングをクリーニングする
LPUハウジングの周辺やプリンターに付着しているレジンをペーパータオルで拭き取ります。レジンがこびり付いている場合は、必要に応じてイソプロピルアルコール(IPA)で湿らせたペーパータオルでこびり付いたレジンを溶かしながら拭き取ってください。
LPUの取り外し
概要:LPUハウジングをメンテナンス位置に移動させた後、LPUを取り外してプラグを抜きます。
ステップ1:レーザーウィンドウを覆う
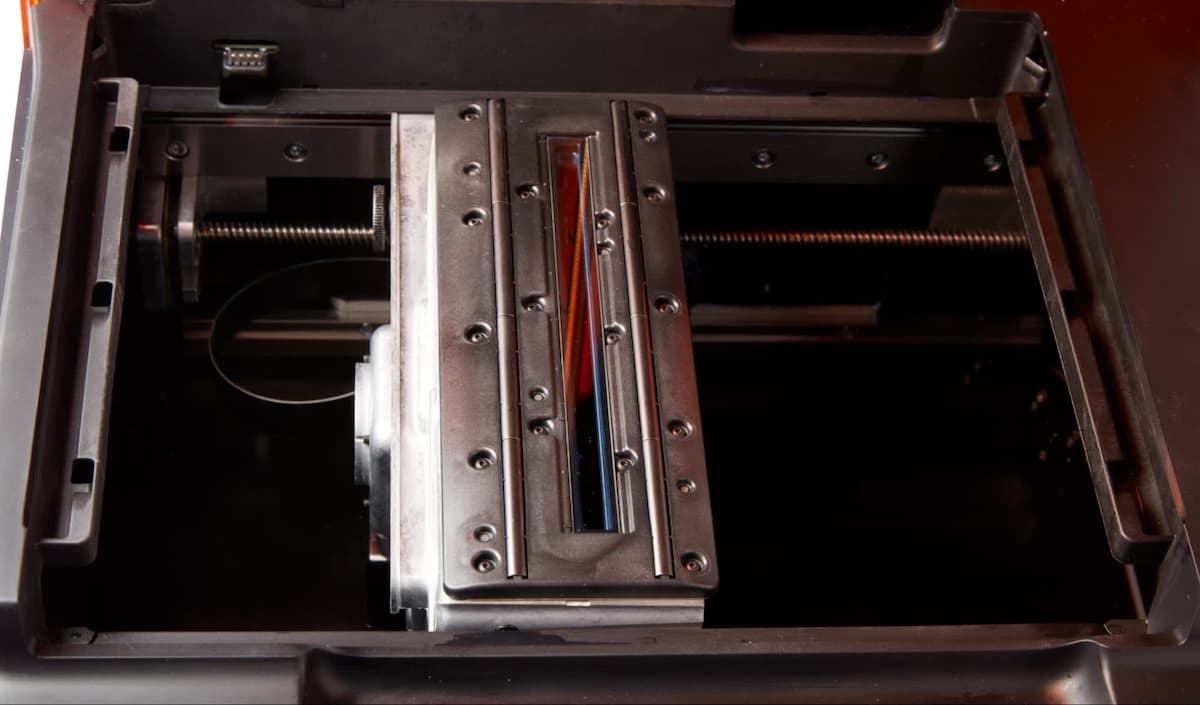
LPUハウジングの上部にあるローラーホルダーの中央には、レーザーが通過する透明な窓があります。メンテナンス作業中は、PEC*PADなど、糸くずの出ないカバーで窓を覆います。
ステップ2:LPUハウジングのネジを緩める
付属の3mm六角ドライバーを使用して、LPUハウジングの3本の六角ネジを完全に緩めます。ネジは、LPUの筐体の左側の後ろの方に付いています。LPUから取り外せるようになるまで、ネジを緩めます。
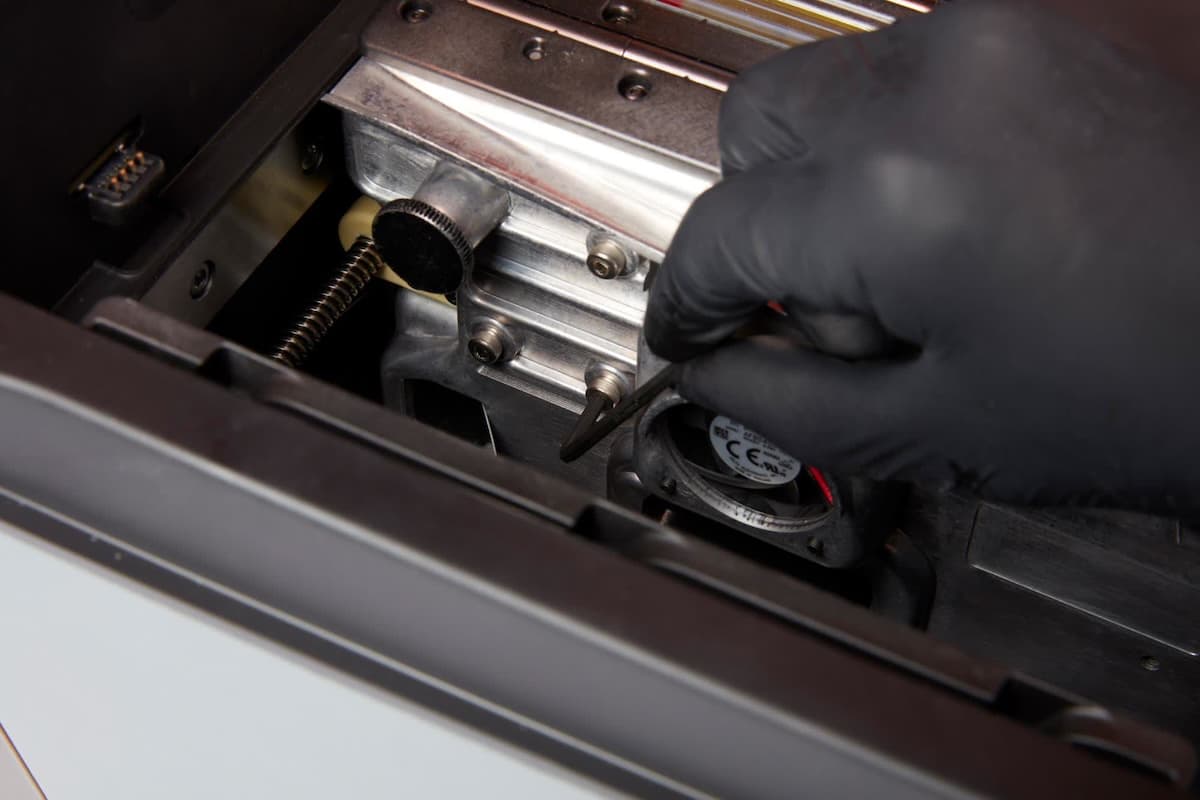
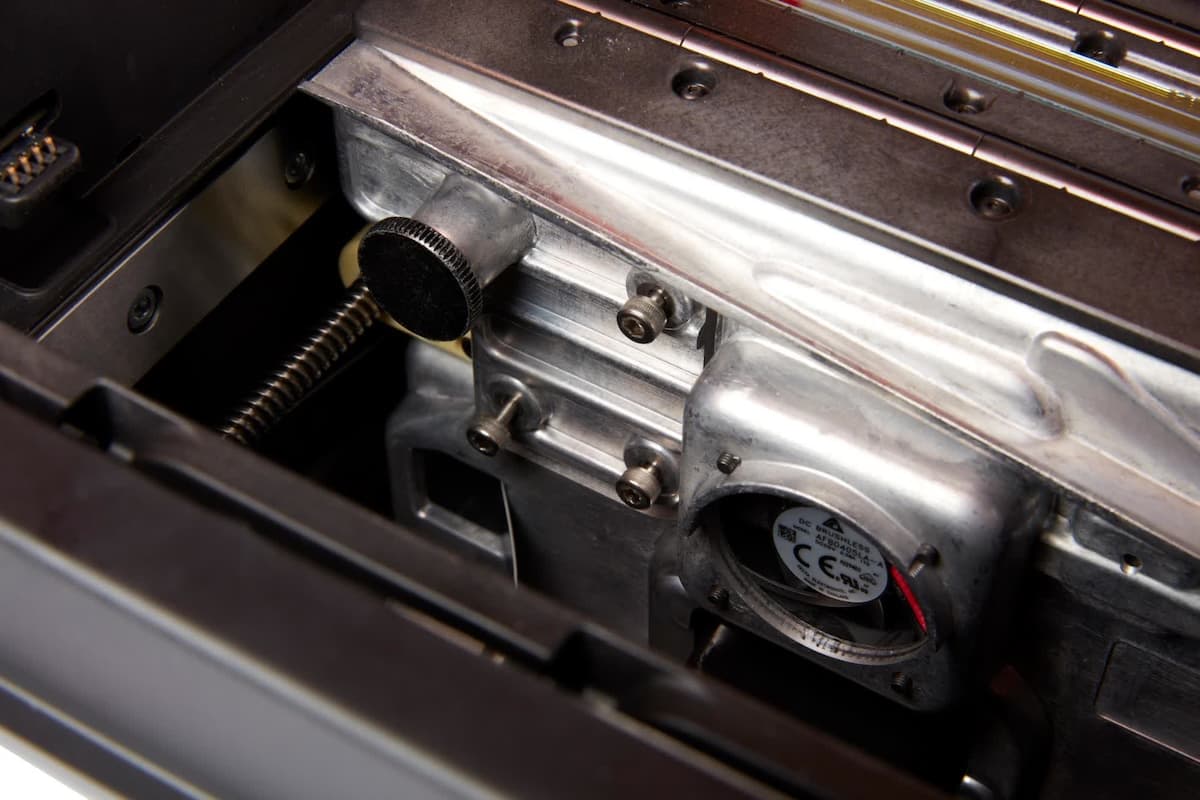
ネジは完全に緩んでも、LPUの筐体から簡単に外れないようになっています。そのどれか1つでも、LPUの筐体から外れてしまったら、作業を続行する前に、元の位置に一旦戻してください。
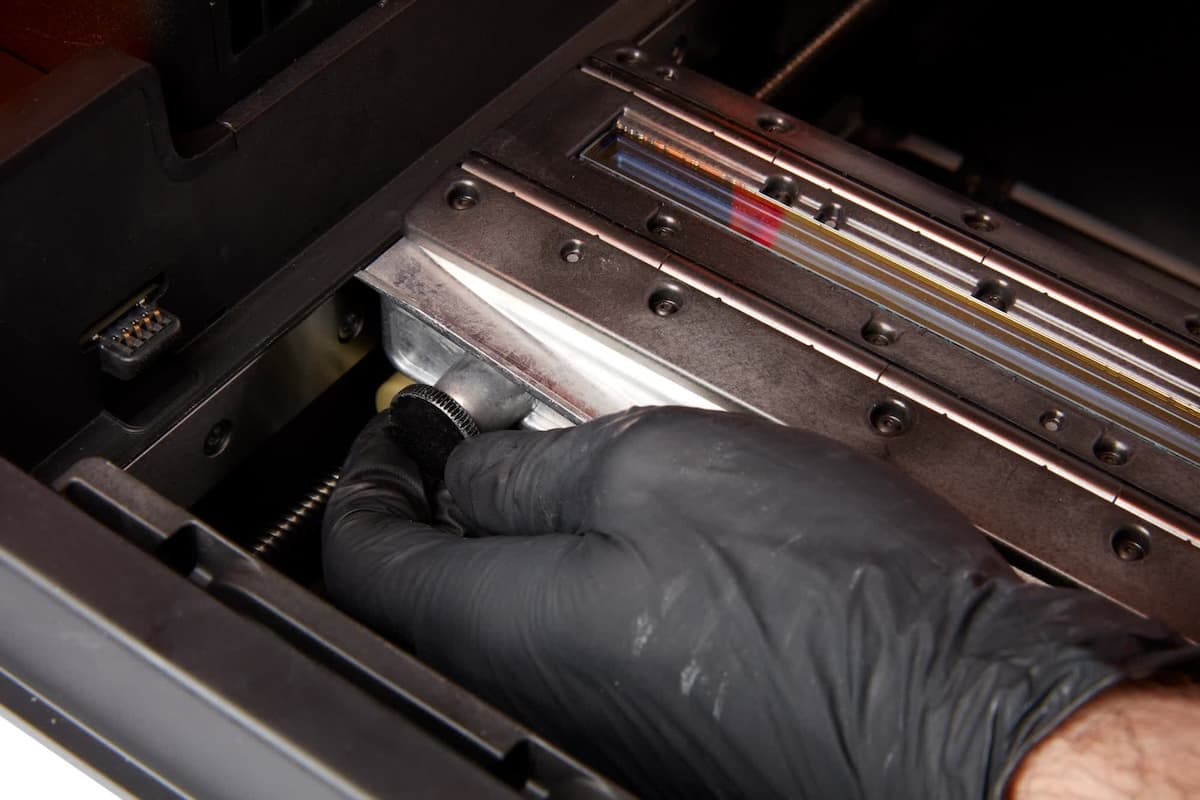
LPUの筐体の後ろ側にあるつまみネジを緩めます。つまみネジの最後の2つか3つの山は残した状態にしておきます。
ステップ3:LPUをLPUハウジングから取り外す
LPUの右側にあるプラスチックカバーを引っ張りながら、サムスクリューを押してLPUをLPUハウジングから外します。LPUの回路基板は引っ張らないようにしてください。
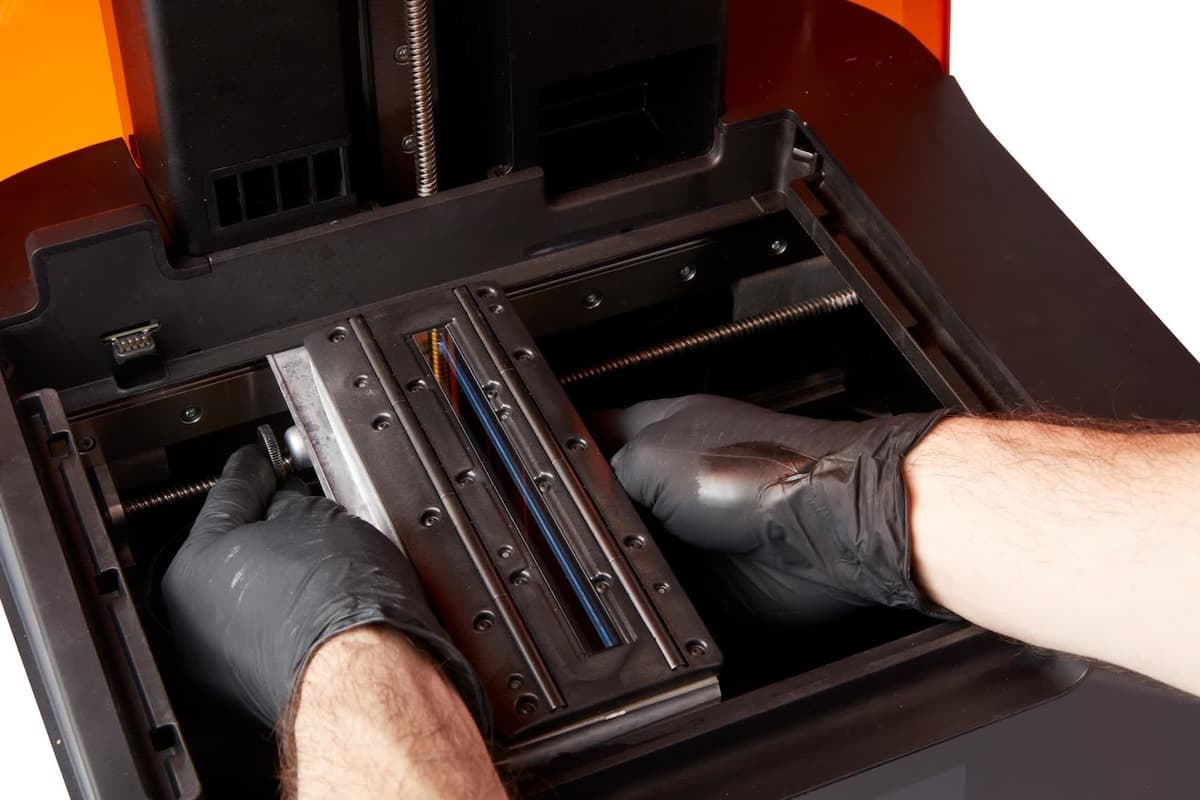
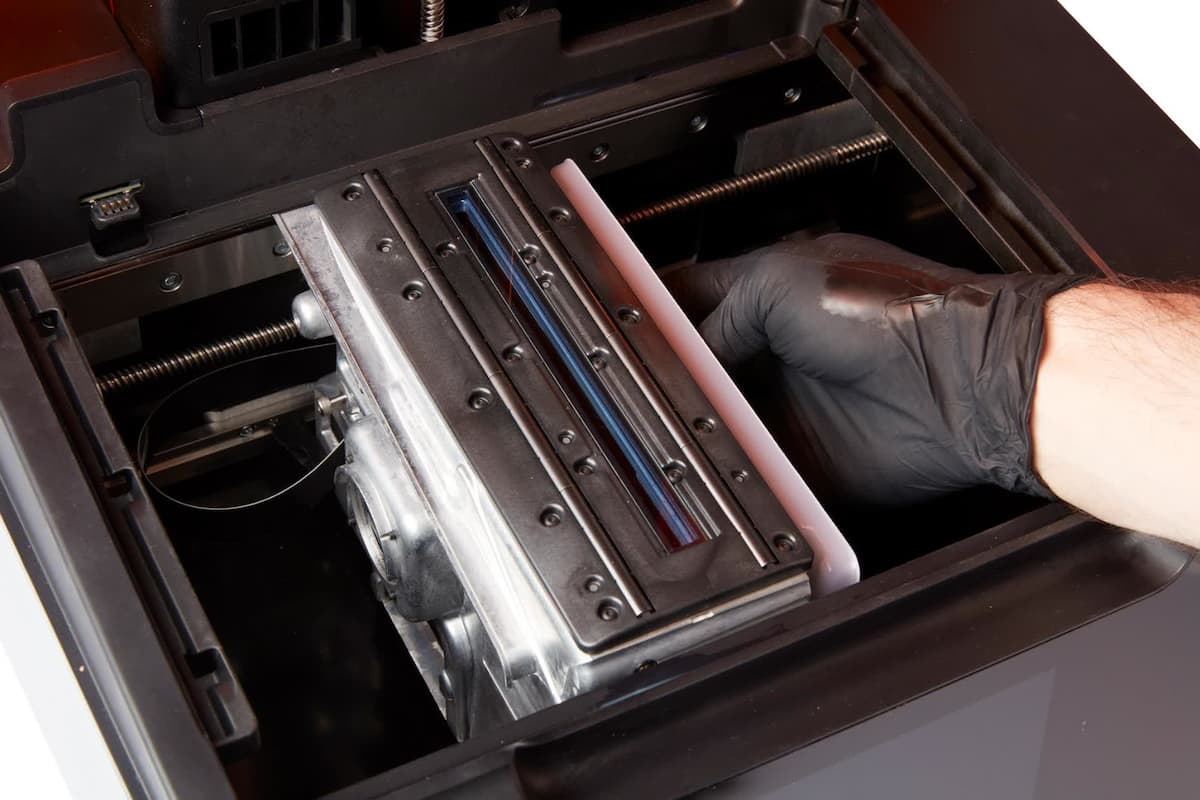
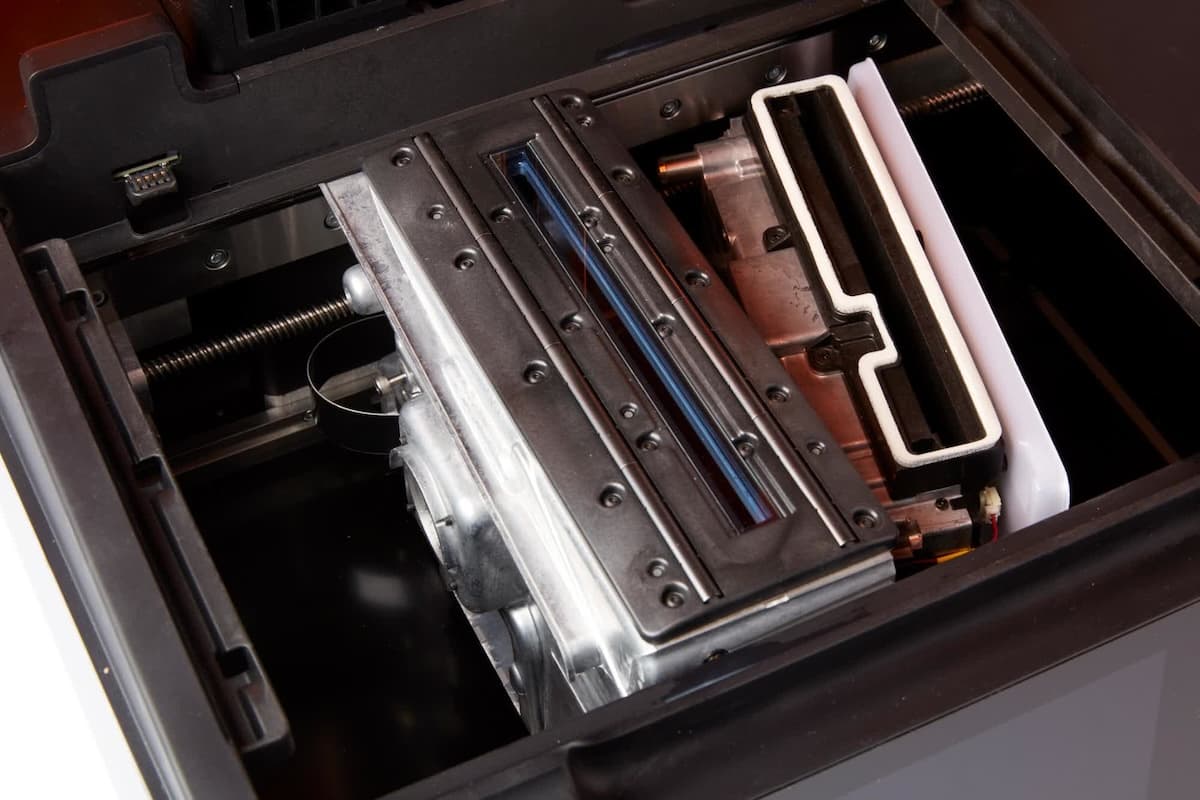
LPUを動かせる状態になれば、つまみネジを緩めて、取り外します。LPUが完全に自由になり、LPUの筐体の右側に寄せられるまで、プラスチックのガードを引っ張り続けます。
注意:
この時点でLPUを強く引っ張ったり、プリンターのキャビティから取り外そうとしたりしないでください。そうすれば、LPUをプリンタに繋いでいるケーブルが引き裂かれてしまう恐れがあります。
ステップ4:リボンケーブルを外す
LPUを前方に傾け、プリンターの前面に向けます。LPUの後ろ側に繋がっている黒いリボンケーブルが露わになります。
注意:
LPUリボンケーブルは繊細です。リボンケーブルを曲げたり、折ったりしないでください。損傷の原因になります。
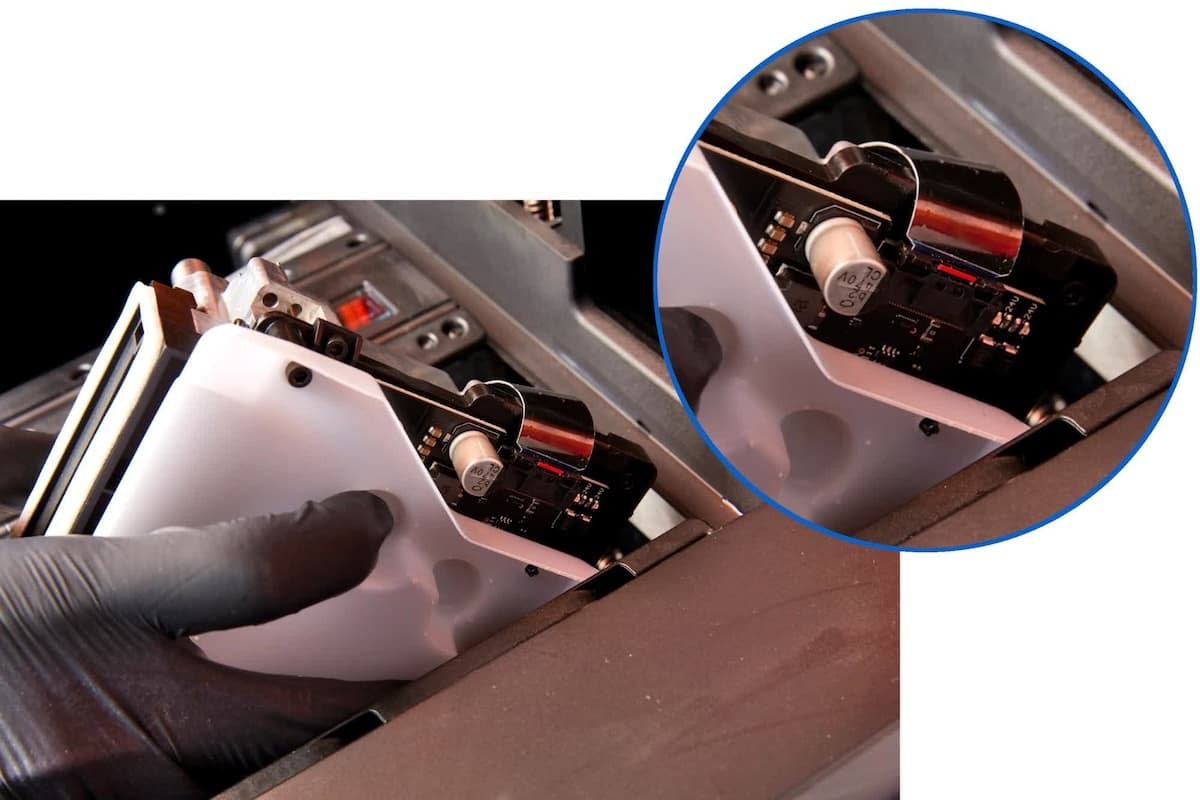
リボンケーブルのプラグのベース部分には小さなタブがあります。そのタブをプリンタの左方向(つまり、ケーブルの方向)にに押し、プラグを優しく引きながら、リボンケーブルをLPUから抜きます。例えば、ピンセットのような小さなプラスチックの工具を使ってタブを押す方が簡単かもしれません。
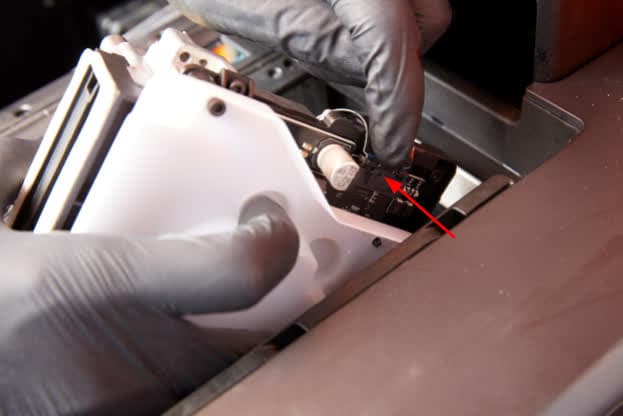
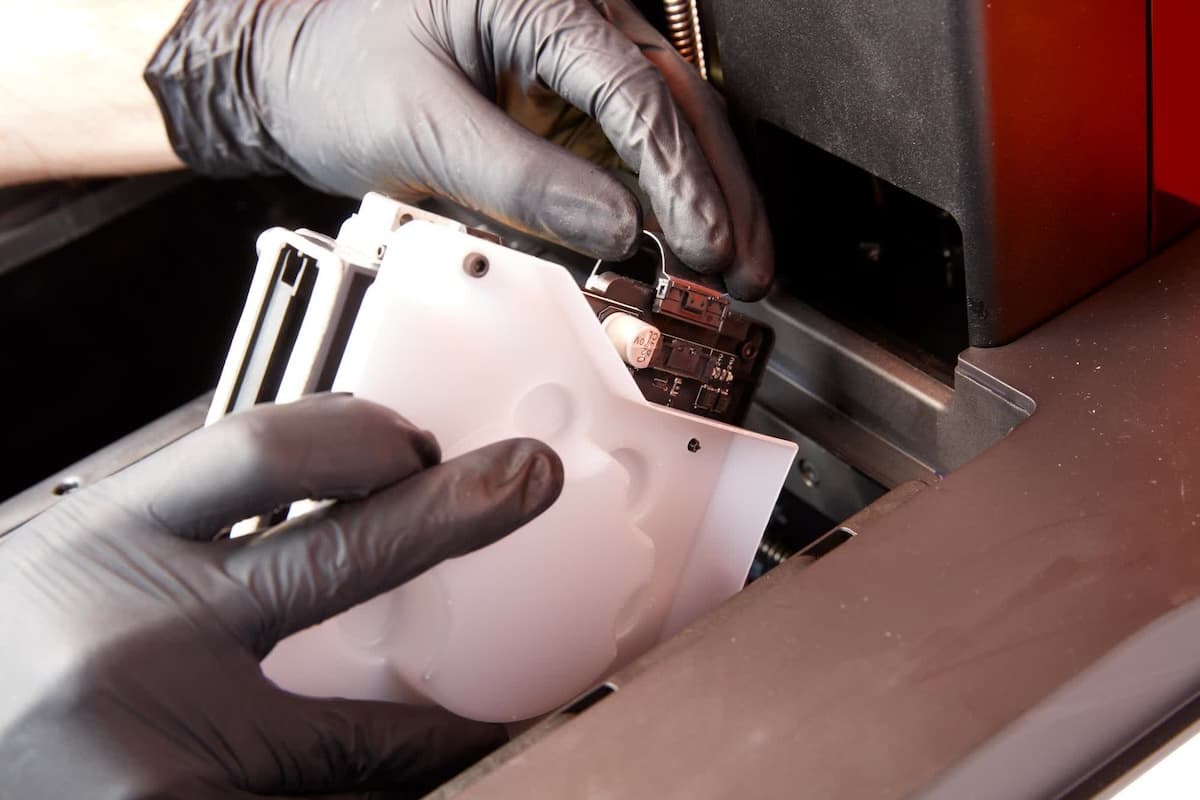
リボンケーブルはLPUの筐体内を通し、リボンケーブルコネクタが筐体の中に止まるようにします。そうしておけば、LPUの取り外し作業を続けている間、リボンケーブルが損傷しないように保護できます。
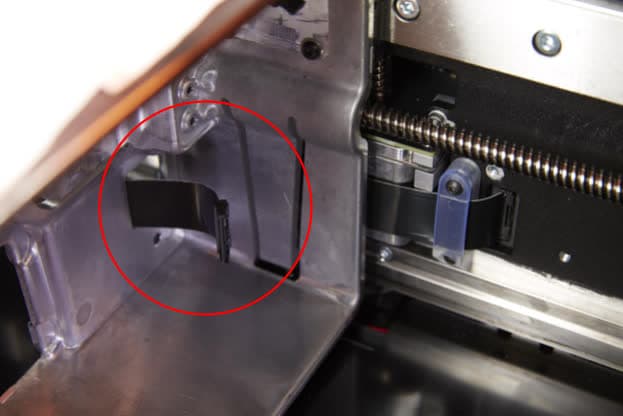
ステップ5:前面のケーブルを外す
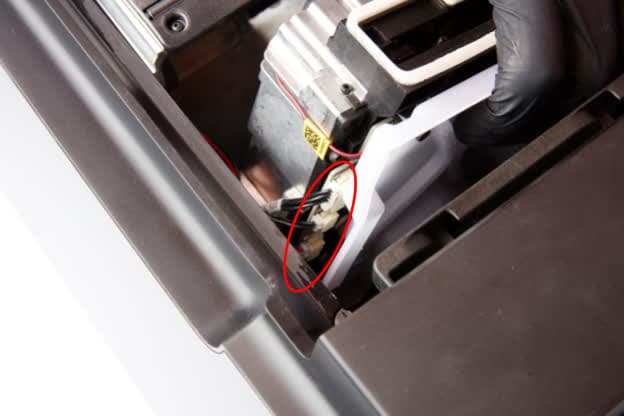
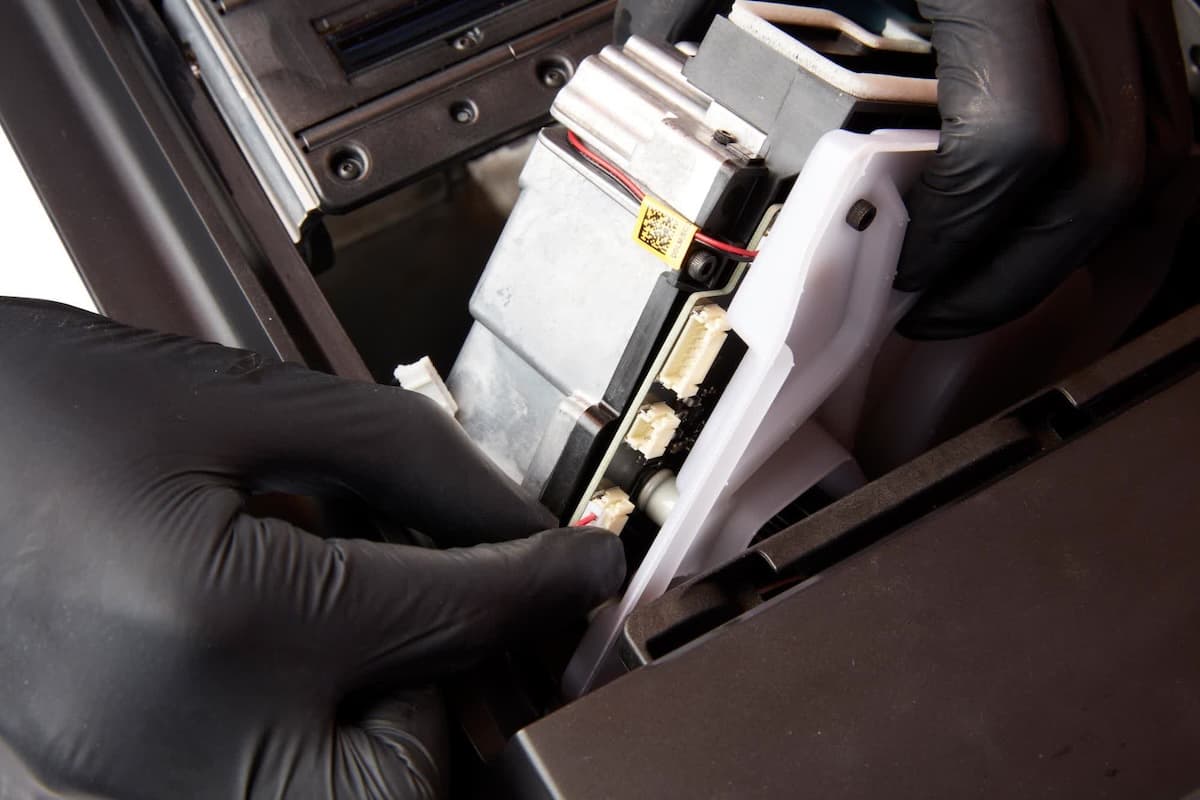
LPUを後ろ向きに(つまり、プリンタの後方に)傾けます。LPUの前側に繋がっている3本のリボンケーブルが露わになります。3本のケーブルのそれぞれのプラグを持ち、1本ずつ優しくLPUから引き抜きます。
ステップ6:LPUを取り外す
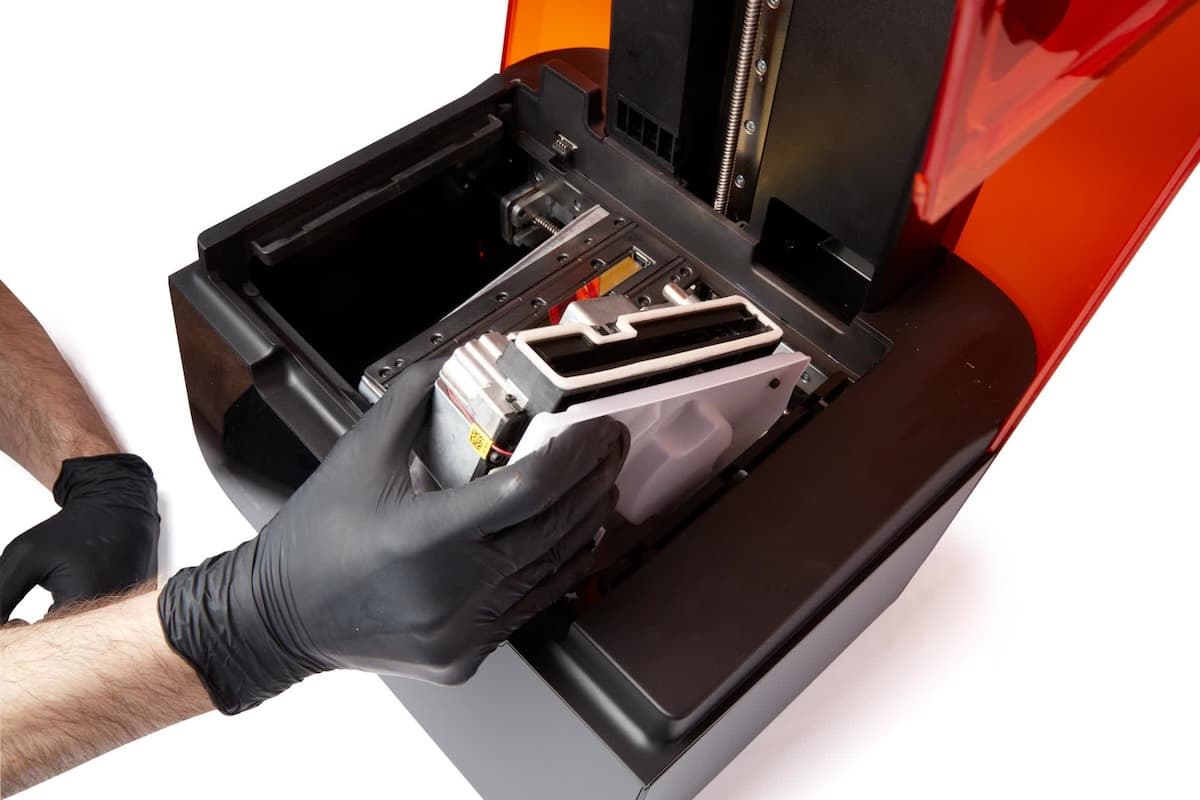
プリンタからLPUを取り外し、横に置きます。LPUにレジンが付着していれば、プリンタから離れた位置に敷いたペーパータオルの上にLPUを置き、プリンタの他の面がLPUに付着しているレジンで汚れないようにしてください。
オプション:LPUリボンケーブルの交換
概要:LPUの交換前または交換中にLPUリボンケーブルが損傷した場合は、リボンケーブルを取り外して交換してください。
ステップ1:リボンケーブルをプリンターから取り外す
付属の2mm六角ドライバーを使用して、LPUリボンケーブルの固定クリップをプリンターフレームに固定している2本の2mmネジを緩めて取り外します。
リボンケーブルのプラグのベース部分には小さなタブがあります。そのタブをプリンターの左方向(つまり、ケーブルの方向)にに押し、プラグを優しく引きながら、リボンケーブルをLPUから抜きます。例えば、ピンセットのような小さなプラスチックの工具を使ってタブを押す方が簡単かもしれません。
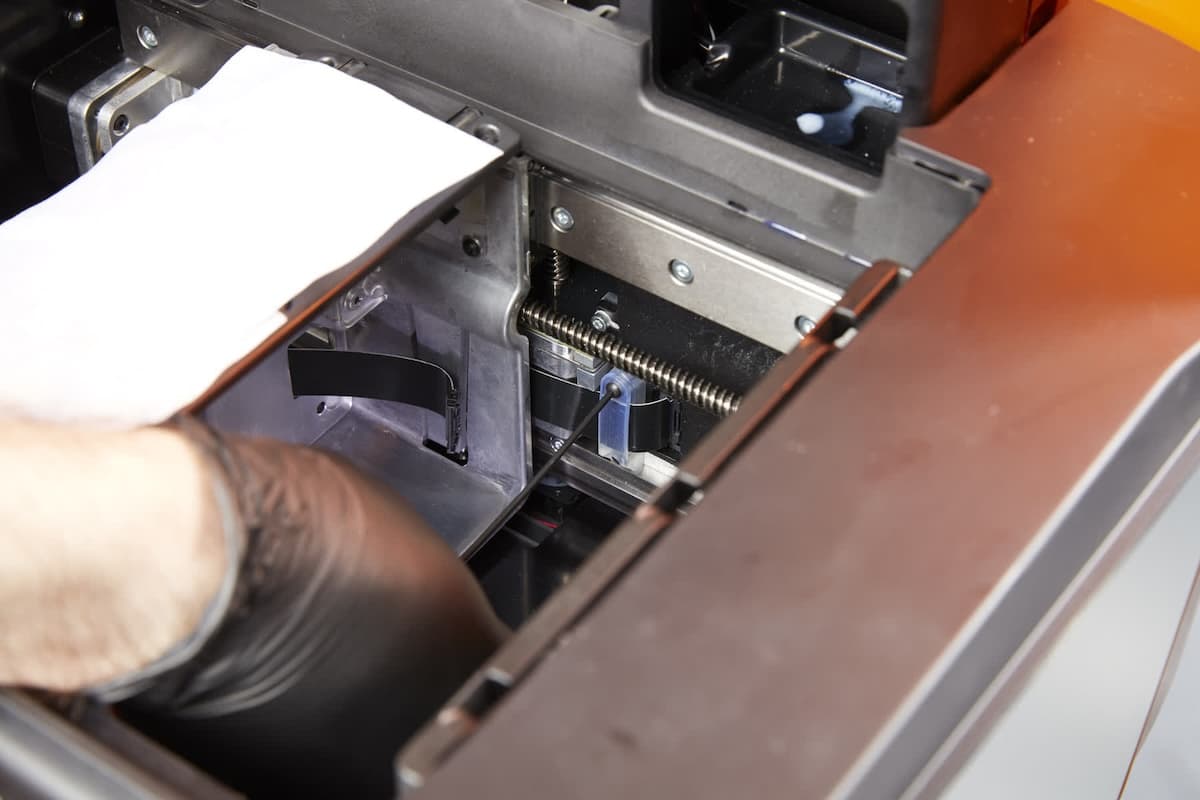
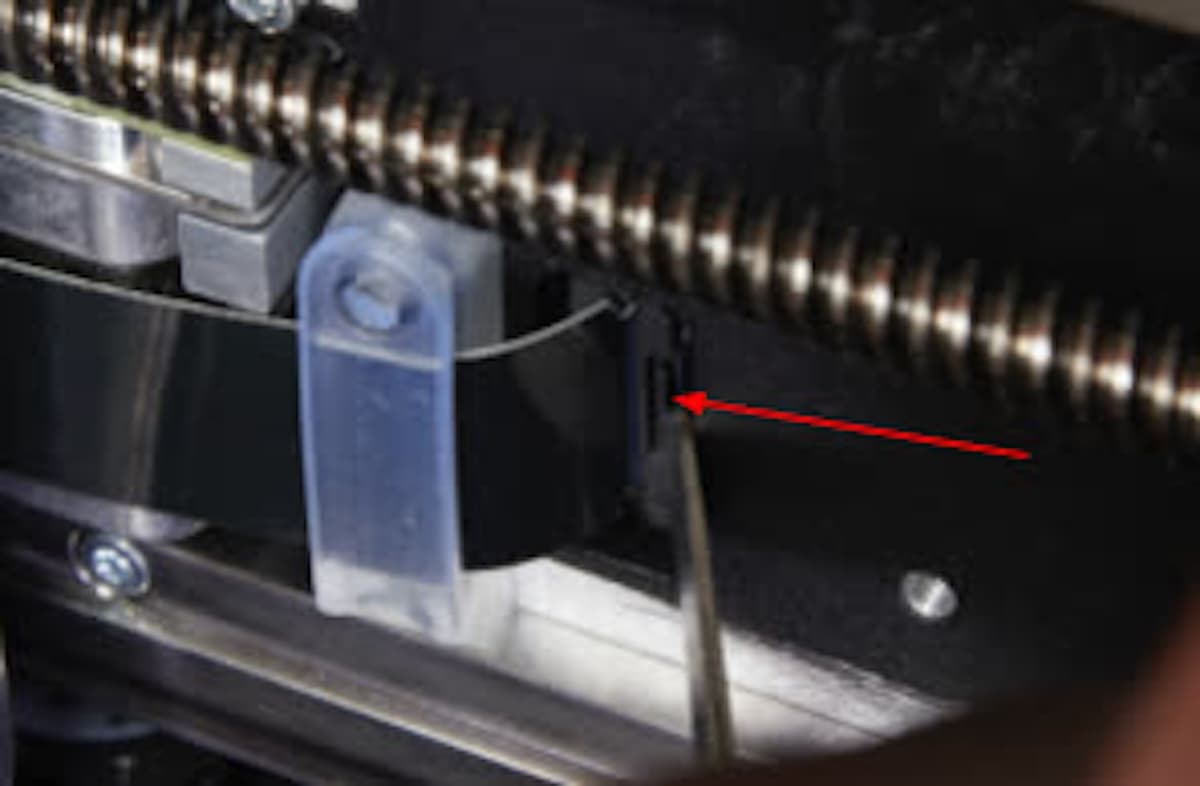
留めクリップをリボンケーブルから外し、横に置きます。
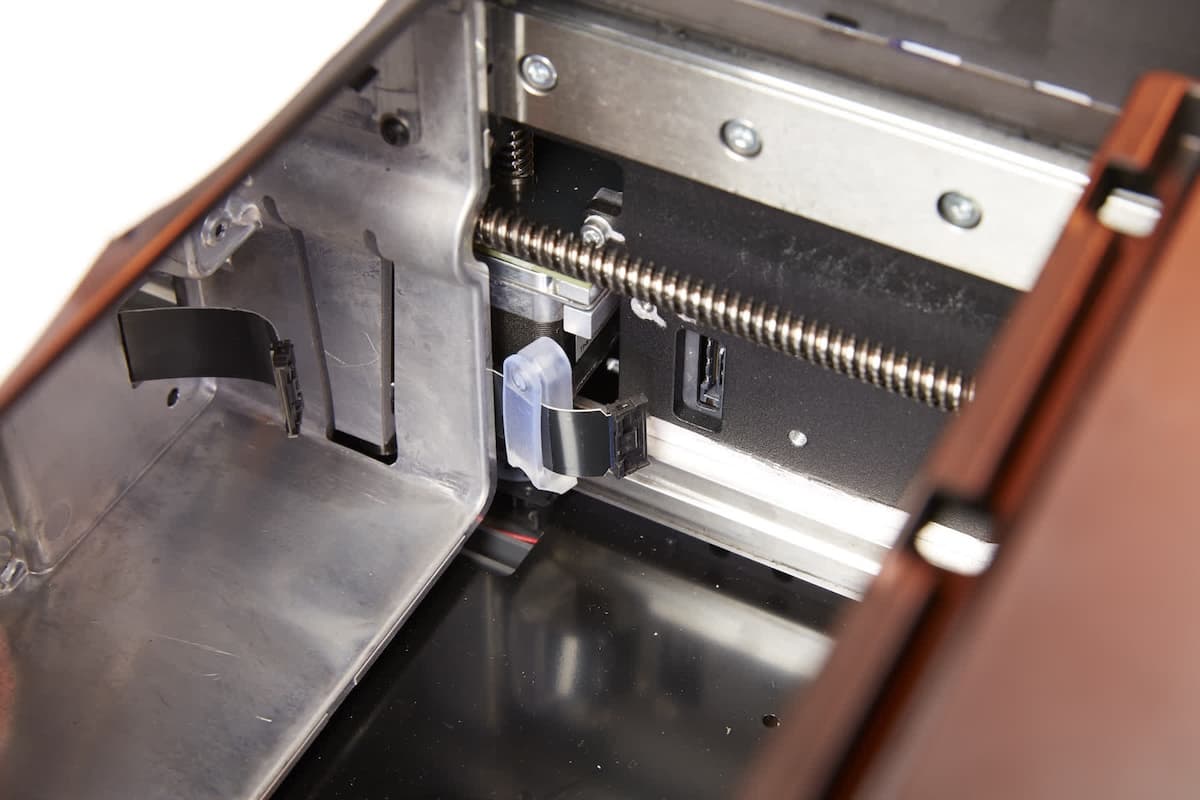
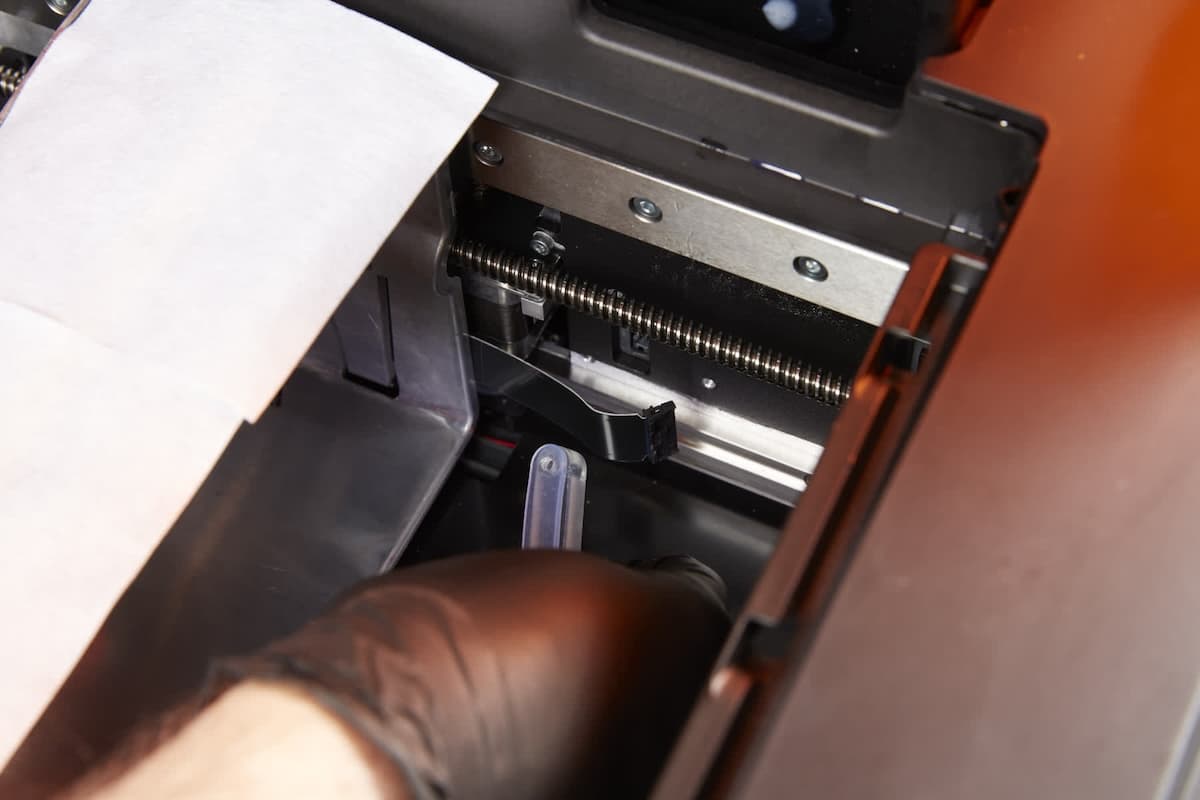
リボンケーブルをLPUの筐体とプリンタの後ろ側の間をゆっくり通し、プリンタから取り出します。
新しいリボンケーブルの一方の端に留めクリップを滑り込ませます。プリンター内の窪みにあるケーブルコネクタにリボンケーブルをつなぎ、ケーブルが完全に接続されていることを確認します。ケーブルは特定の一方向にしかプラグと接続できません。
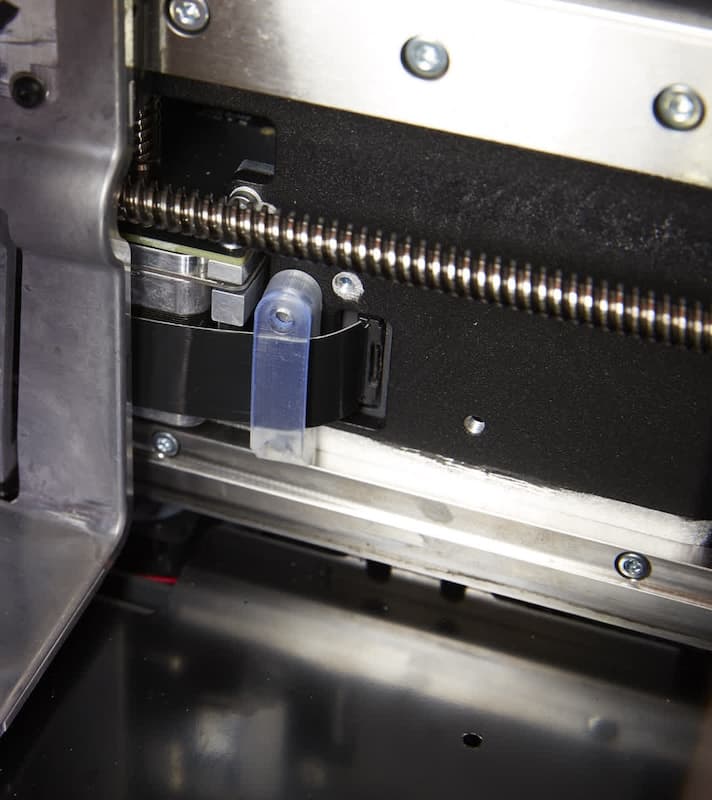
ステップ4:リボンケーブルをLPUの筐体に通す
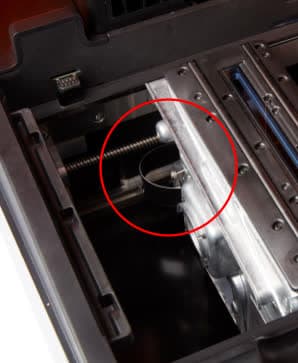
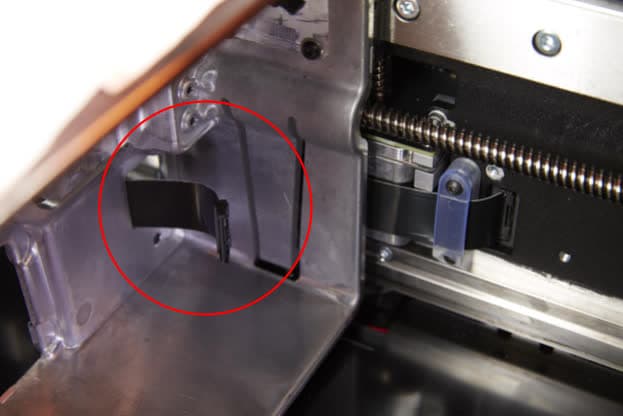
リボンケーブルの繋がっている方の端をLPUの筐体の左の裏側に通します。続いて、その端をLPUの筐体の左側に空いている小さな長方形の穴の中に通し、筐体内に戻します。
ステップ5:リボンケーブルを固定する
2mmの六角ネジ2本をリボンケーブル保持クリップに挿入し、プリンターフレームにねじ込みます。備品として提供されている2mmの六角ドライバを使って、両方のネジを隠れるぐらいまでしっかり締めます。
新しいLPUを取り付ける
概要:古いLPUを取り外した後、交換用LPUを接続して取り付けます。
ステップ1:LPUハウジングをクリーニングする
古いLPUにレジンが付着していた場合は、作業を続ける前にペーパータオルでLPUハウジングの内側をクリーニングしてください。レジンがこびり付いている場合は、必要に応じてイソプロピルアルコール(IPA)で湿らせたペーパータオルでこびり付いたレジンを溶かしながら拭き取ってください。
ステップ2:LPUを準備する
新しいLPUを梱包材から慎重に取り出します。この段階ではまだモジュールのカバーを外さないでください。新しいLPUを古いモジュールと同じ向きにしてプリンタ内に挿入します。
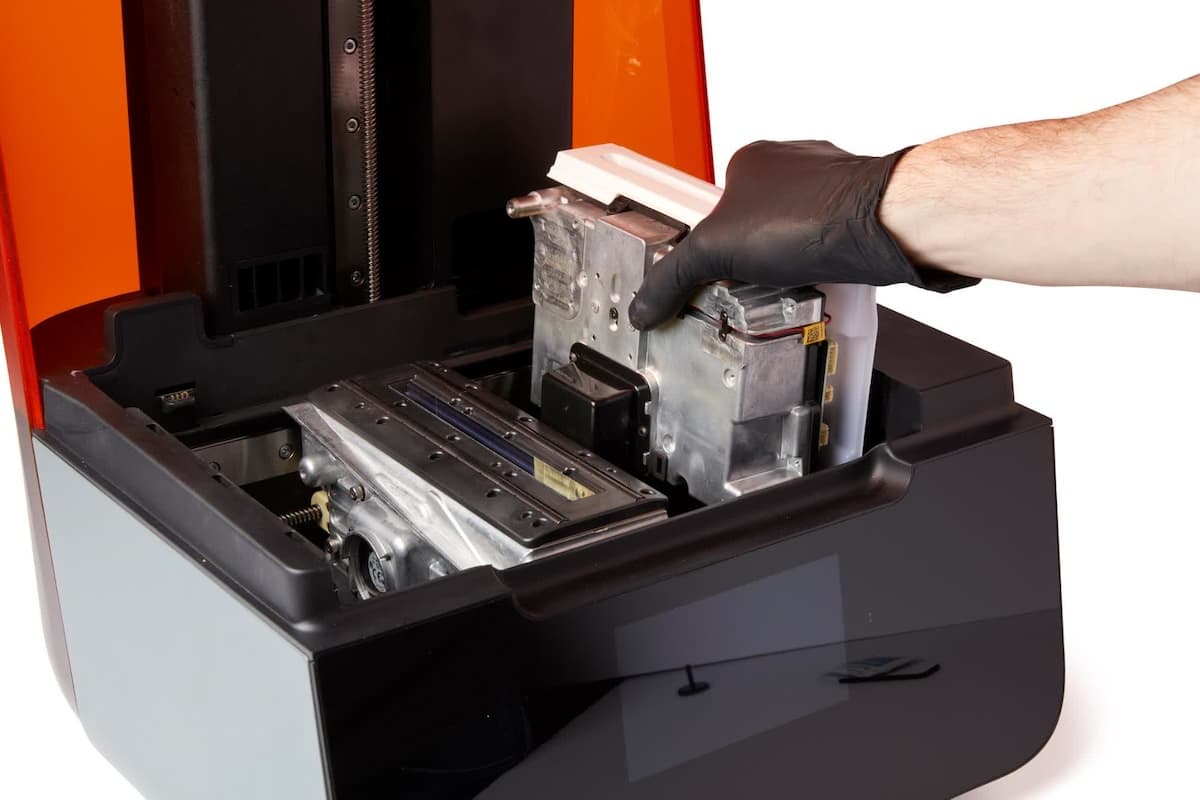
ステップ3:前面のケーブルを再接続する
LPUを後ろ向きに(つまり、プリンタの後方に)傾けます。LPUの前側に3本のリボンケーブルをしっかり繋ぎます。各プラグのサイズは異なっており、それぞれのサイズに合うコネクタにしか繋げないようになっています。
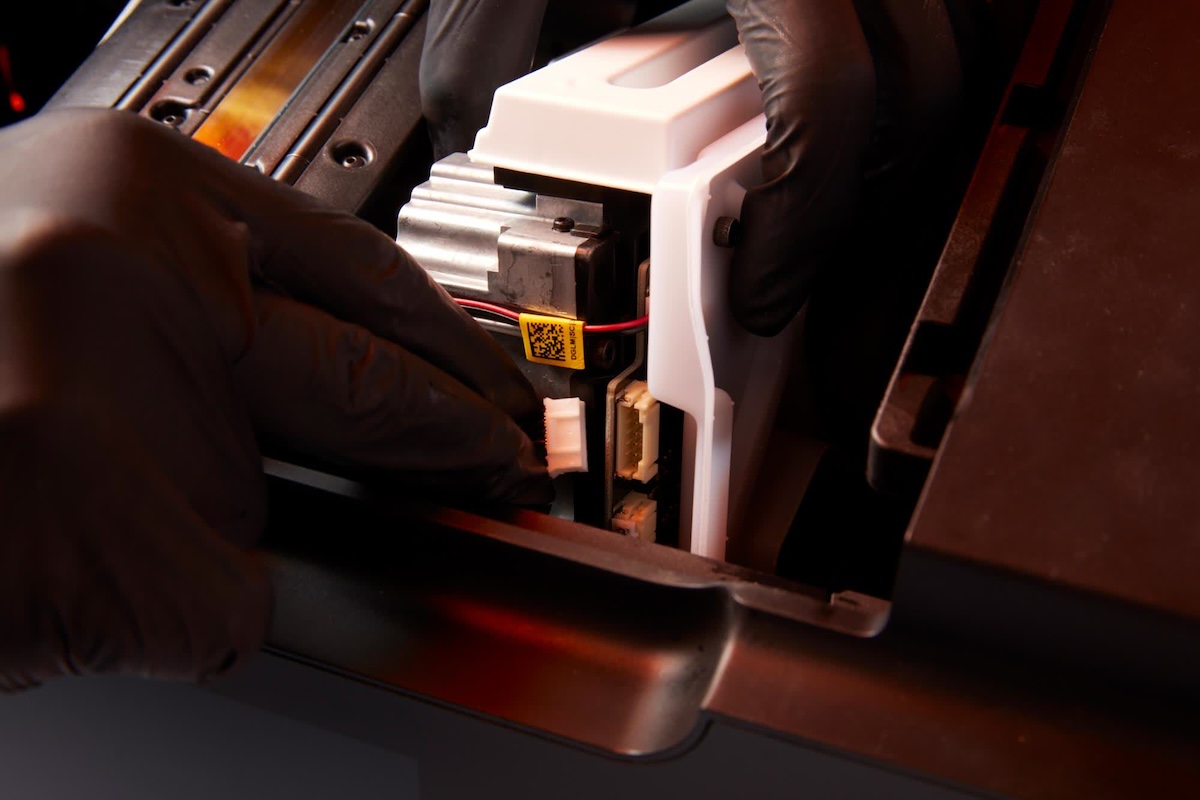
注意:
LPUのコネクタ内のピンを曲げないでください。
ステップ4:リボンケーブルを再接続する
LPUをプリンタの前方に傾けます。LPUの後ろ側にあるケーブルコネクタにリボンケーブルを繋ぎ直し、ケーブルが完全に接続されていることを確認します。
ステップ5:LPUをLPUハウジングに挿入する
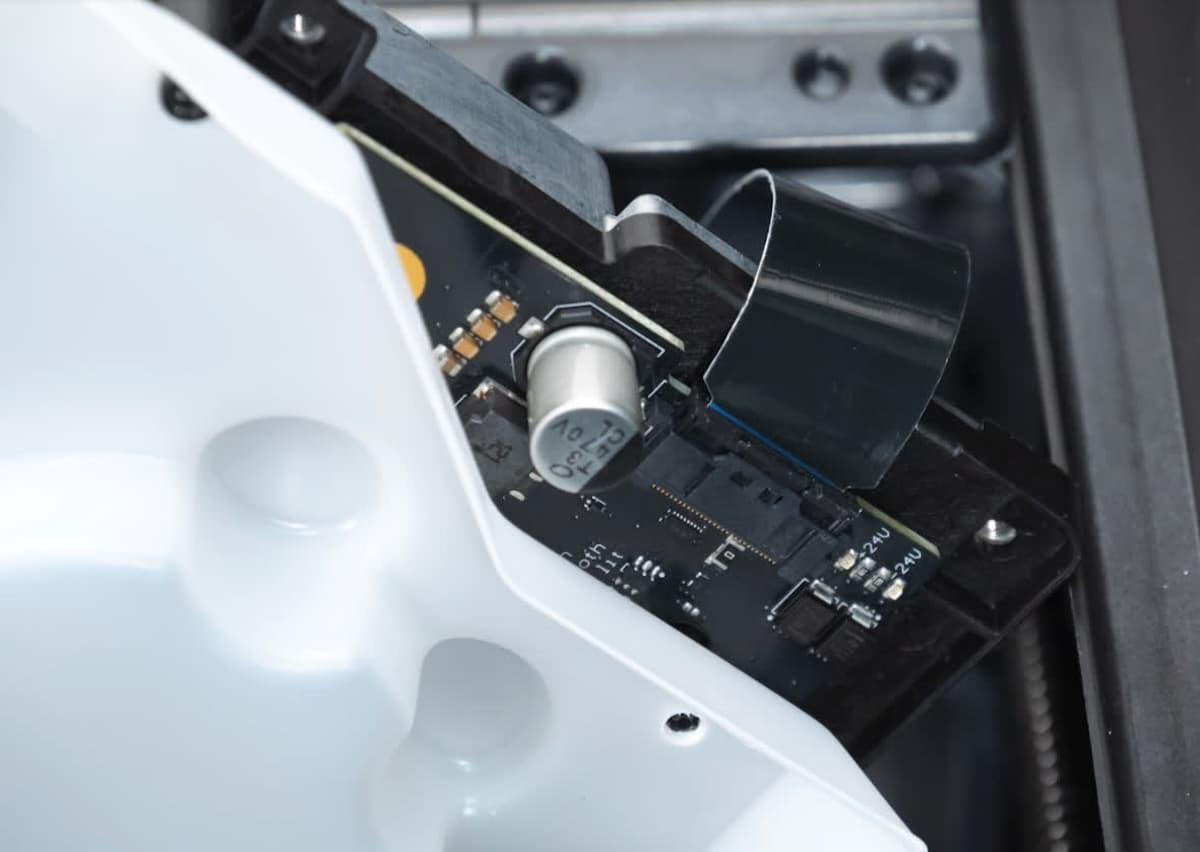
LPUのカバーを外します。リボンケーブルを優しくLPUの筐体の後ろ側を通しながら、LPUが定位置の方向に近づけるようにします。
注意:
LPUをハウジングに挿入する際、LPUのリボンケーブルを潰したり折り曲げたりしないようご注意ください。LPUのリボンケーブルが損傷すると、プリンターが正常に作動しなくなります。
前面のケーブルをLPUの筐体内にねじ込んだり、強く押し込んだりしないようにしてください。LPUの筐体の中には歯車などの可動部品が幾つもあります。こうした可動部品にケーブルが絡まると、プリンタが正常に作動しなくなり、修理が必要になります。
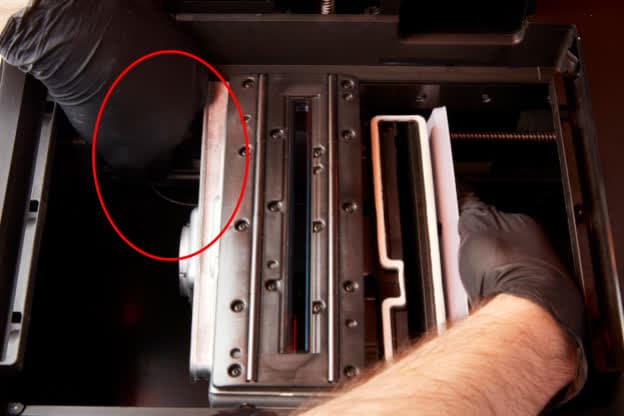
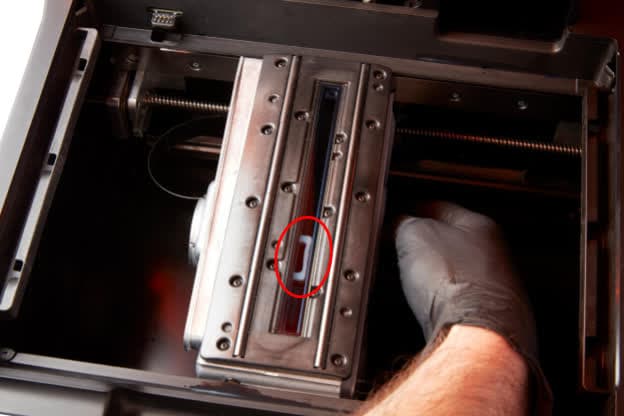
LPUの右側にあるプラスチックのカバーを押しながら、LPUを筐体の中に入れます。その際、カバーの下にある回路基板は押さないようしてください。LPUが定位置に着けた時、LPUの上部の周りの白いガスケットが、ローラーホルダーのレーザー窓越しからまだ見える場合があります。
ステップ6:LPUを固定する
LPUの筐体の左側にあるネジ穴につまみネジを通したら、そのネジを締めます。そのtまみネジを締めると、LPUが筐体内に更に引き寄せられます。LPUがしっかり定位置に着くと、白いガスケットが見えなくなっているはずです。
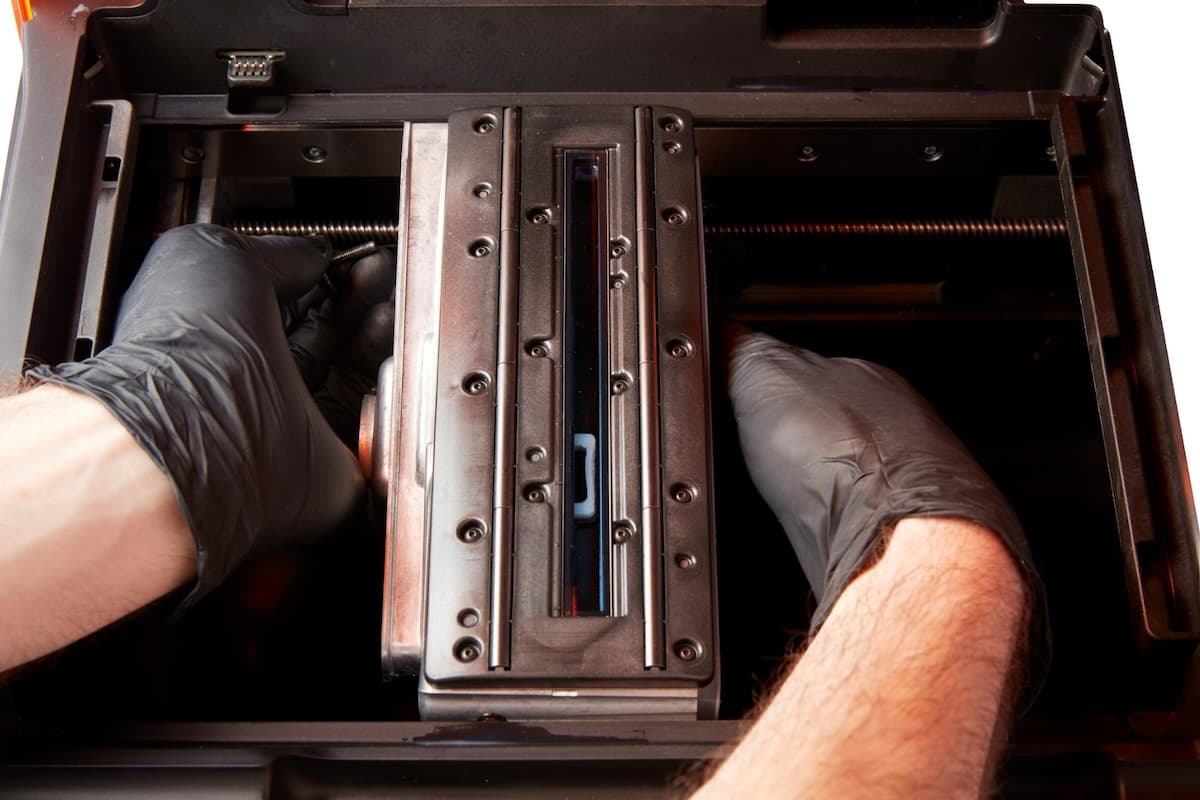
3本の六角ネジを手で締め、LPUにそれぞれねじ込まれていることを確認します。付属の六角ドライバーを使って六角ネジを指で回せなくなる程度まで締め付けます。ネジを締め付け過ぎないようにしてください。
六角ネジをすべて締め終わったら、つまみネジの締まり具合を確かめ、まだ締められる余地があるようなら、更に締め付けます。
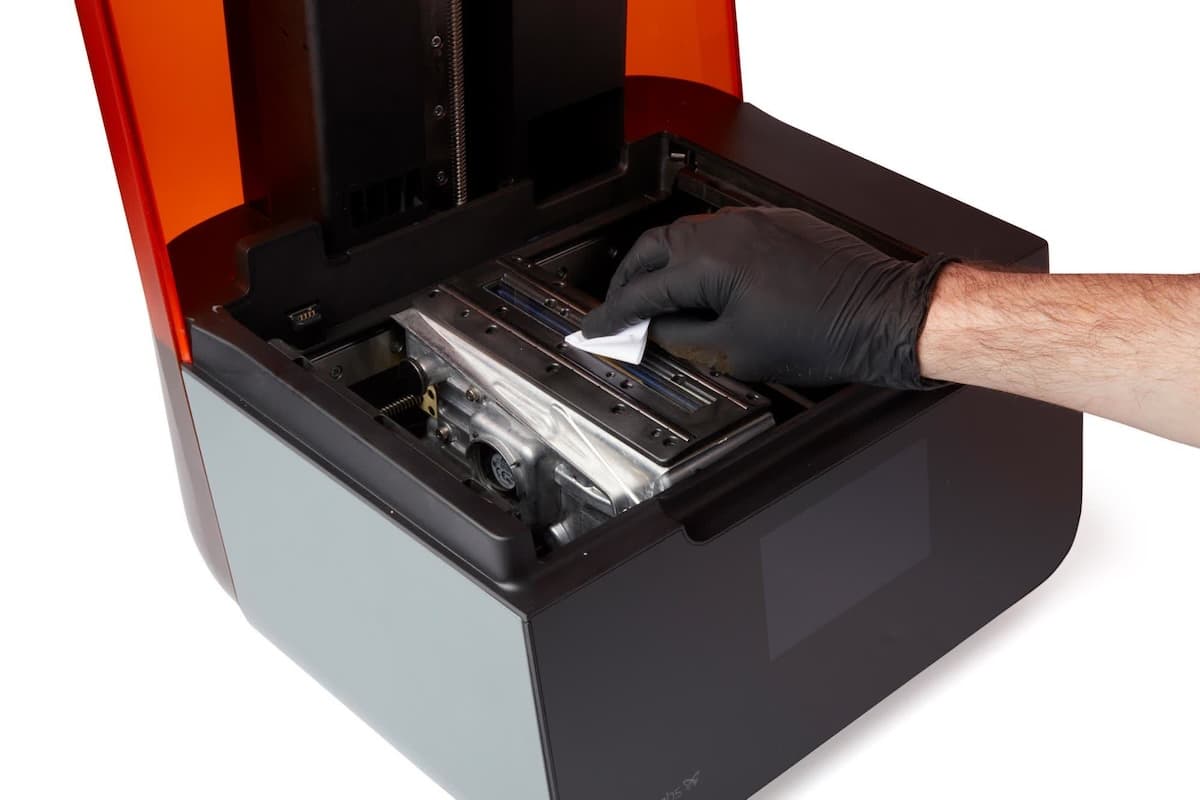
ローラーホルダーの光学窓に破片または染みが付いていないか点検します。窓が汚れていたら、備品として提供されているガラスクリーニング用のワイパーで汚れを取り除いてください。拭き取り方向は、光学ウィンドウの最奥側から手前の方向とします。全面がきれいになるまで、PEC*PADの面を変えて、同じ方向への拭き取り作業を繰り返します。
修理を完了する