WHITE PAPER
Formlabs Logo

Cleaning all powder out of a build chamber

Cleaning all powder out of a build chamber

Formlabs recommends using a new build chamber for each type of powder. Build chambers should be well-labeled with their dedicated powder. If you plan to reuse a build chamber with a different material, it is critical to fully clean all powder out of the build chamber first. You may need to clean the build chamber multiple times.

Note:

You do not need to clean your build chamber when switching between Nylon 12 Powder and Nylon 12 GF Powder or between Nylon 11 Powder and Nylon 11 CF Powder. If you are switching between any other two materials, continue following the cleaning steps below.

Warning:

Use appropriate personal protective equipment when handling loose or unsintered powder. Refer to the support articles Safety with Fuse 1 generation printers and Safety with the Fuse Sift for more information.

Notice:

Failing to clean out all powder before switching materials can lead to print failures or permanent damage to the machine. Read and understand all instructions in this article before proceeding.

Supplies:

  • Particulate filtering respiratory protection (N95 or better)
  • Non-reactive nitrile gloves
  • Safety glasses
  • Compressed air or gas duster
  • Compliant vacuum with static dissipative components, such as a Class II, Division 2 vacuum
    • Large brush attachment (included with the Fuse Sift)
  • Nylon brush
  • Non-abrasive microfiber cloth
  • Paper towels

Estimated time required: 30 minutes

Before cleaning

Prepare the build chamber and a dust-free work environment before starting the cleaning process.

Step 1: Collect necessary tools

Collect the required cleaning tools and put on personal protective equipment (e.g. respiratory protection, gloves, safety glasses).

Step 2: Empty the build chamber

If the build chamber currently contains a powder cake, use the Fuse Sift to empty the build chamber.

To empty the build chamber:

  1. Insert the build chamber into the Fuse Sift and close the build chamber latch.
  2. Connect the build chamber plug to the Fuse Sift.
  3. Check the build chamber status on the touchscreen. When the touchscreen displays the status Ready, push the Light button on the control panel. This turns on the light and vents the workspace.
  4. On the touchscreen, tap Unpack to lift the print bed and eject the cake.
  5. Remove the build chamber from the Fuse Sift to continue cleaning.

Cleaning the build chamber

After emptying the bulk of the powder from the build chamber, clean all surfaces thoroughly.

Step 1: Vacuum the build chamber

Vacuum the external surfaces of the build chamber and the print bed. Take care to vacuum all powder from surfaces.

Step 2: Clean under the gasket

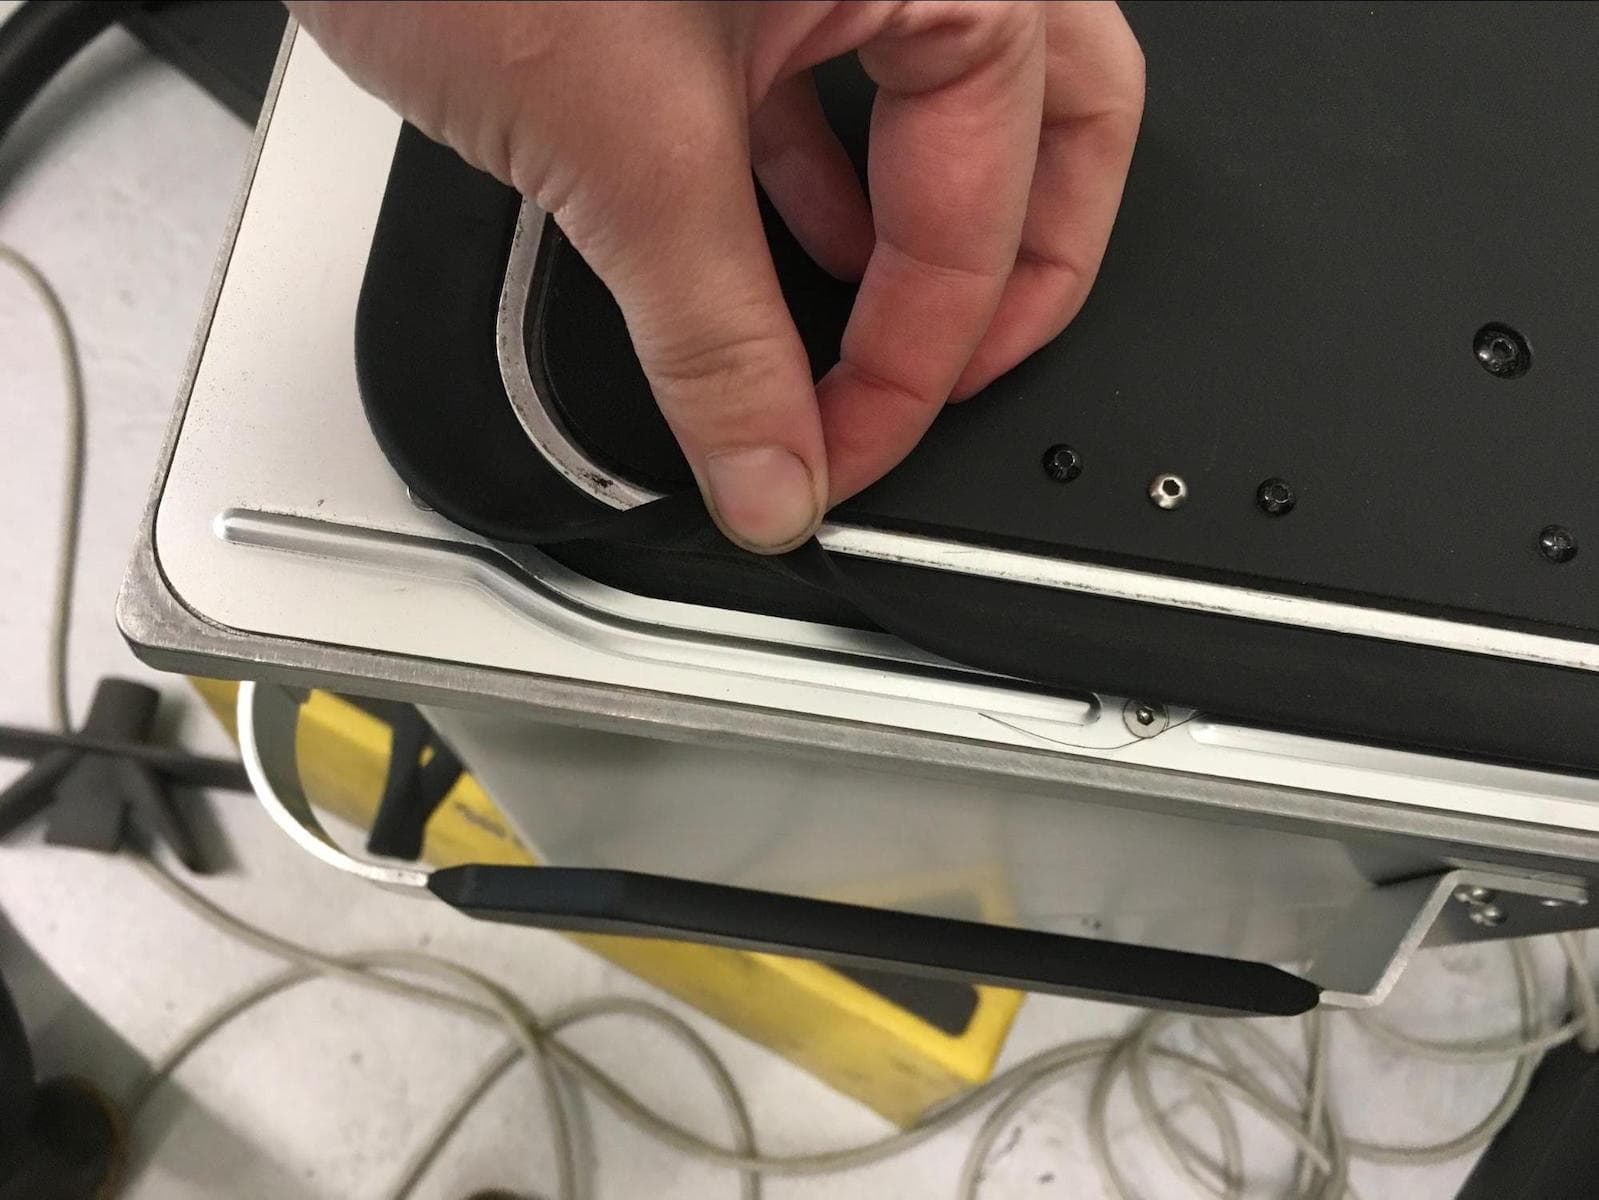
Gently lift the outside edge of the gasket that encircles the print bed. Vacuum any powder from underneath the gasket. Use compressed air or a gas duster as necessary to remove powder.

Notice:

When using compressed air or a gas duster to clean the machine, always keep the vacuum running to catch any mobilized powder.

Lifting the outside edge of the gasket around the print bed

Step 3: Clean the piston gap

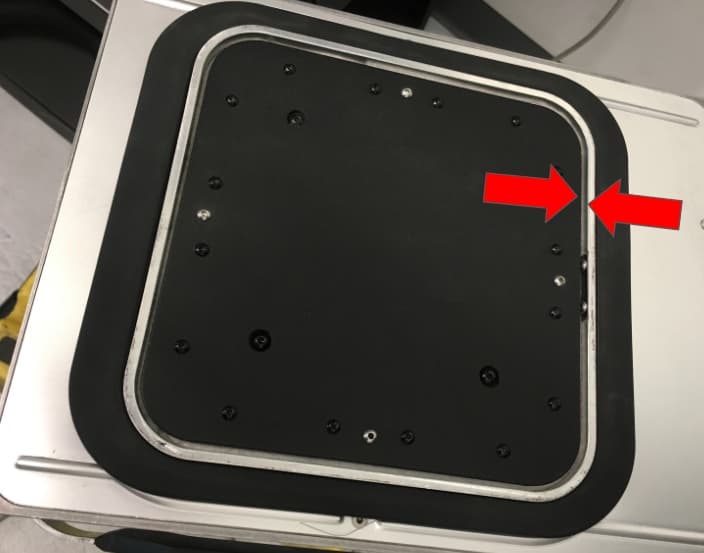
Use compressed air or a gas duster to blow out any powder from the gap between the print bed and the inner walls of the build chamber. Fully clean this space before continuing. This area often collects powder and can be difficult to clean. Failing to clean out all powder before switching materials can lead to print failures or permanent damage to the machine.

Cleaning the gap between the print bed and the inner walls of the build chamber

Step 4: Clean the inner walls

Lower the print bed to gain access to the inner walls of the build chamber.

To lower the print bed:

  1. Insert the build chamber into the Fuse Sift and close the build chamber latch.
  2. Connect the build chamber plug to the Fuse Sift.
  3. Press the (down arrow) button on the control panel. The print bed lowers.
  4. Remove the build chamber from the Fuse Sift to continue cleaning.

Use a vacuum with a brush attachment to clean the inner walls of the build chamber. Use a nylon brush if necessary to remove any residue or remaining powder.

Notice:

Only use a nylon brush to clean the inner walls of the build chamber. Metal brushes may scratch the walls.

Wiping the build chamber

Finish by wiping all surfaces on the build chamber with a clean microfiber cloth. If you used compressed air to clean the build chamber, powder may have settled on previously cleaned surfaces.

Step 1: Wipe the outer surfaces of the build chamber

Use a damp paper towel or microfiber cloth to wipe the build chamber’s outer surfaces until they are fully clean.

Step 2: Wipe the inner surfaces of the build chamber

Use a damp paper towel or microfiber cloth to wipe the build chamber’s inner surfaces until they are fully clean.

Replacing the print bed

Formlabs strongly recommends changing your print bed when cleaning your build chamber for use with a new powder.

  • When switching from a powder with a lower melting point, such as TPU 90A Powder or Polypropylene Powder, to a powder with a higher melting point, such as Nylon 12 Powder, reusing the print bed may result in damage to the build chamber.
  • Residual powder can contaminate your next print, leading to discoloration or parts with reduced mechanical properties.

The print bed for Fuse 1 generation build chambers is available for purchase on the Formlabs Store. To replace the print bed, follow the instructions in Replacing the Fuse 1 generation print bed [EN] [DE] [ES] [FR] [IT] [JA] [ZH]. Contact Formlabs Support or your certified service provider for more information.

Next steps

After re-inspecting all surfaces and confirming that all powder has been removed from the build chamber, the cleaning procedure is complete.

If you cleaned the build chamber in order to switch materials, it can now be used for a print with the new material. Continue watching for signs of contamination, such as streaking or discoloration from mixed powder types. If signs of contamination are present, dispose of any contaminated powder and repeat the cleaning steps above.