Tipp:
Prüfen Sie den Wartungsplan für Drucker der Generation Fuse 1 , bevor Sie mit dem Drucken beginnen, um optimale Ergebnisse zu erzielen.


Dieser Leitfaden veranschaulicht die verschiedenen Bauteile der Drucker Fuse 1 und Fuse 1+ 30W, die Ersteinrichtung und wie man einen Druck startet. Weitere Informationen finden Sie in der Bedienungsanleitung und der Sicherheitsdokumentation .
Tipp:
Prüfen Sie den Wartungsplan für Drucker der Generation Fuse 1 , bevor Sie mit dem Drucken beginnen, um optimale Ergebnisse zu erzielen.
Fuse-1-Generation: Onboarding- und Schulungsvideos
Produktkomponenten
Fuse 1+ 30W
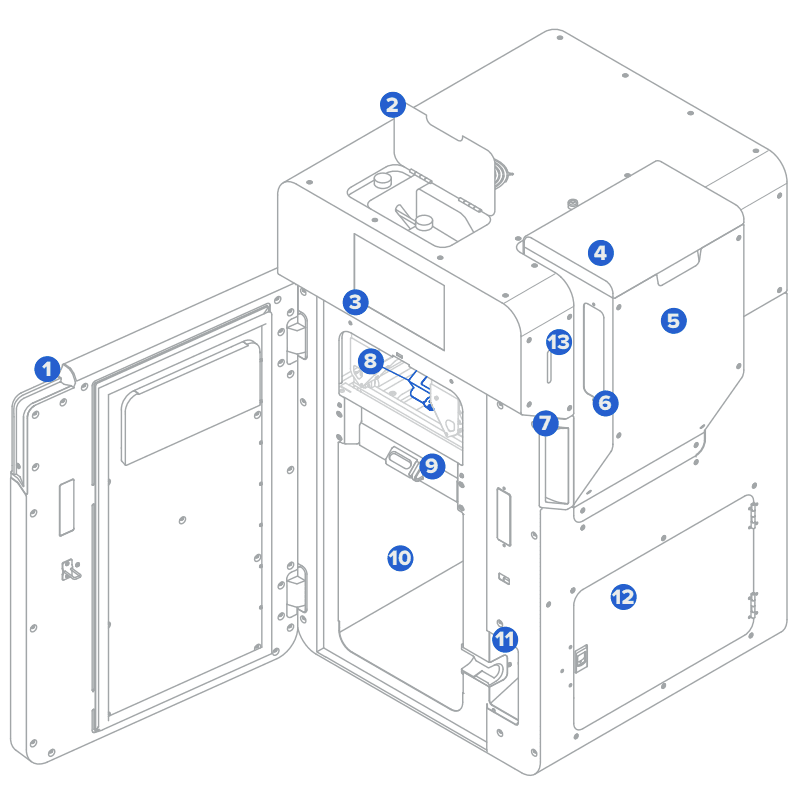
① Tür des Druckgehäuses: Ermöglicht den Zugriff auf das Druckgehäuse und das Fach der optischen Kassette.
② Tür des IR-Sensors: Ermöglicht den Zugriff von oben auf den IR-Sensor und den Pulver-Kartenleser.
③ Touchscreen: Die kapazitive LCD-Touch-Benutzeroberfläche zeigt Druckinformationen, Einstellungen und Fehlermeldungen.
④ Einfülltrichterdeckel: Verhindert, dass Schmutz in den Einfülltrichter gelangt und Pulver aus dem Einfülltrichter austritt.
⑤ Einfülltrichter: Speichert bis zu 9 kg Pulver für den Druck.
⑥ Einfülltrichterfenster: Ermöglicht die Sichtprüfung des Pulverstands im Einfülltrichter.
⑦ Türgriff: Eine Griffmulde, die das Schließen der Tür erleichtert.
⑧ Kassettenfach: Hält die optische Kassette an ihrem Platz.
⑨ Konstruktionskammerverriegelung: Sichert eine Konstruktionskammer.
⑩ Druckgehäuse: Beherbergt die Konstruktionskammer und das optische System für den Druck.
⑪ Konstruktionskammerschacht: Verbindet den Stecker der Konstruktionskammer.
⑫ Filterkabinettür: Abgedichtete Tür für den Zugang zu den Einlass- und Abluftfiltern.
Fuse 1
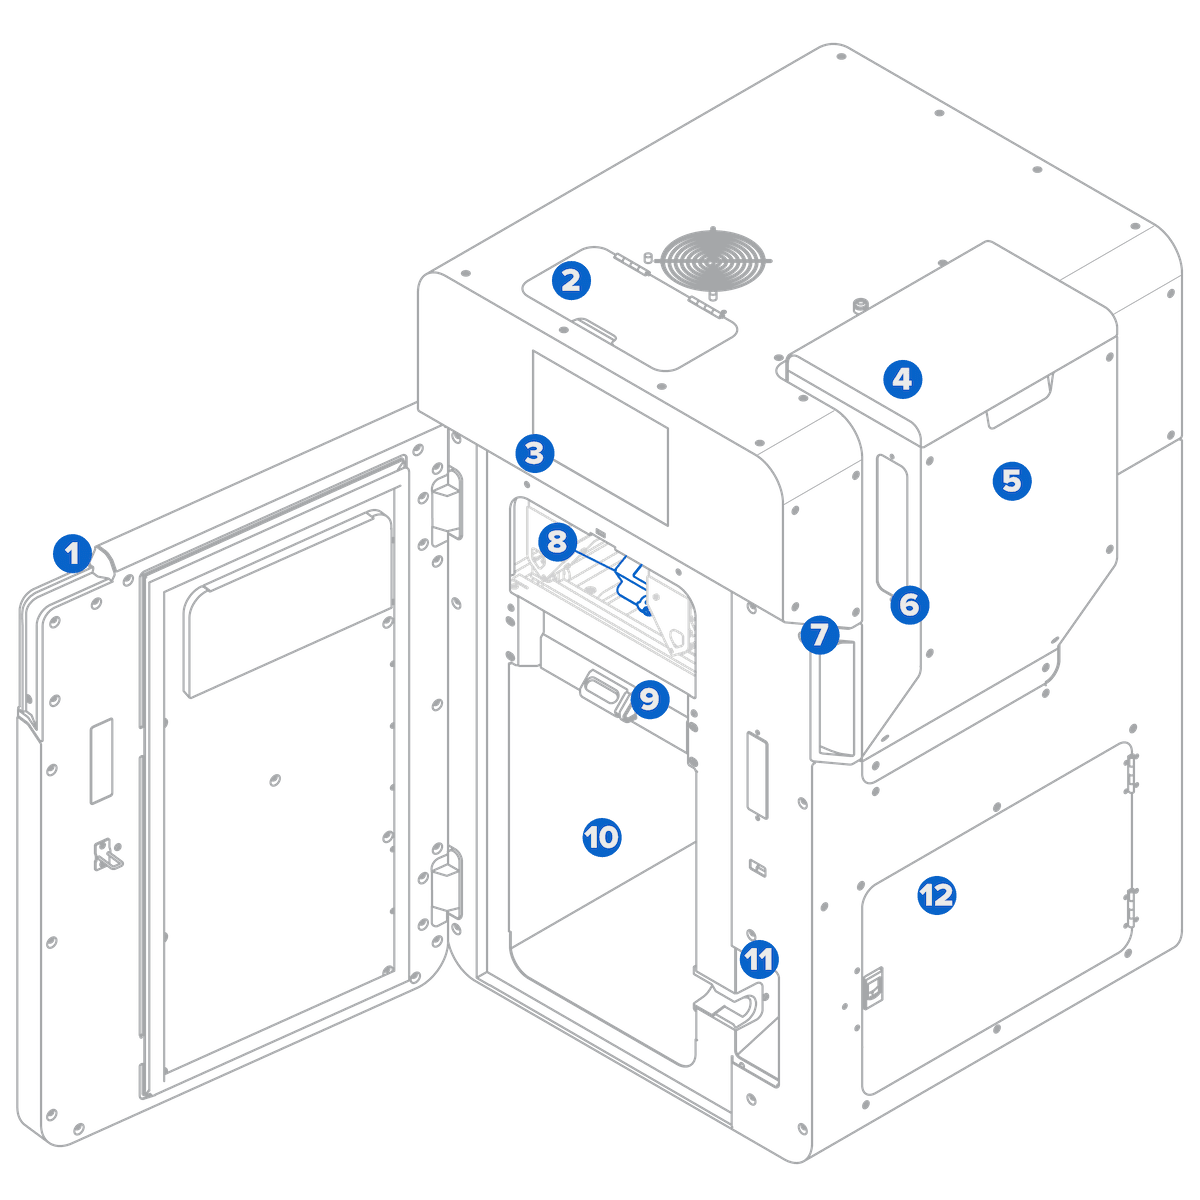
① Tür des Druckgehäuses: Ermöglicht den Zugriff auf das Druckgehäuse und das Fach der optischen Kassette.
② Tür des IR-Sensors: Ermöglicht den Zugriff von oben auf den IR-Sensor und das Stickstoffdruckregelventil.
③ Touchscreen: Die kapazitive LCD-Touch-Benutzeroberfläche zeigt Druckinformationen, Einstellungen und Fehlermeldungen.
④ Trichterdeckel: Verhindert, dass Schmutz in den Trichter gelangt und Pulver aus dem Trichter austritt.
⑤ Trichter: Speichert bis zu 14,5 l Pulver für den Druck.
⑥ Trichterfenster: Ermöglicht die Sichtprüfung des Pulverstands im Trichter.
⑦ Türgriff: Eine Griffmulde, die das Schließen der Tür erleichtert.
⑧ Kassettenfach: Hält die optische Kassette an ihrem Platz.
⑨ Verriegelung der Konstruktionskammer: Sichert eine Konstruktionskammer.
⑩ Druckgehäuse: Beherbergt die Konstruktionskammer und das optische System für den Druck.
⑪ Buchse der Konstruktionskammer: Verbindet den Stecker der Konstruktionskammer.
⑫ Tür des Filterfachs: Abgedichtete Tür für den Zugang zu den Einlass- und Auslassfiltern.
⑬ Kartenschlitz für Pulverkarte: Schlitz zum Einsetzen von Pulver-Kreditkarten.
Auspacken
Vorsicht:
Bewegen oder transportieren Sie den Fuse 1 in Anbetracht seiner Größe und seines Gewichts niemals allein. Falls das Gerät umpositioniert werden muss, sollten mindestens zwei Personen die mitgelieferten Tragegurte verwenden.
Wird installiert

Hinweis:
Ein Drucker der Fuse-1-Generation erfordert eine Betriebsumgebung mit geringer Umgebungsluftfeuchtigkeit und niedriger statischer Elektrizität. Aufgrund der empfindlichen Komponenten und des Druckmediums können Zuverlässigkeit und Druckqualität Schwankungen unterliegen, falls sich die Umgebungstemperatur oder die Luftfeuchtigkeit außerhalb der angegebenen Bereiche befinden. Die empfohlene Betriebsumgebung finden Sie im Supportartikel über die Vorbereitung des Arbeitsbereichs . Falls Sie die Außenverkleidung des Geräts bei Wartungs- oder Testarbeiten entfernen, erden Sie das Gerät über den mit dem Erdungssymbol gekennzeichneten Erdungsbolzen.
Verbindung
Vorbereitung auf den Einsatz
Nächste Schritte
Sobald Sie Ihren Drucker der Generation Fuse 1 eingerichtet haben, laden Sie PreForm auf Ihren Computer herunter und bereiten sich auf Ihren ersten Druck vor.
Lesen Sie nach der Installation von PreForm die Supportartikel über die Verwendung von PreForm und das Designen erfolgreicher 3D-Modelle , um mehr über die Software und die Vorbereitung von Modellen für den Druck auf Formlabs-SLS-Druckern zu erfahren.
Wenn Sie PreForm zum ersten Mal verwenden, wird ein Onboarding-Tutorial angezeigt, das Sie durch die Funktionen der Software führt. Klicken Sie auf Help > Show Onboarding Tutorial (Hilfe > Onboarding-Tutorial anzeigen), um diese Informationen jederzeit erneut abzurufen.
Hochladen eines Druckauftrags auf das Gerät und Starten des Drucks über den Touchscreen. Nachdem die Konstruktionskammer vollständig abgekühlt ist, entfernen Sie sie aus dem Drucker und bringen Sie sie zum Fuse Sift, um Ihre Drucke zu entnehmen und zu reinigen. Übertragen Sie nach dem Entpacken des Pulverkuchens im Fuse Sift Ihre Druckteile zum Reinigen und Abschleifen in den Fuse Blast .
Weitere Ressourcen