
ヒント:
詳細や歯科用CADの設定については、サポート記事Printing crown and bridge models with Model Resin(Model Resinでクラウンやブリッジのモデルを造形する)をご参照ください。

Formlabsの3Dプリンタは、精度を重視して設計されています。Formlabs製のプリンタはいずれも厳密な較正を経て工場から出荷されており、通常はオンサイトでの較正は必要ありません。FormlabsはForm 3およびForm 3Bに、極めて高い精度が求められる用途にも対応できるようにするために、寸法適合性を最適化する設定が追加されました。
フィットチューニングは、用途に応じて造形したパーツのフィット感をさらに調整できるようにする機能です。Form 3とForm 3Bで造形された部品の精度を向上させるために、FormlabsはX軸とY軸の寸法適合性を調整するための設定を追加しました。この値を増減させることで、造形時の水平方向の伸びを補正し、歯科修復用の金型などの最終部品のフィット感を向上させることができます。
ヒント:
詳細や歯科用CADの設定については、サポート記事Printing crown and bridge models with Model Resin(Model Resinでクラウンやブリッジのモデルを造形する)をご参照ください。
Complete the following steps to tune your printer for fitment:
備考:
フィットチューニングは、一貫した性能と安全性を確実に維持する必要がある生体適合性の材料が使われている場合は実施できません。
備考:
フィットチューニングは、現在まだModel Resin V3を使って、積層ピッチを100ミクロンに設定して造形したパーツでのみ実行できるベータ版の機能です。他のレジンや別の積載ピッチの設定でフィットチューニングを実施する場合、調整後の造形物の性能検証はお客様の責任で行ってください。
テストファイルのデータで造形する
プリンタの準備ができたら、テストファイルをダウンロードし、そのデータをPreFormからお使いのプリンタに造形ジョブとして送信します。
備考:
この機能は、最新のファームウェアとPreFormのバージョンでのみ利用可能です。Form 3/Form 3Bのファームウェアのバージョンが1.16.0以降であること、そしてお使いのコンピュータにPreFormバージョン3.21.0以降がインストールされていることを確認してください。
Prepare your printer
Before printing the test file, ensure the printer is using the latest firmware and has a well-maintained tank inserted.
Prepare the model in PreForm
Open the test file in the latest version of PreForm.
The exact material and layer thickness settings selected here will be the only material and layer thickness affected by the final Fit Tuning adjustment. For example, if you print the test file in Model Resin V3 with a layer thickness of 100 microns, only that combination of material and layer thickness is affected by the subsequent adjustment. All other combinations of materials and layer thicknesses are unaffected.
The supplied test file opens as a FORM file that should not be modified, including actions such as moving, rescaling, reorienting, or adding supports.
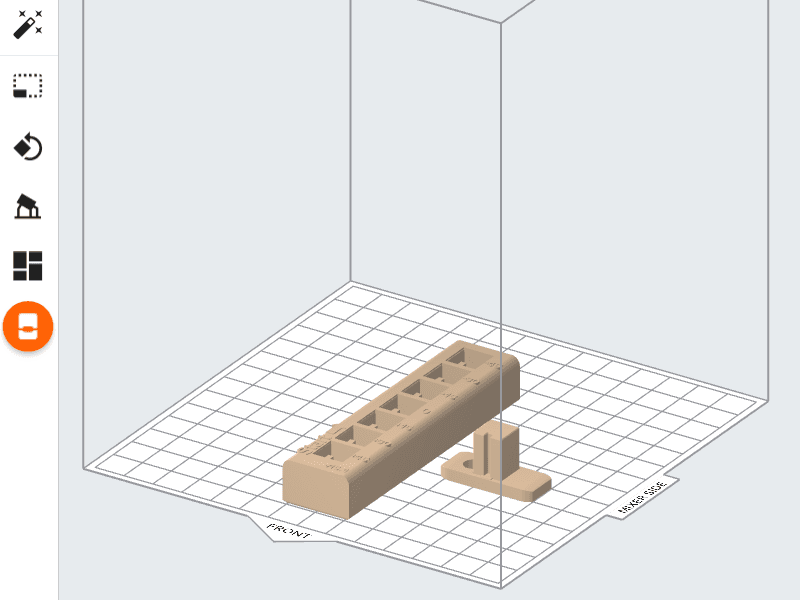
造形したパーツの後処理を行う
造形が終わった後のパーツを隈なく洗浄し、十分に乾かせてから二次硬化させます。
備考:
通常のワークフローと同じ洗浄・二次硬化方法で安定した結果を得ることができます。造形したテストファイルに未洗浄のレジンが残っていると、フィットチューニングの結果に影響します。
フィットチューニングテストを実施する
FORM形式のファイルのデータに基づいて造形したパーツを洗浄、二次硬化、そして冷却した後、そのパーツのフィット感を確認します。フィットチューニングテストで造形するパーツは、「ブロック」と 「ペグ 」という2つのテスト造形物で構成されます。中に入れば入るほど段々きつくなるブロックの穴にペグを差し込んでいき、最も望ましいフィット感が得られる地点を確認します。
フィットチューニングテストを実行するには:
ステップ 1: 仕組みを理解する
フィットチューニングテストは、ユーザーが3Dプリントしたモデルのフィット感を調整するための機能です。フィットチューニングテストで造形するパーツは、「ブロック」と 「ペグ 」という2つのテスト造形物で構成されます。
プリンタによって、テストの結果は+45、+30、+15、0、-15、-30、-45のいずれかの値になります。スタート位置は最も緩いフィット感の+45で、ブロックが上がるにつれてフィット感がタイトになっていきます。
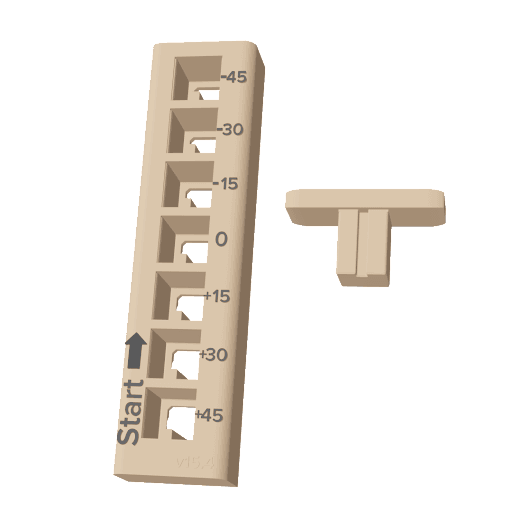
Testing begins by following the path identified on the block as the Start position. Insert the peg into the slot labeled as +45.
Attempt to remove the peg from the block. If the fitment is loose and the peg can be easily removed, insert the peg into the next slot.
If the +45 slot is too tight to insert the peg, stop. Enter 45 μm as the test value, reprint the test file, and retry.
To check proper fitment:
Tip:
Insert the peg into the block by squeezing the peg and block with your thumb and index finger.
Step 4: Review the results
Once the peg is inserted into a slot position that meets fitment criteria, check the number displayed in the peg’s viewing hole. This number is the printer's Fit Tuning value for the given material and layer thickness.
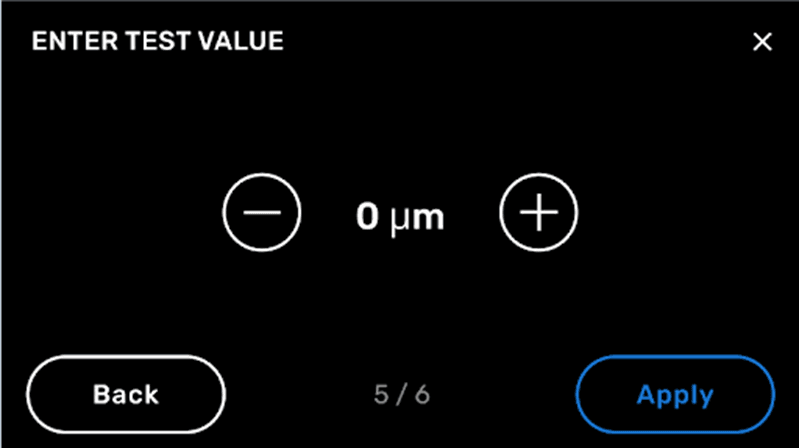
Enter this value using the printer touchscreen.
If the -45 slot is still too loose, enter -45 μm as the test value, reprint the test file, and retry.
新しい設定を適用する
Apply the result from the peg on the test print to the Enter Test Value on the printer’s touchscreen. Adjustments are cumulative—for example, if you enter a test value of -45 μm, redo the test, and enter a new value of -15 μm, the total adjustment will be -60 μm.
備考:
ユニットごとにばらつきがあるため、使用するプリンタごとにフィットチューニングテストを実施する必要がある場合があります。変更した設定はオフセットツールのプリントに使用したプリンタにのみ適用します。
プリンター
のチューニング
ペグをテストブロックの適合スロットに挿入した時に表示される数字をプリンターのチューニングに使用します。
備考:
以前にアップロードした、テスト造形物と同じ材料と積層ピッチのジョブは、フィットチューニングテストで新たなに得た値の影響を受けません。フィットチューニングテストで得た値を調整した後に造形ジョブを再アップロードすると、それらのファイルに変更が反映されます。
ヒント:
詳細や歯科用CADの設定については、サポート記事Printing crown and bridge models with Model Resin(Model Resinでクラウンやブリッジのモデルを造形する)をご参照ください。
手順に問題があったり、予期しないテスト結果が出た場合は、Formlabsサポートまでご連絡ください。
トラブルシューティング
フィットチューニング値が更新されていません
PreFormからプリンターにFORMファイルをアップロードする際、FORMファイルにはプリンターのFit Tuning(フィットチューニング)値が含まれます。FORMファイルを送信した後にプリンタのFit Tuning値を調整した場合、その前に送信していたプリントを開始すると、プリンタのタッチスクリーンにエラーメッセージFit Tuning Out of Date(フィットチューニング値が更新されていません) が表示されます。
プリントジョブのFit Tuning値は、ファイルが一旦プリンタに送信されると更新できません。新しいFit Tuning値をプリントジョブに適用するには、PreFormからFORMファイルを再送信してください。
PreFormからFORMファイルを再アップロードしても問題が解決しない場合は、Formlabsサポートまたは正規販売代理店にお問い合わせください。
その他資料