WHITE PAPER
Formlabs Logo

Tuning the bed temperature of your Fuse 1+ 30W printer for improved part yield with Nylon 12 GF Powder

Tuning the bed temperature of your Fuse 1+ 30W printer for improved part yield with Nylon 12 GF Powder

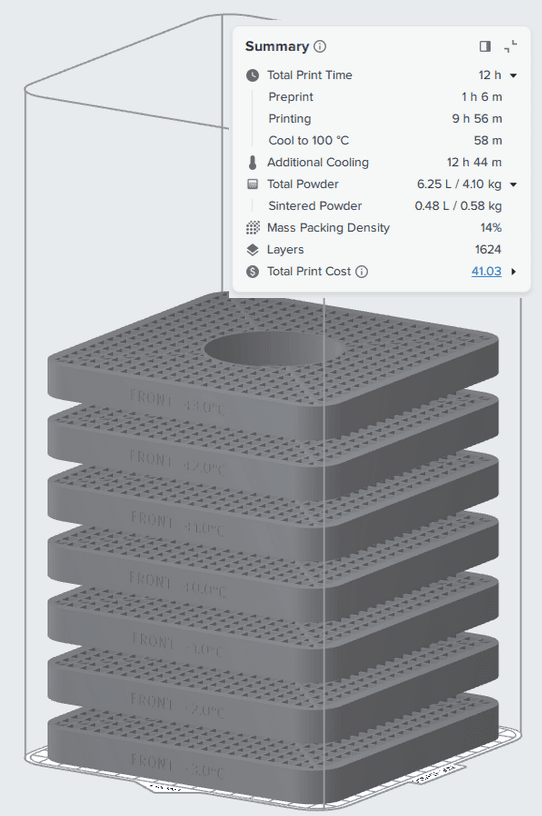
Prior to printing with Nylon 12 GF Powder, fine-tune your Fuse 1+ 30W printer to set up your prints for success. Fine-tuning the bed temperature prior to printing your first build results in fewer surface defects on your parts caused by variable printer temperatures. This process is run as a diagnostic print, uploaded through PreForm to the printer. The print contains several parts that need to be cleaned and inspected to determine the necessary temperature offset for your printer.  

Note:

Every Fuse 1+ 30W printer should be fine-tuned when printing with Nylon 12 GF Powder for the first time. Printers next to each other may require different offsets. While Nylon 12 GF Powder can be printed with a Fuse 1 printer, Formlabs does not currently offer a bed temperature tuning print for the Fuse 1.
Bed Temperature Tuning print in PreForm

Bed Temperature Tuning print in PreForm

Run the Bed Temperature Tuning Print

  1. If you have previously used the printer with an applied offset, reset the printer’s offset to 0 prior to beginning the fine-tuning process. This can be done by following the directions to Set the bed temperature offset, and setting the printer offset to 0.
  2. Update PreForm to its latest version.
  3. Download the Nyon 12 GF Bed Temperature Tuning Print.
  4. Open PreForm and select Job Settings.
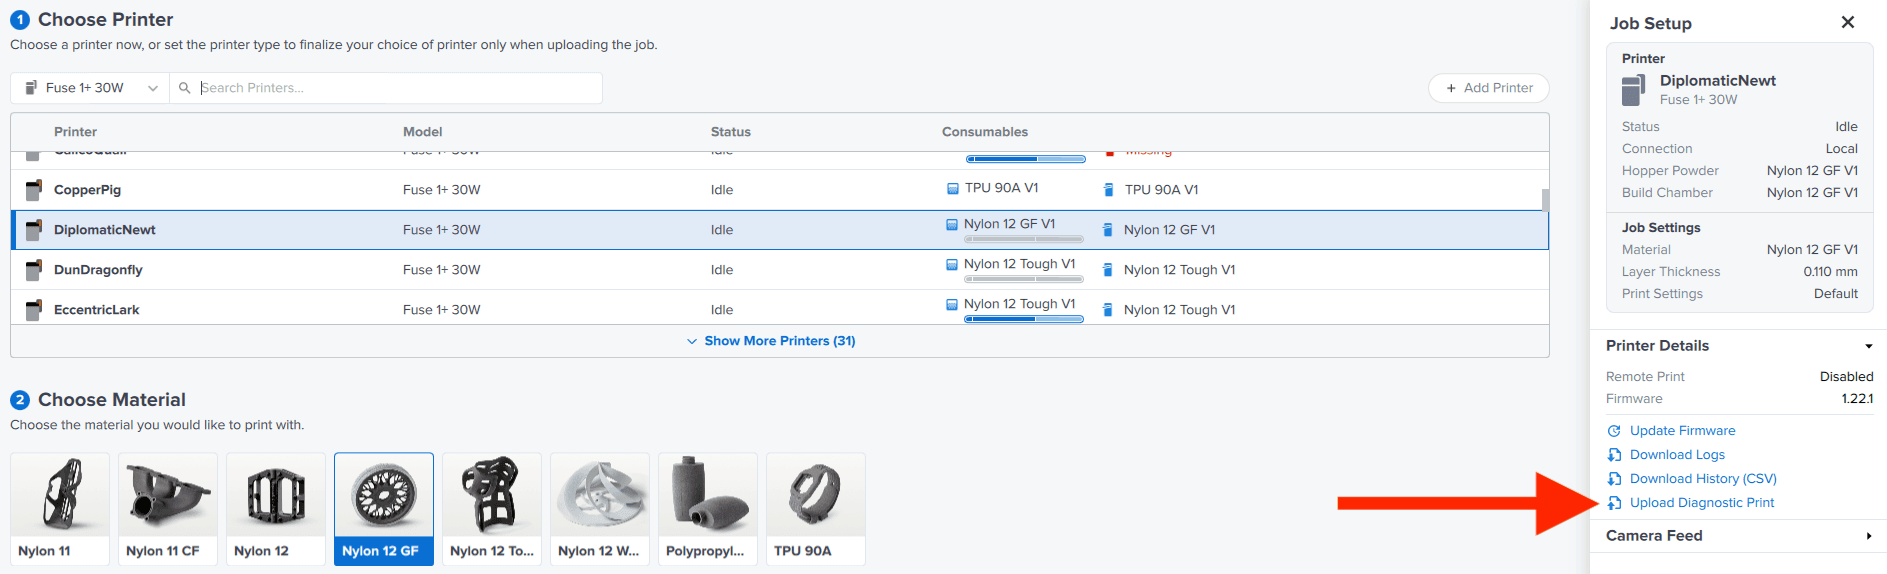
  5. In the Job Setup window, make sure the correct printer is selected, then select Upload Diagnostic Print.
alttext
  1. Select the file from your computer. Once the file has successfully uploaded, start the print from your printer.
  2. To run the print, 3 kg of powder is required, at a refresh rate of 50%. Age powder if needed to create the correct mix. To load the printer’s hopper with 3 kg of powder, fill the hopper to the 7 L mark.
  3. Allow the print to fully cool per Formlabs recommendations.

Clean the parts

Once the print completes, parts can be extracted from the build chamber by using the Fuse Sift or the Fuse Depowdering Kit. Excess powder can be sifted with fresh powder and re-used.

Parts should be fully cleaned of powder prior to inspection either by the Fuse Blast or other media blasting solutions. Extract the seven plaques and clean them before inspection.

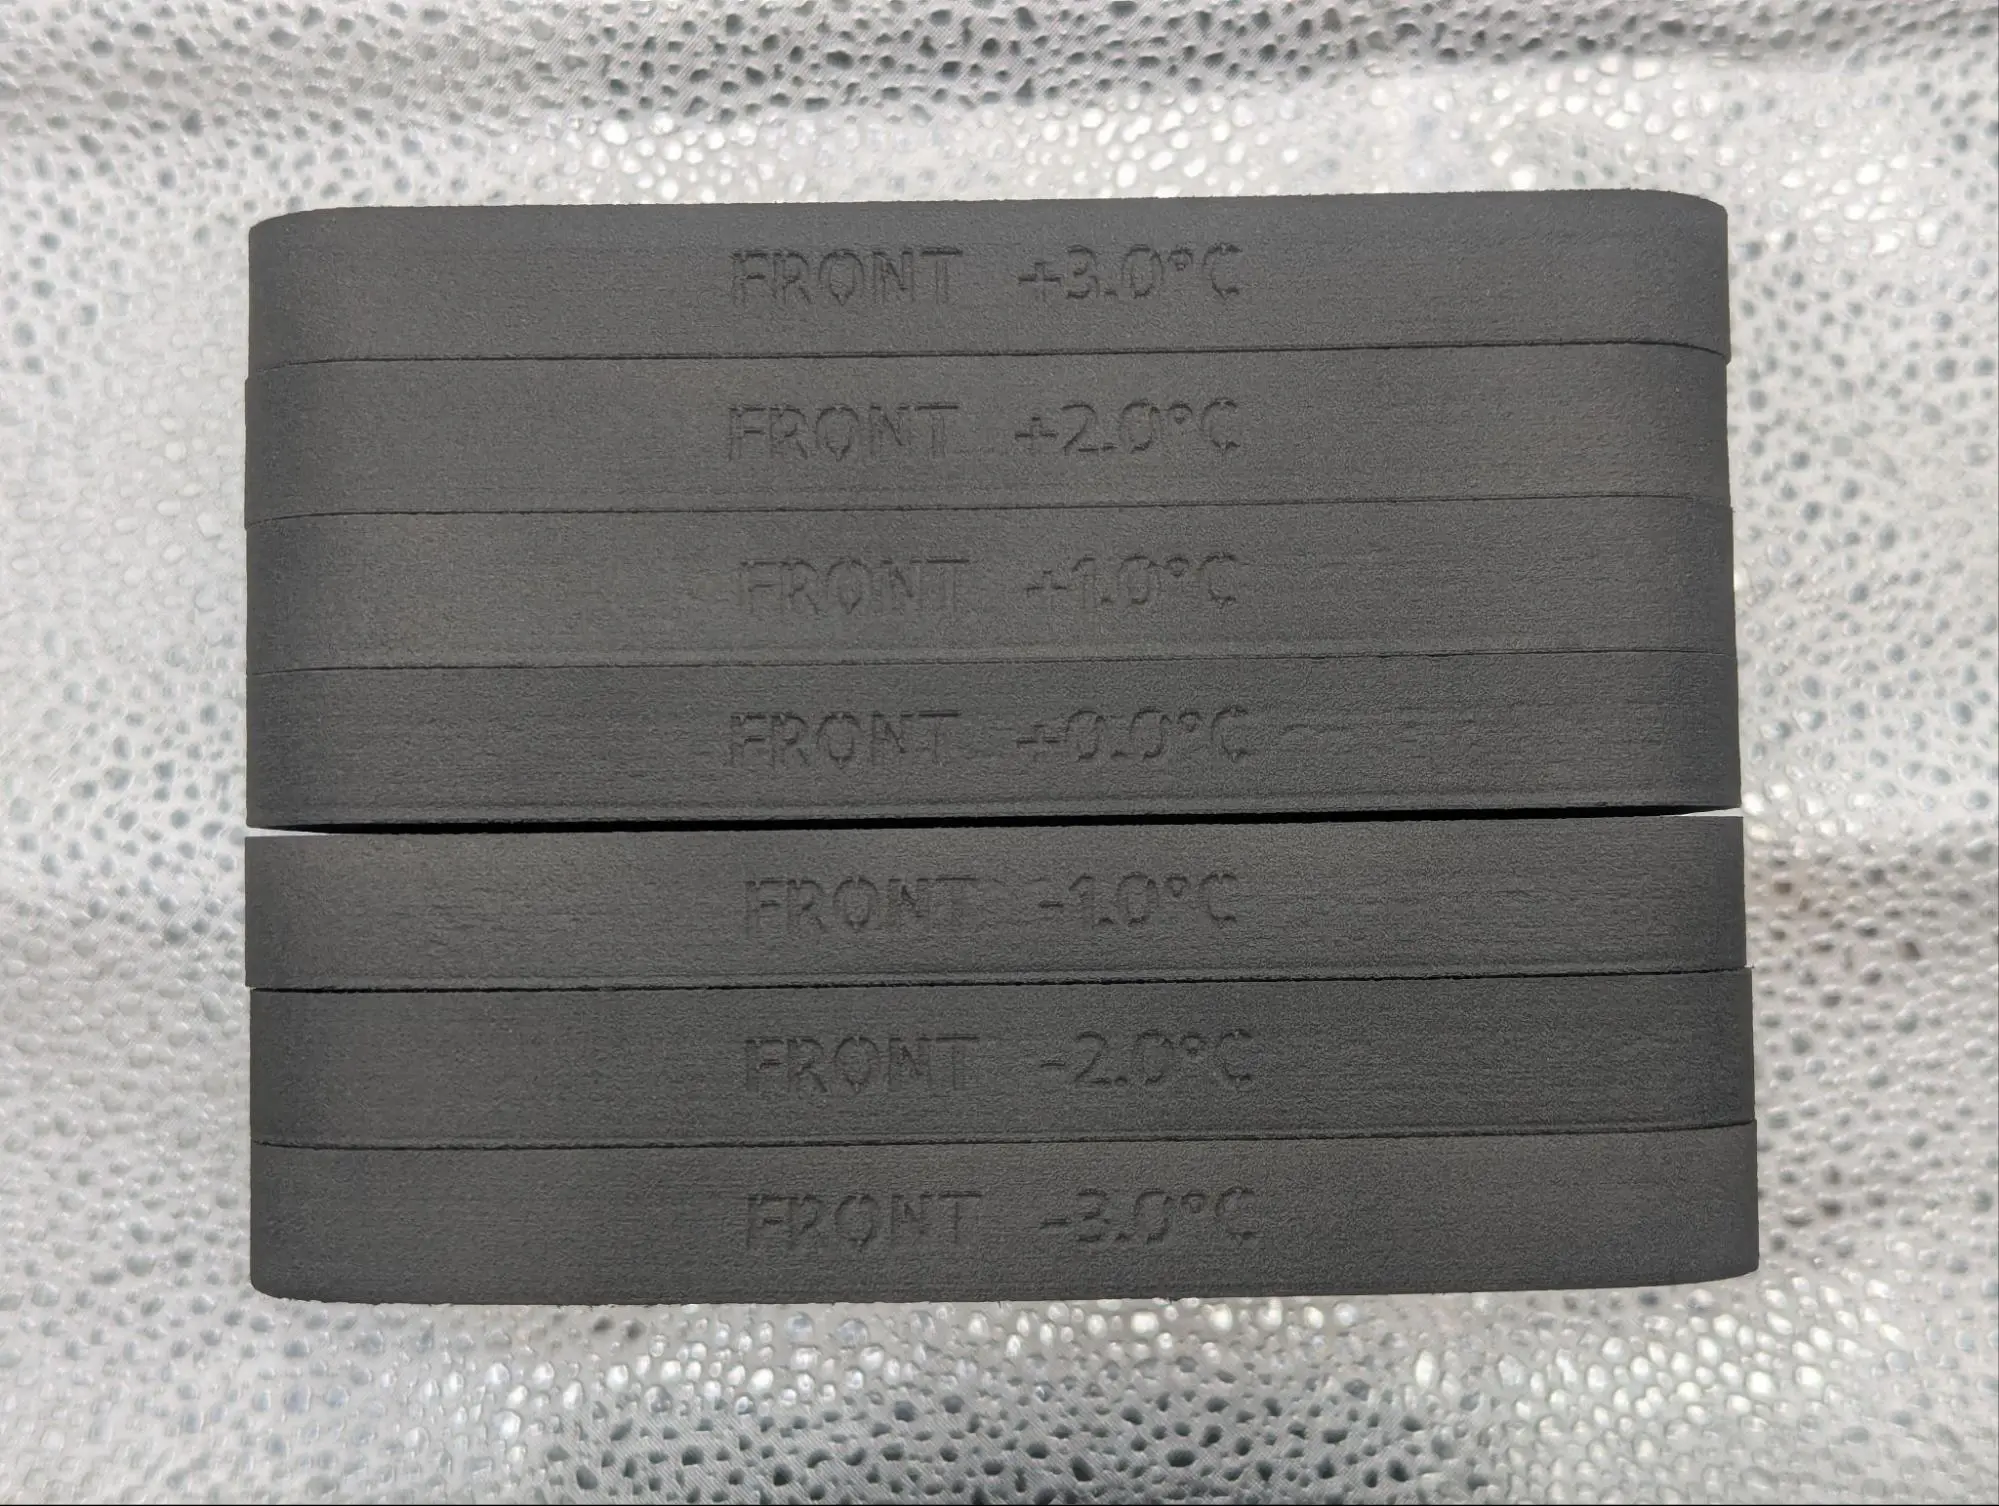
Each plaque is listed with the temperature offset it was printed with (-3 ºC, -2 ºC, -1 ºC, 0 ºC, +1 ºC, +2 ºC, +3 ºC). Line the plaques up from -3 ºC to +3 ºC to prepare for inspection.

Example of Nylon 12 GF plaques ready for inspection

Inspect the plaques

Note:

If the test print fails and not all plaques are completed, complete the inspection using the plaques that printed successfully. The correct offset will be included in the parts that printed successfully.

The print is designed to exaggerate surface defects to provide a clear indication of when the bed temperature is too hot or cold. The ideal temperature is represented by the plaque with a small but nonzero amount of surface defects. These defects do not represent the quality of the parts the printer will produce after it is tuned.

To determine the appropriate temperature offset for your printer:

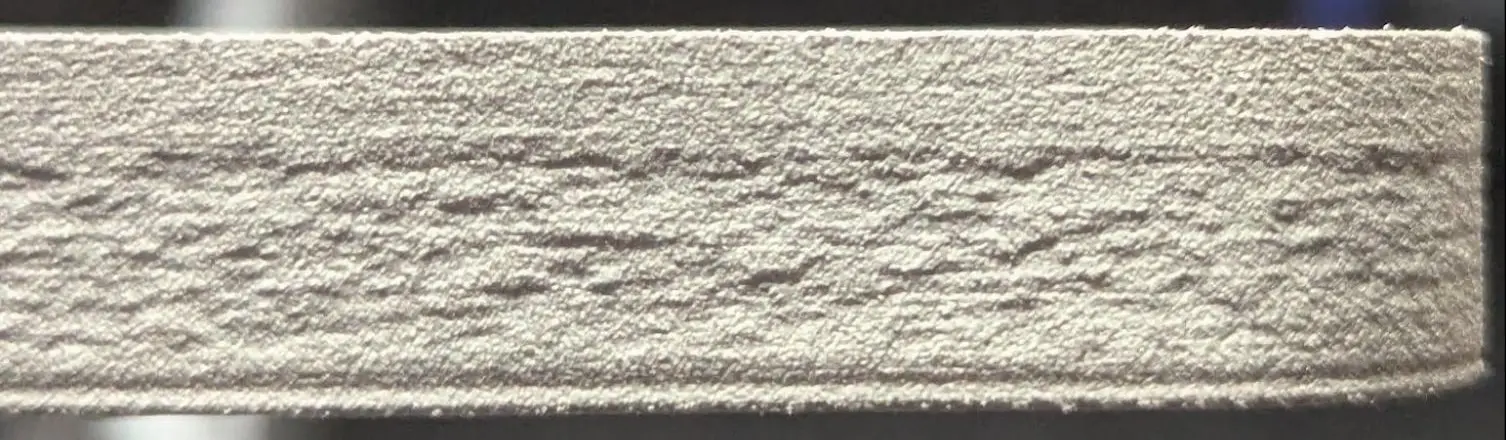
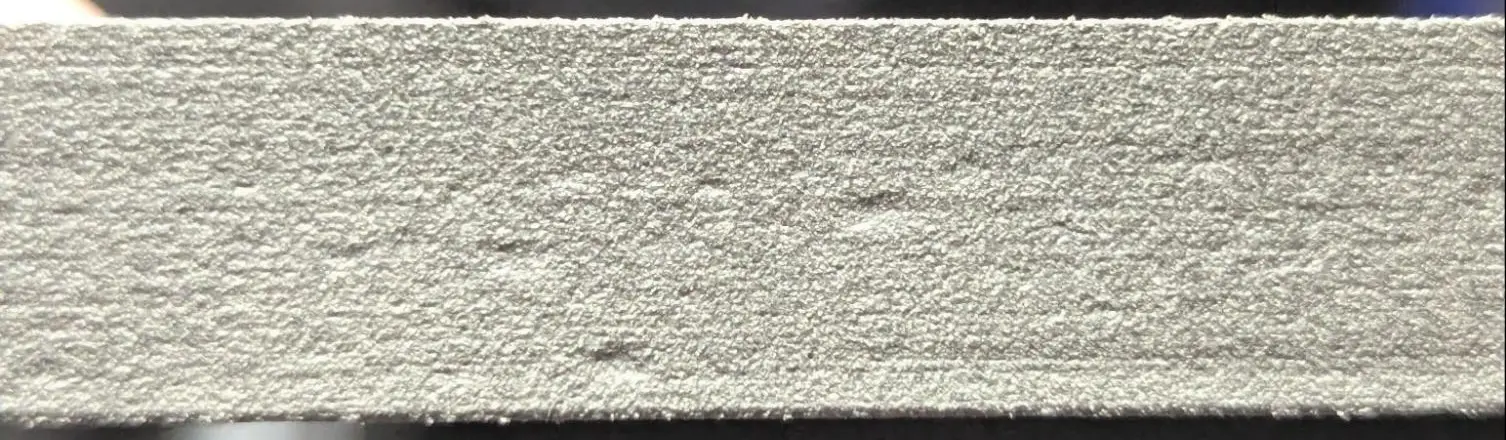
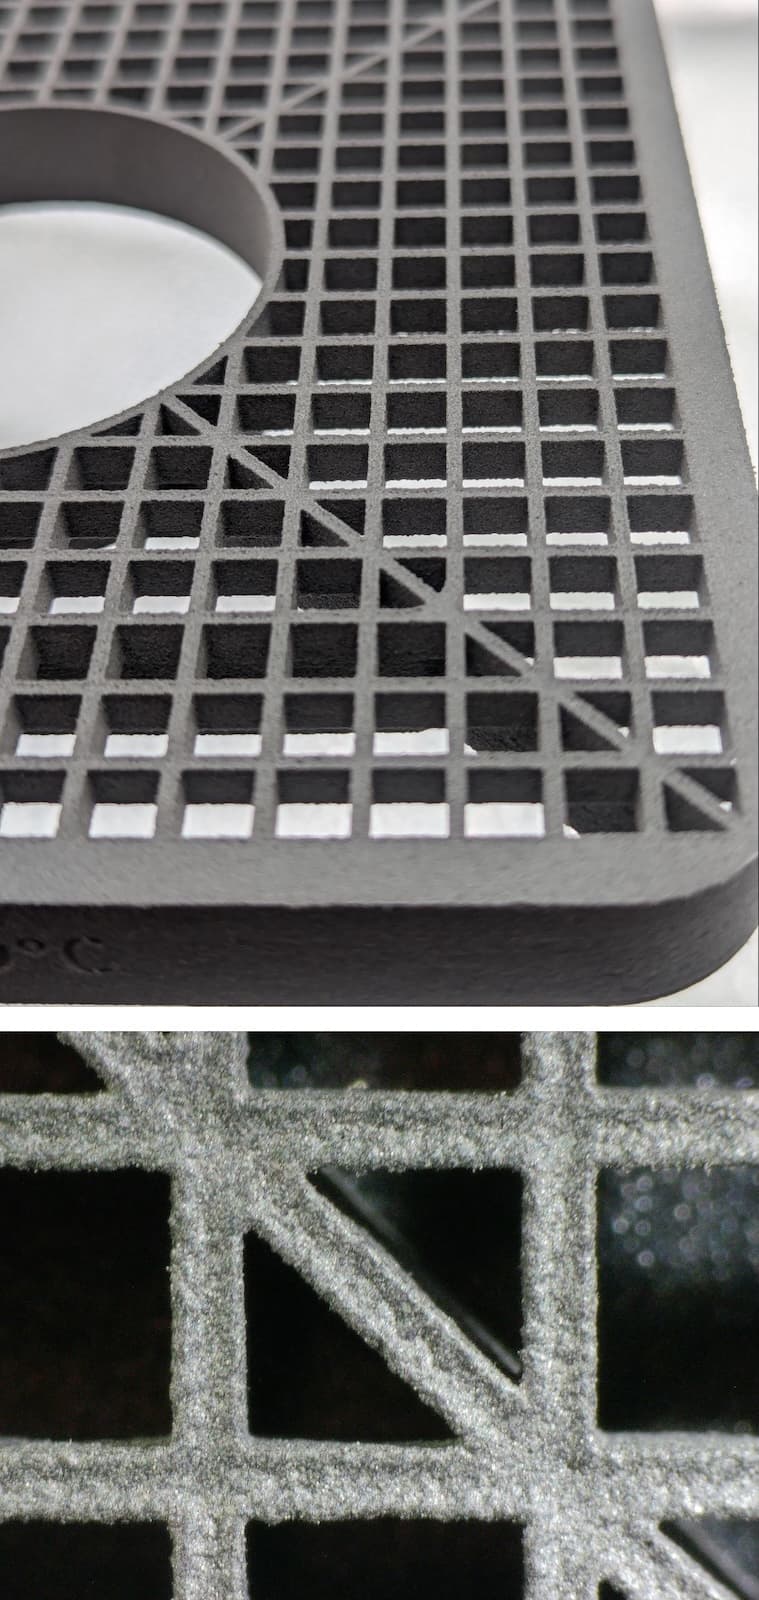
  1. Start with the hottest plaque (+3 ºC) and inspect the vertical surfaces for an orange peel-like texture. Inspect the vertical walls around the outside of the part, as well as those inset halfway to the center and the diagonally-aligned stiffeners. Be sure to look at parts from every angle, as the defect may not be present or look the same on all sides.
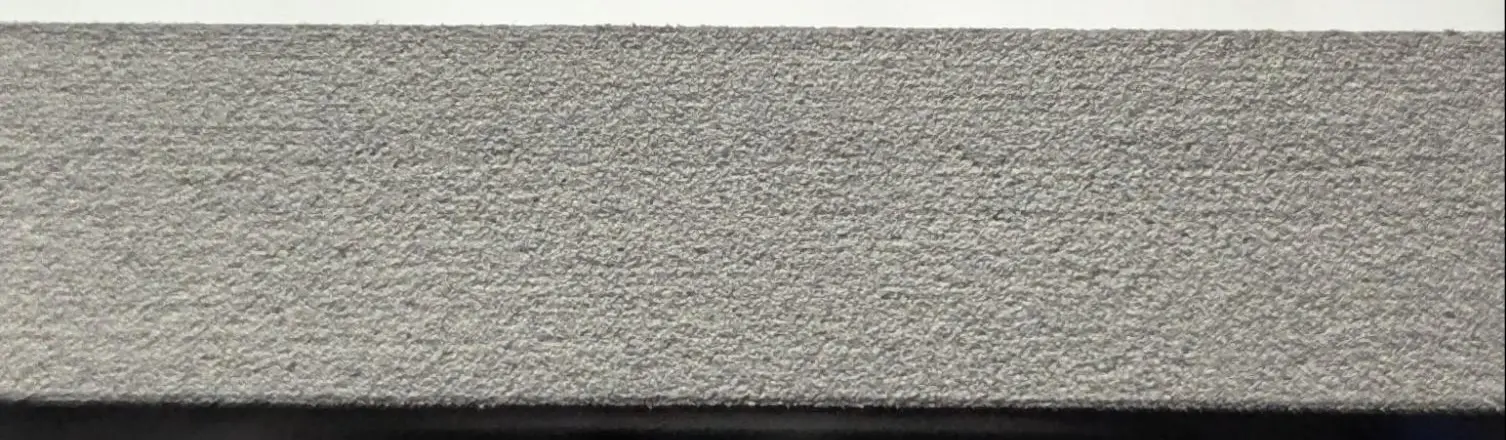
    1. If none exists, +3 ºC is too hot. Move to the +2 ºC plaque.
    2. If severe orange peel is present, +3 ºC is too cold. Increase the bed temperature target on the printer to +3 ºC and run the print again.
  2. Inspect the plaques for orange peel in descending order of temperature.
    1. The first plaque where orange peel texture appears on the vertical surfaces of the part represents the ideal temperature.
    2. If the coldest plaque (-3 ºC) still shows no orange peel, then it is too hot. Reduce the bed temperature target on the printer to -3 ºC and run the print again.
Auto-generating supports in PreForm

Severe orange peel (too cold)

Auto-generating supports in PreForm

Moderate orange peel texture (ideal temperature)

Auto-generating supports in PreForm

No orange peel present (too hot)

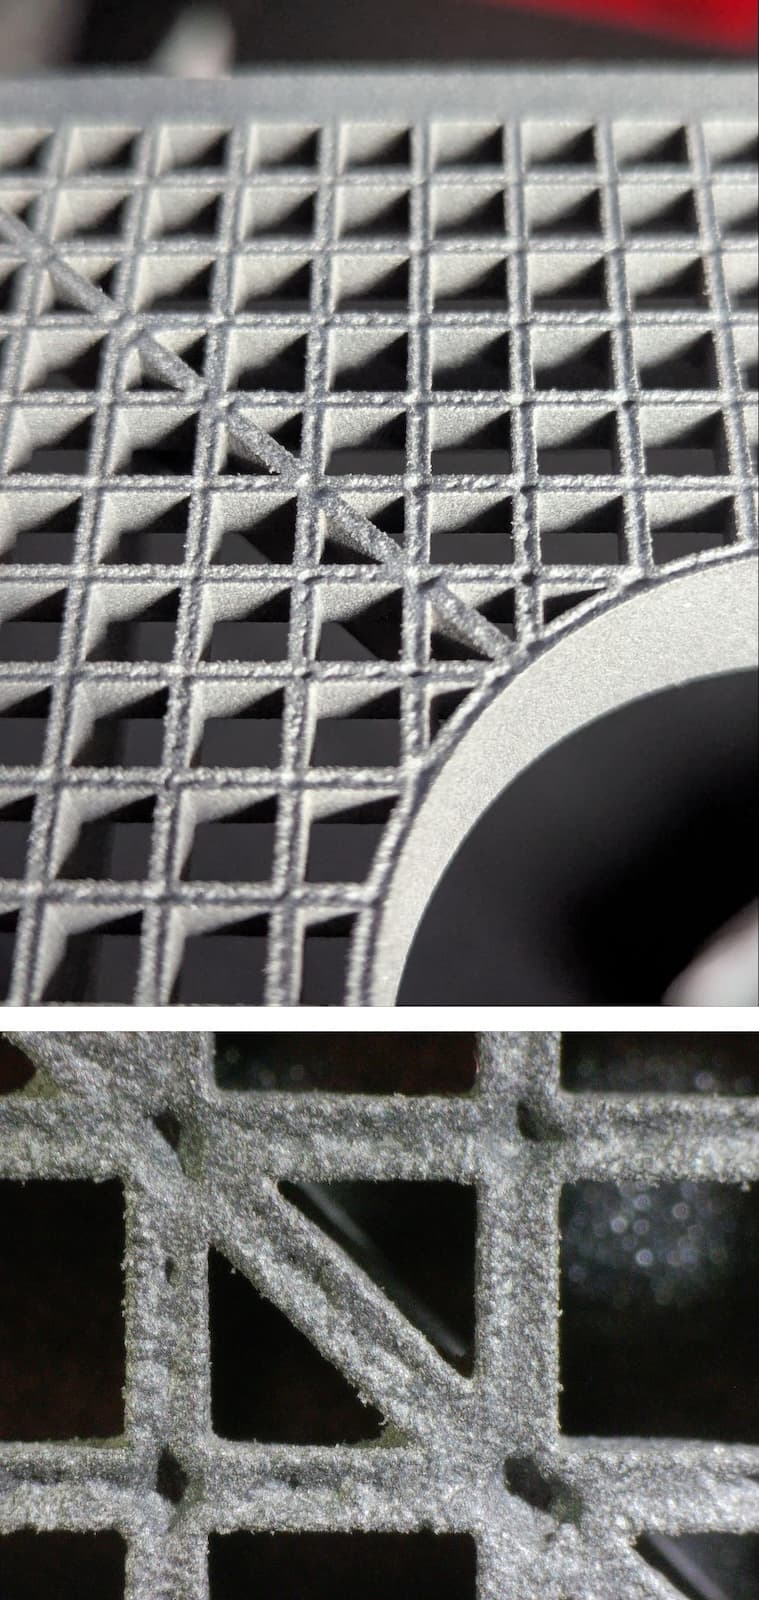
  1. To confirm if the chosen plaque is ideal, inspect the grid on the top of the part. There should be no instances of pitting, where a small hole forms on the surface. Look for signs of pitting, especially at the intersection of grid lines. 
    • Pitting will be the worst where a vertical, horizontal, and diagonal line meet.
    • Pitting, if present, will not be equally bad in every location. There will often be hot spots where it shows up and cold spots where it does not.
    • It is likely that every part will have some level of dimpling on the grid lines. This should not be confused with pitting. The difference lies in whether the surface has actual holes speckled across it (pitting) or has a gently curved meniscus with raised edges (dimpling).
  2. A properly chosen setpoint should not have significant pitting, which begins above a certain high-temperature threshold. If the chosen plaque exhibits pitting, then it is still too hot. The ideal temperature is actually 1 ºC colder.
    • Example: the hottest plaque to show orange peel is 0 ºC, but there is pitting present on the surface of the grid. The ideal bed temperature offset is therefore -1 ºC.
Auto-generating supports in PreForm

Dimpling without pitting

Auto-generating supports in PreForm

Plaque showing pitting

After inspecting all seven plaques, determine the correct offset temperature that best matches the above criteria, by using the temperature offsets listed on the plaques. This offset can then be manually set on the machine

Note:

The correct offset temperature may lie between two plaques, and the correct offset may be a half degree between the printed plaques (ie. +1.5 ºC). 

Set the Bed Temperature Target

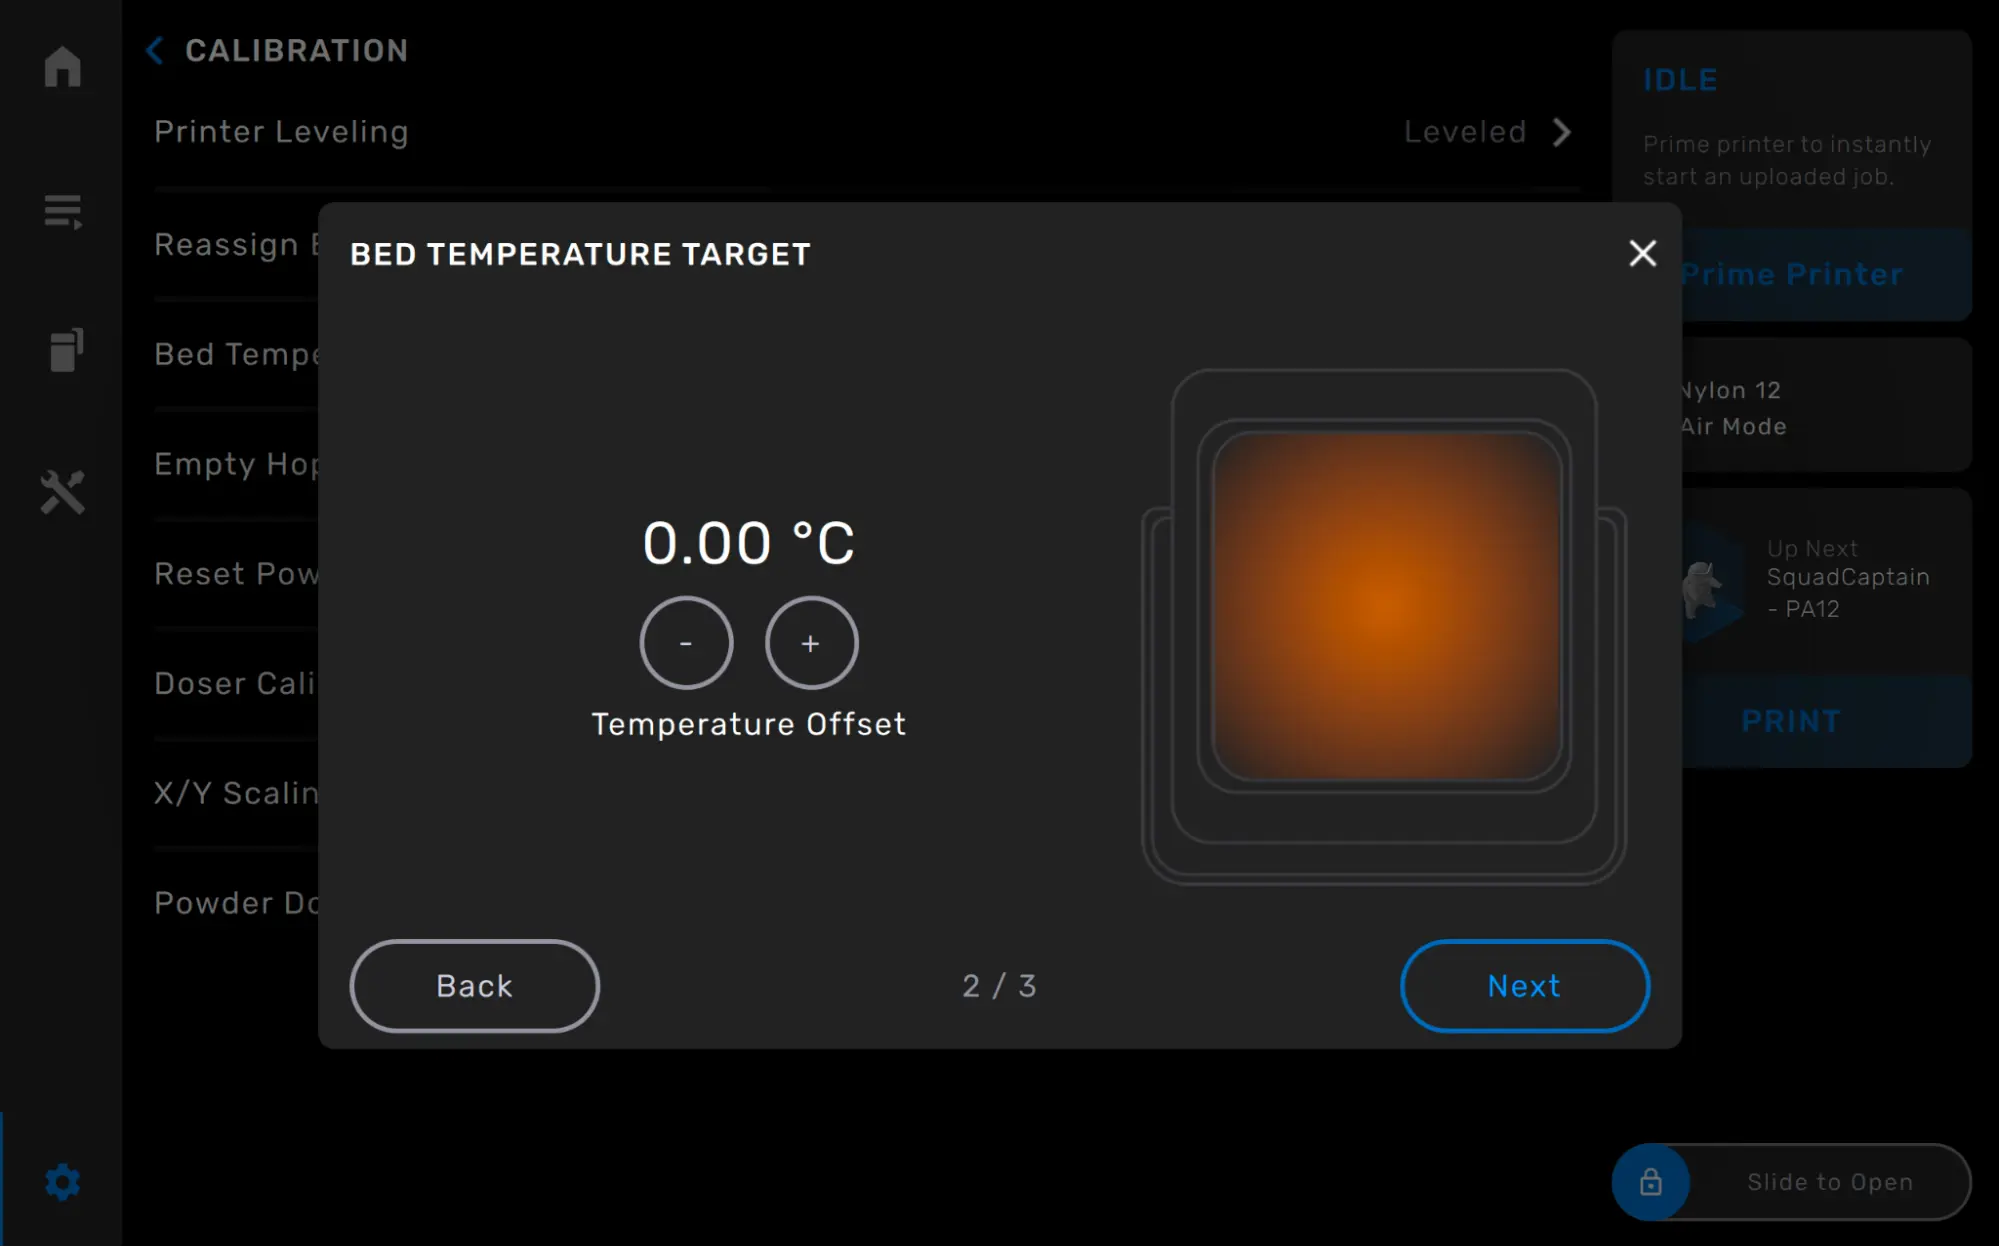
The Bed Temperature Target can be adjusted by up to ±5 °C in 0.25 °C increments. After completing the Bed Temperature Tuning Print, adjust the Bed Temperature Target on the printer to match the offset determined during the Bed Temperature Tuning inspection.

Note:

Two printers operating side by side may require different Bed Temperature Targets.

To adjust the Bed Temperature Target:

  1. Ensure that the printer is not running a print job and is currently Idle. The Bed Temperature Target can only be adjusted before a print, not while the print is running.
  2. Tap the gear icon on your printer’s touchscreen. The Settings screen appears.
  3. Tap Calibration. The Calibration screen appears.
  4. Tap Bed Temperature Target. A screen with information about the target temperature appears.
  5. Tap Next. The Bed Temperature Target screen appears.
alttext
  1. Tap + or - to increase or decrease the Temperature Offset.
  2. When you are done adjusting the Temperature Offset, tap Next. Confirm the new offset and tap Set.