技術白書
Formlabs Logo

Form Autoのエラーメッセージ

Form Autoのエラーメッセージ

プリンターまたはForm Autoに何らかの異常が発生した場合、エラーメッセージとエラー内容の詳細がプリンターのタッチスクリーンに表示されます。プリンターのエラーメッセージの詳細については、Form 3/Form 3Bのエラーメッセージをご覧ください。

ヒント:

エラーの原因がForm Autoかプリンターかを判断するには、Form Autoのプラグを抜いて、エラーが再発するかどうかを確認します。

Dashboard settings(ダッシュボードの設定)で、この記事に掲載されているエラー、およびその他のプリントイベントに関するSMSまたは通知メールが受信できるように設定してください。

診断ログを収集

Formlabsのプリンターは、何らかの異常が発生した際、その問題の詳細情報を提供するための診断ログを保持しています。問題発生時にFormlabsサポート正規販売代理店にご連絡いただく際、早期解決が図れるよう、これらの診断ログならびにその他の情報(観察結果や詳しい状況説明など)をご提供ください。

Form Autoに搭載されているプリンターの診断ログにアクセスするには、プリンターをタッチスクリーンの位置に回転させてください。

有効なWi-Fiまたはイーサネットを通じてインターネットに接続されているプリンタの場合

  1. プリンタのHome(ホーム)画面左下にあるレンチの形をしたアイコンをタップします。Settings(設定)画面が表示されます。
  2. System(システム)をタップします。System(システム)画面が表示されます。
  3. Upload Diagnostic Info(診断情報をアップロード)をタップします。診断情報をアップロードするかどうかを確認するメッセージが表示されます。
  4. Next(次へ)をタップして、アップロードを開始します。アップロードが完了すると、確認メッセージが表示されます。
  5. プリンターにログをアップロードできないことを示すエラーメッセージが表示された場合、プリンター上でアップロードに必要なストレージ容量が不足している可能性があります。Queue(キュー)のリストからプリントジョブを削除し、診断ログのアップロードに必要なストレージ容量を確保してください。
  6. プリンターを再起動して、もう一度アップロードを試みます。

インターネットに接続されていないプリンタの場合:

  1. PreFormを開きます。
  2. Edit Job Setup(ジョブのセットアップを編集)をクリックします。Job Setup(ジョブのセットアップ)ウィンドウが開きます。
  3. お使いのプリンターのシリアルネームを選択します。
  4. Download Logs(ログのダウンロード)をクリックします。確認ウィンドウが表示されます。
  5. Browse(参照)をクリックして、診断ログをお使いのコンピューター内の指定場所にダウンロードします。
  6. OKをクリックします。診断ログは暗号化されたFORMLOGS形式で保存・表示されます。
  7. Formlabsサポートまたは正規販売代理店に連絡する際、このファイルを添付してください。
  8. PreFormにERROR_BAD_STATEというメッセージが表示された場合、アップロードに必要なストレージ容量が不足している可能性があります。Queue(キュー)のリストから不要なプリントジョブを削除し、ログのアップロードに必要なストレージ容量を確保します。
  9. プリンターを再起動して、もう一度アップロードを試みます。
こちらからネットワークや非ネットワークの接続オプションに関する

詳細をご確認いただけます。

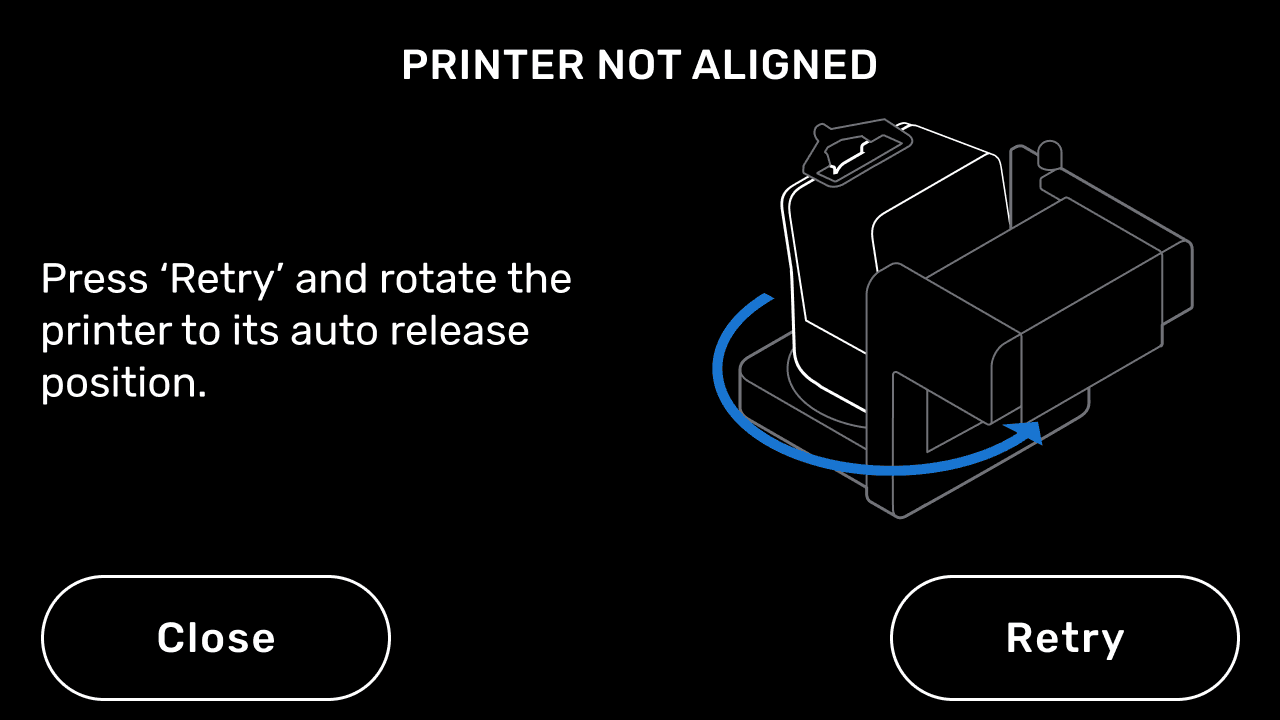
プリンターの位置がずれている

Form Autoのエラーメッセージ:プリンターの位置がずれています

造形品を自動的に取り外すためには、プリンターがパーツ取り外し装置に面している必要があります。プリンターが造形品取り出し用筐体の方を向いていない場合、プリンターにエラーメッセージPrinter not aligned(プリンターが正しく配置されていません)が表示されます。プリンターを造形位置(造形品取り出し用筐体に向かって)に回転させ、Retry(再試行)をタップします。

造形品の取り外しに失敗する

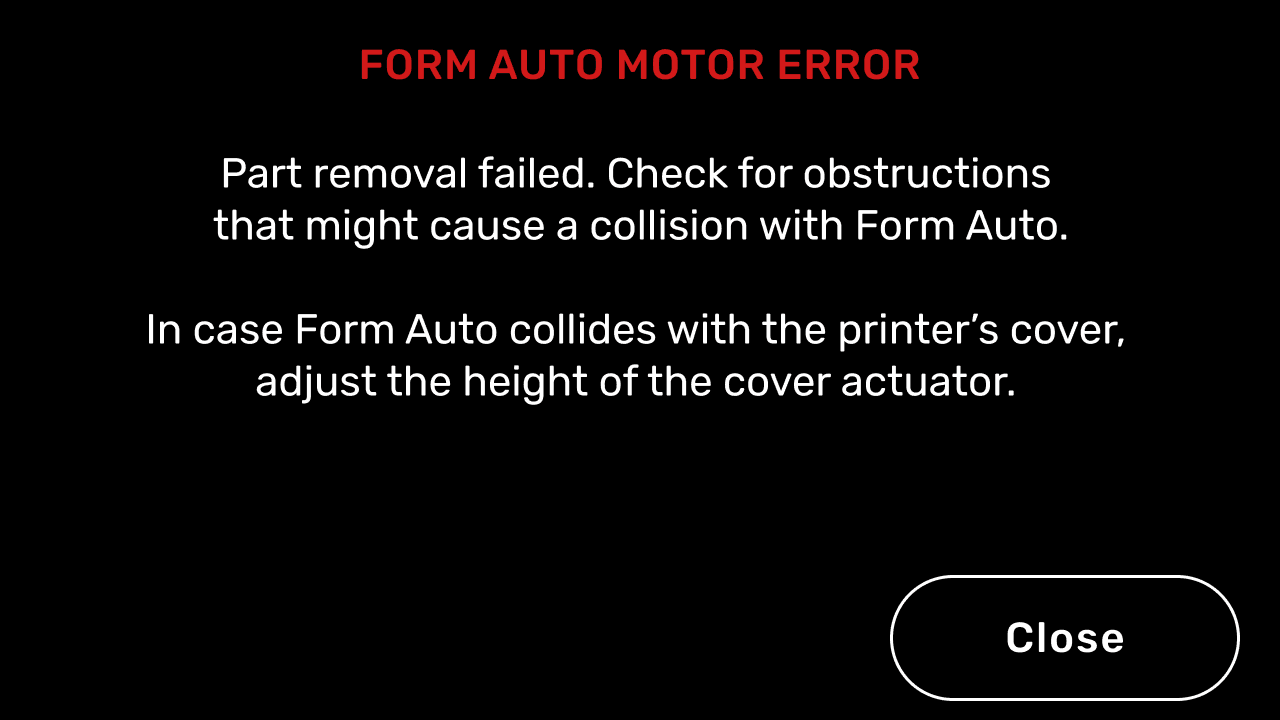
Form Autoのエラーメッセージ:モーターエラー
Form Autoエラーメッセージ:パーツ取り出し失敗

Form Autoが複数回試行しても造形品を自動的に取り外せない場合、プリンタにPart removal failure(造形品取り外し失敗)エラーメッセージまたはMotor error(モーターエラー)メッセージが表示されます。

造形品を手動で取り出し、ビルドプラットフォームを再度装着してプリントを続行します。プリントしたパーツを取り出すには:

通信エラー

Form Autoのエラーメッセージ:通信エラー

Form Autoと通信できない場合、プリンターにエラーメッセージCommunication error(通信エラー)が表示されます。Form AutoのUSBケーブルがプリンター背面のUSBポートに完全に接続されていることを確認してください。この問題を解決するには:

  1. プリンタのUSBポートとForm AutoのUSBプラグに液体レジンなどの汚れがないか点検します。Form Autoとプリンタの電源を切った状態で、必要に応じてUSBポートまたはプラグを少量のIPAで清掃します。テストを行う前に、ポートまたはプラグを完全に乾かしてください。
  2. 別のプリンターがある場合は、Form Autoに接続してみてください。
    • 1台のプリンターだけがForm Autoと通信できない場合は、USBポートの交換が必要な場合があります。Formlabsサポートまたは正規販売代理店にお問い合わせください。
    • Form Autoと通信できるプリンタがない場合は、続行します。
  3. Form Autoのガントリーの背面パネルを取り外し、マザーボードにアクセスします。ガイド「Form Autoのマザーボードの交換 [EN] [DE] [ES] [FR] [IT] [JA] [ZH]」の指示に従ってください。
  4. マザーボードの左側に接続されているUSBケーブルを抜きます。
  5. Form 3世代のプリンターに付属のケーブルなど、別のUSB-A to USB-BケーブルをプリンターとForm Autoのマザーボードに直接接続します。
    • プリンターがForm Autoと通信できるようになったら、ケーブルをForm Autoのベースに通して、元のUSBケーブルと交換します。
    • それでもプリンターがForm Autoと通信できない場合は、Form Autoのマザーボードが損傷しているか、故障している可能性があります。Formlabsサポートまたは正規販売代理店にお問い合わせください。

モーターエラー

Form Autoのエラーメッセージ:モーターエラー

The printer displays a generic Motor error message if the Form Auto motors cannot move as expected. Check for obstructions around the printer and Form Auto that interfere with the movement of the cover or part removal mechanism. If the part removal mechanism interferes with the printer cover, adjust the cover actuator.

The printer may also display a more specific motor-related error, such as Error 357 (which indicates a general motor movement failure) or Error 358 (which indicates that a specific motor failed to reach its home position). These errors also have subcodes: Error 357/1 and 358/1 are related to the part removal mechanism, while Error 357/2 and 358/2 are related to the part release gantry. To resolve these errors:

Error 357

A generic Error 357 is not usually indicative of a more pervasive issue and can often be fixed by resetting and recalibrating the machine. This error and its subcodes occur when the printer sends a command to a motor and the encoder on the motor doesn't detect the expected movement after a few seconds.

  1. Power cycle the Form Auto using the power switch on the unit.
  2. Recalibrate the Form Auto. On the printer’s touchscreen, tap Settings > Form Auto > Calibrate Form Auto and follow the on-screen instructions.
  3. When the calibration is complete, run a test harvest. On the printer’s touchscreen, tap Settings > Form Auto > Run Print Removal Cycle.
  4. If the issue recurs, record a video of the print removal cycle showing the error and contact Formlabs Support or your authorized reseller. Include the video you recorded.

Error 357/1

Error 357/1 indicates an issue with the motor that closes and opens the part removal mechanism or its encoder.
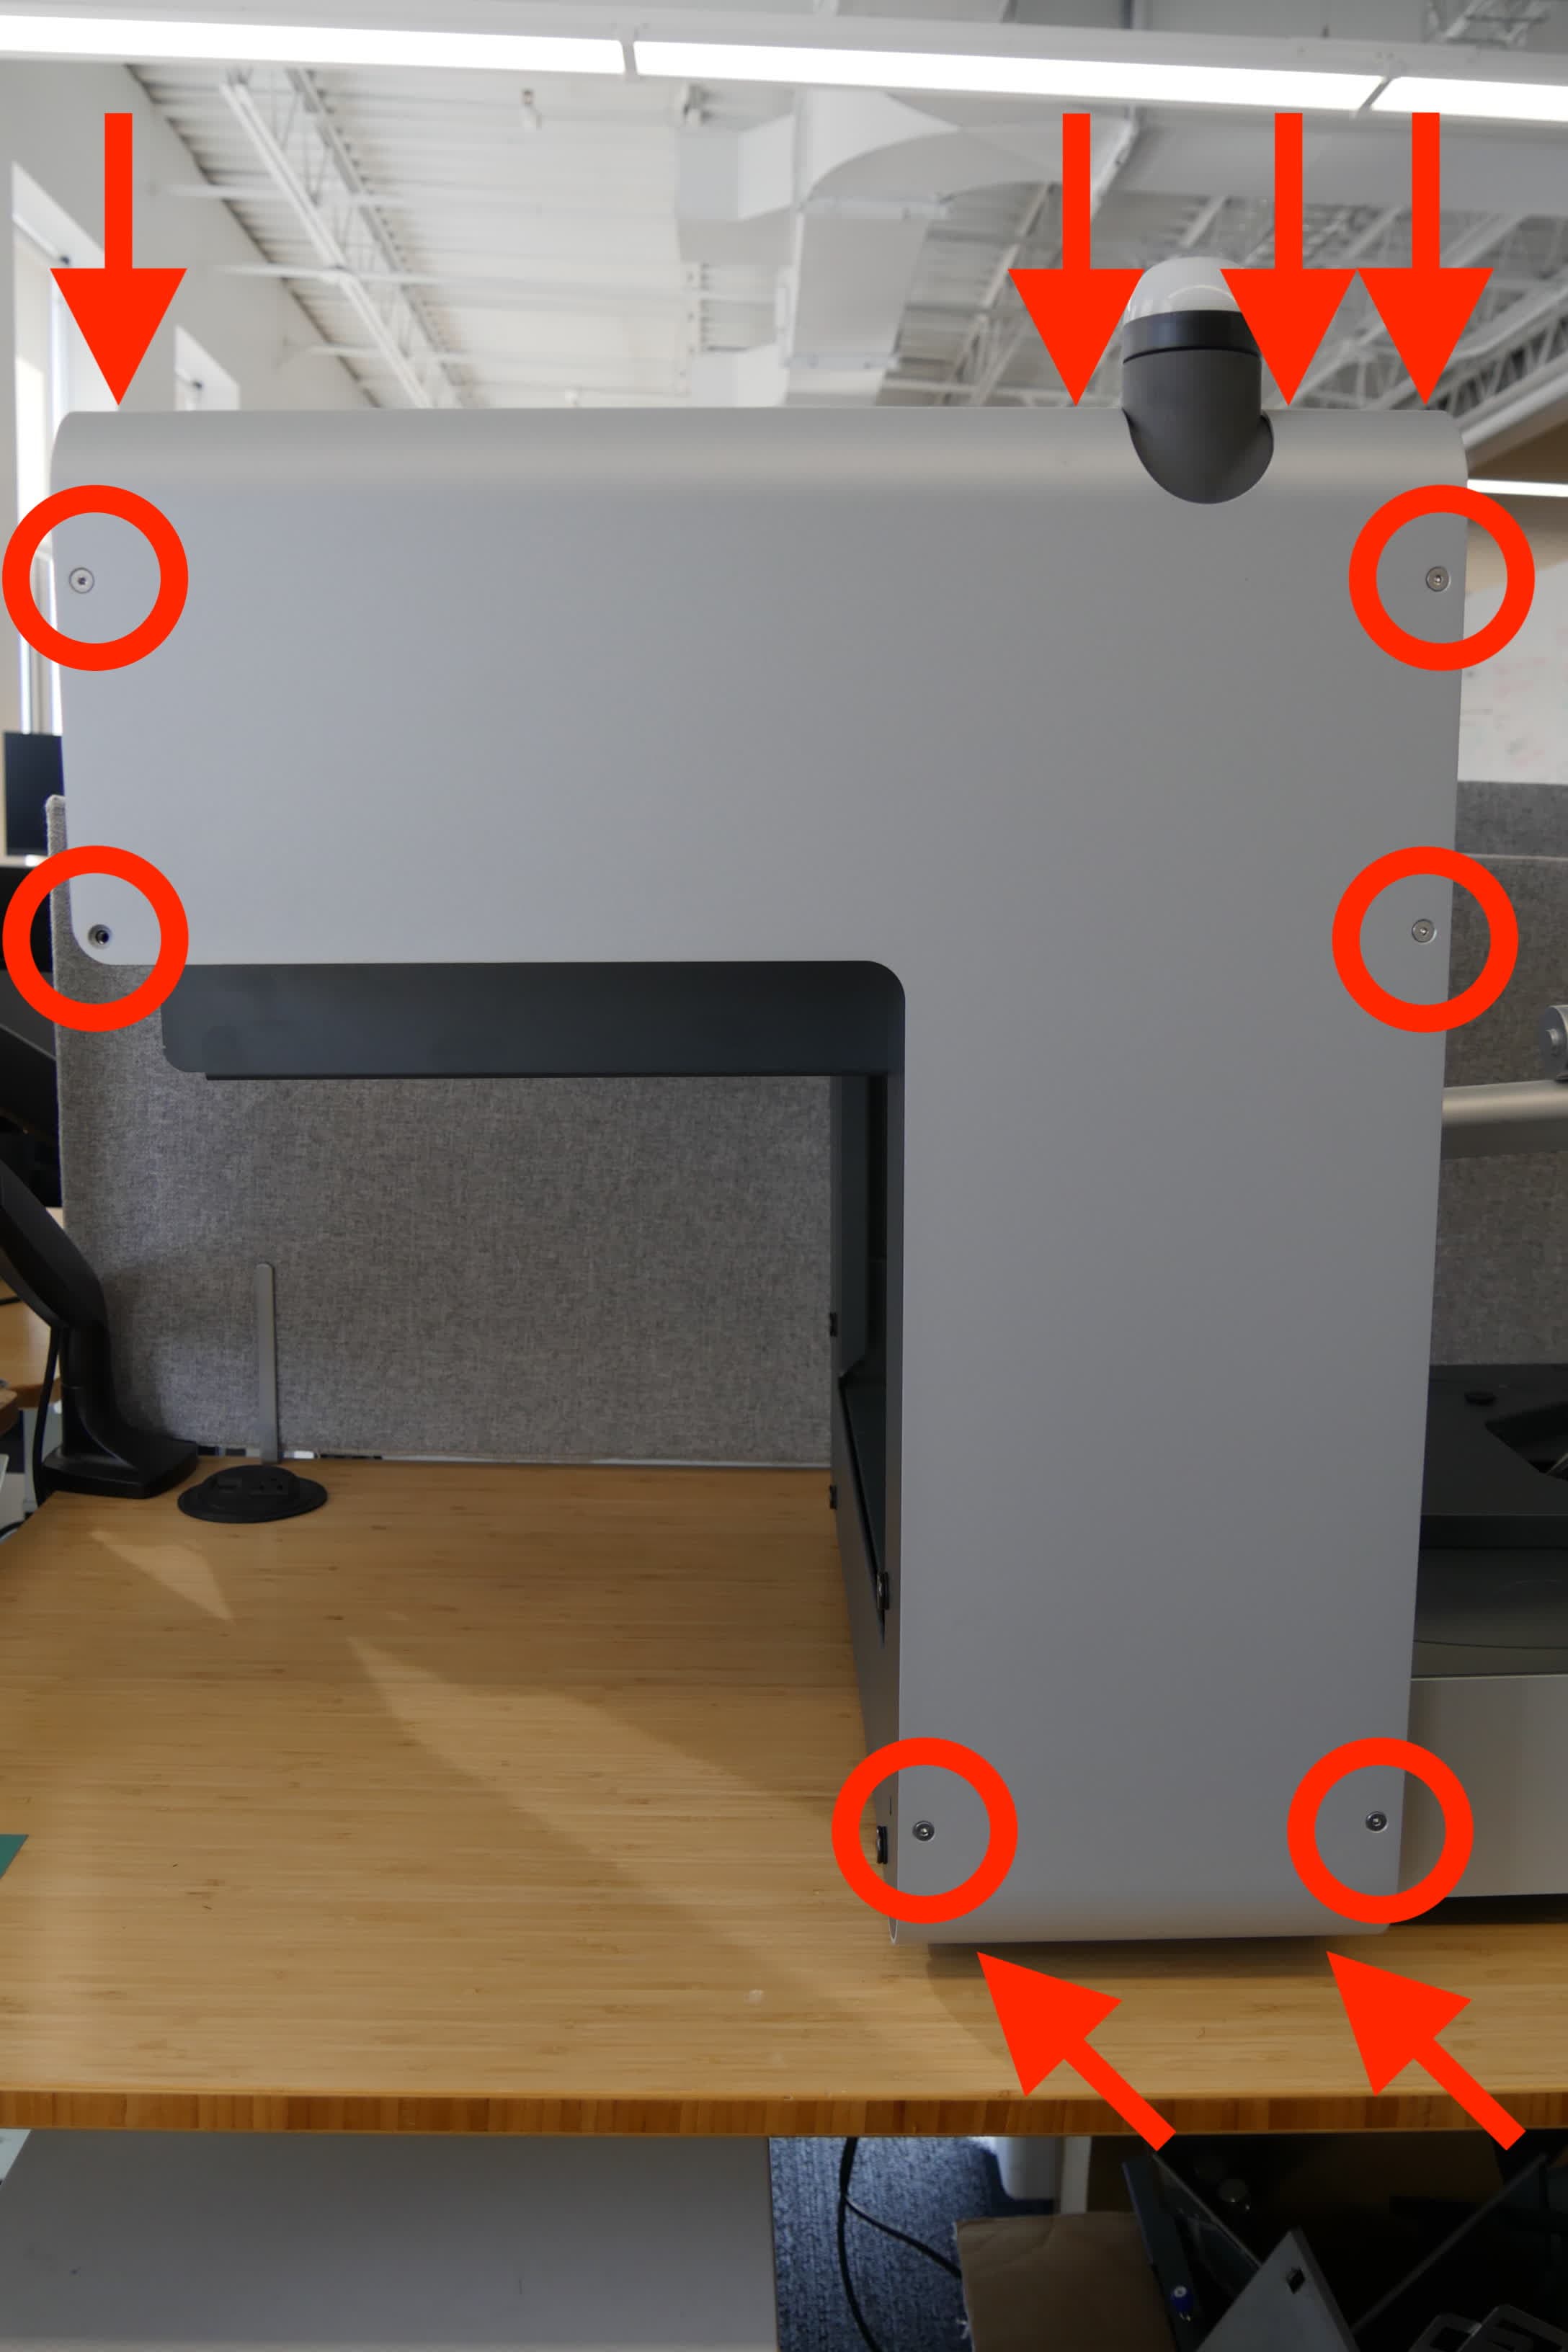
  1. Run a test harvest. On the printer’s touchscreen, tap Settings > Form Auto > Run Print Removal Cycle. Check if the part removal mechanism attempts to close or open at all.
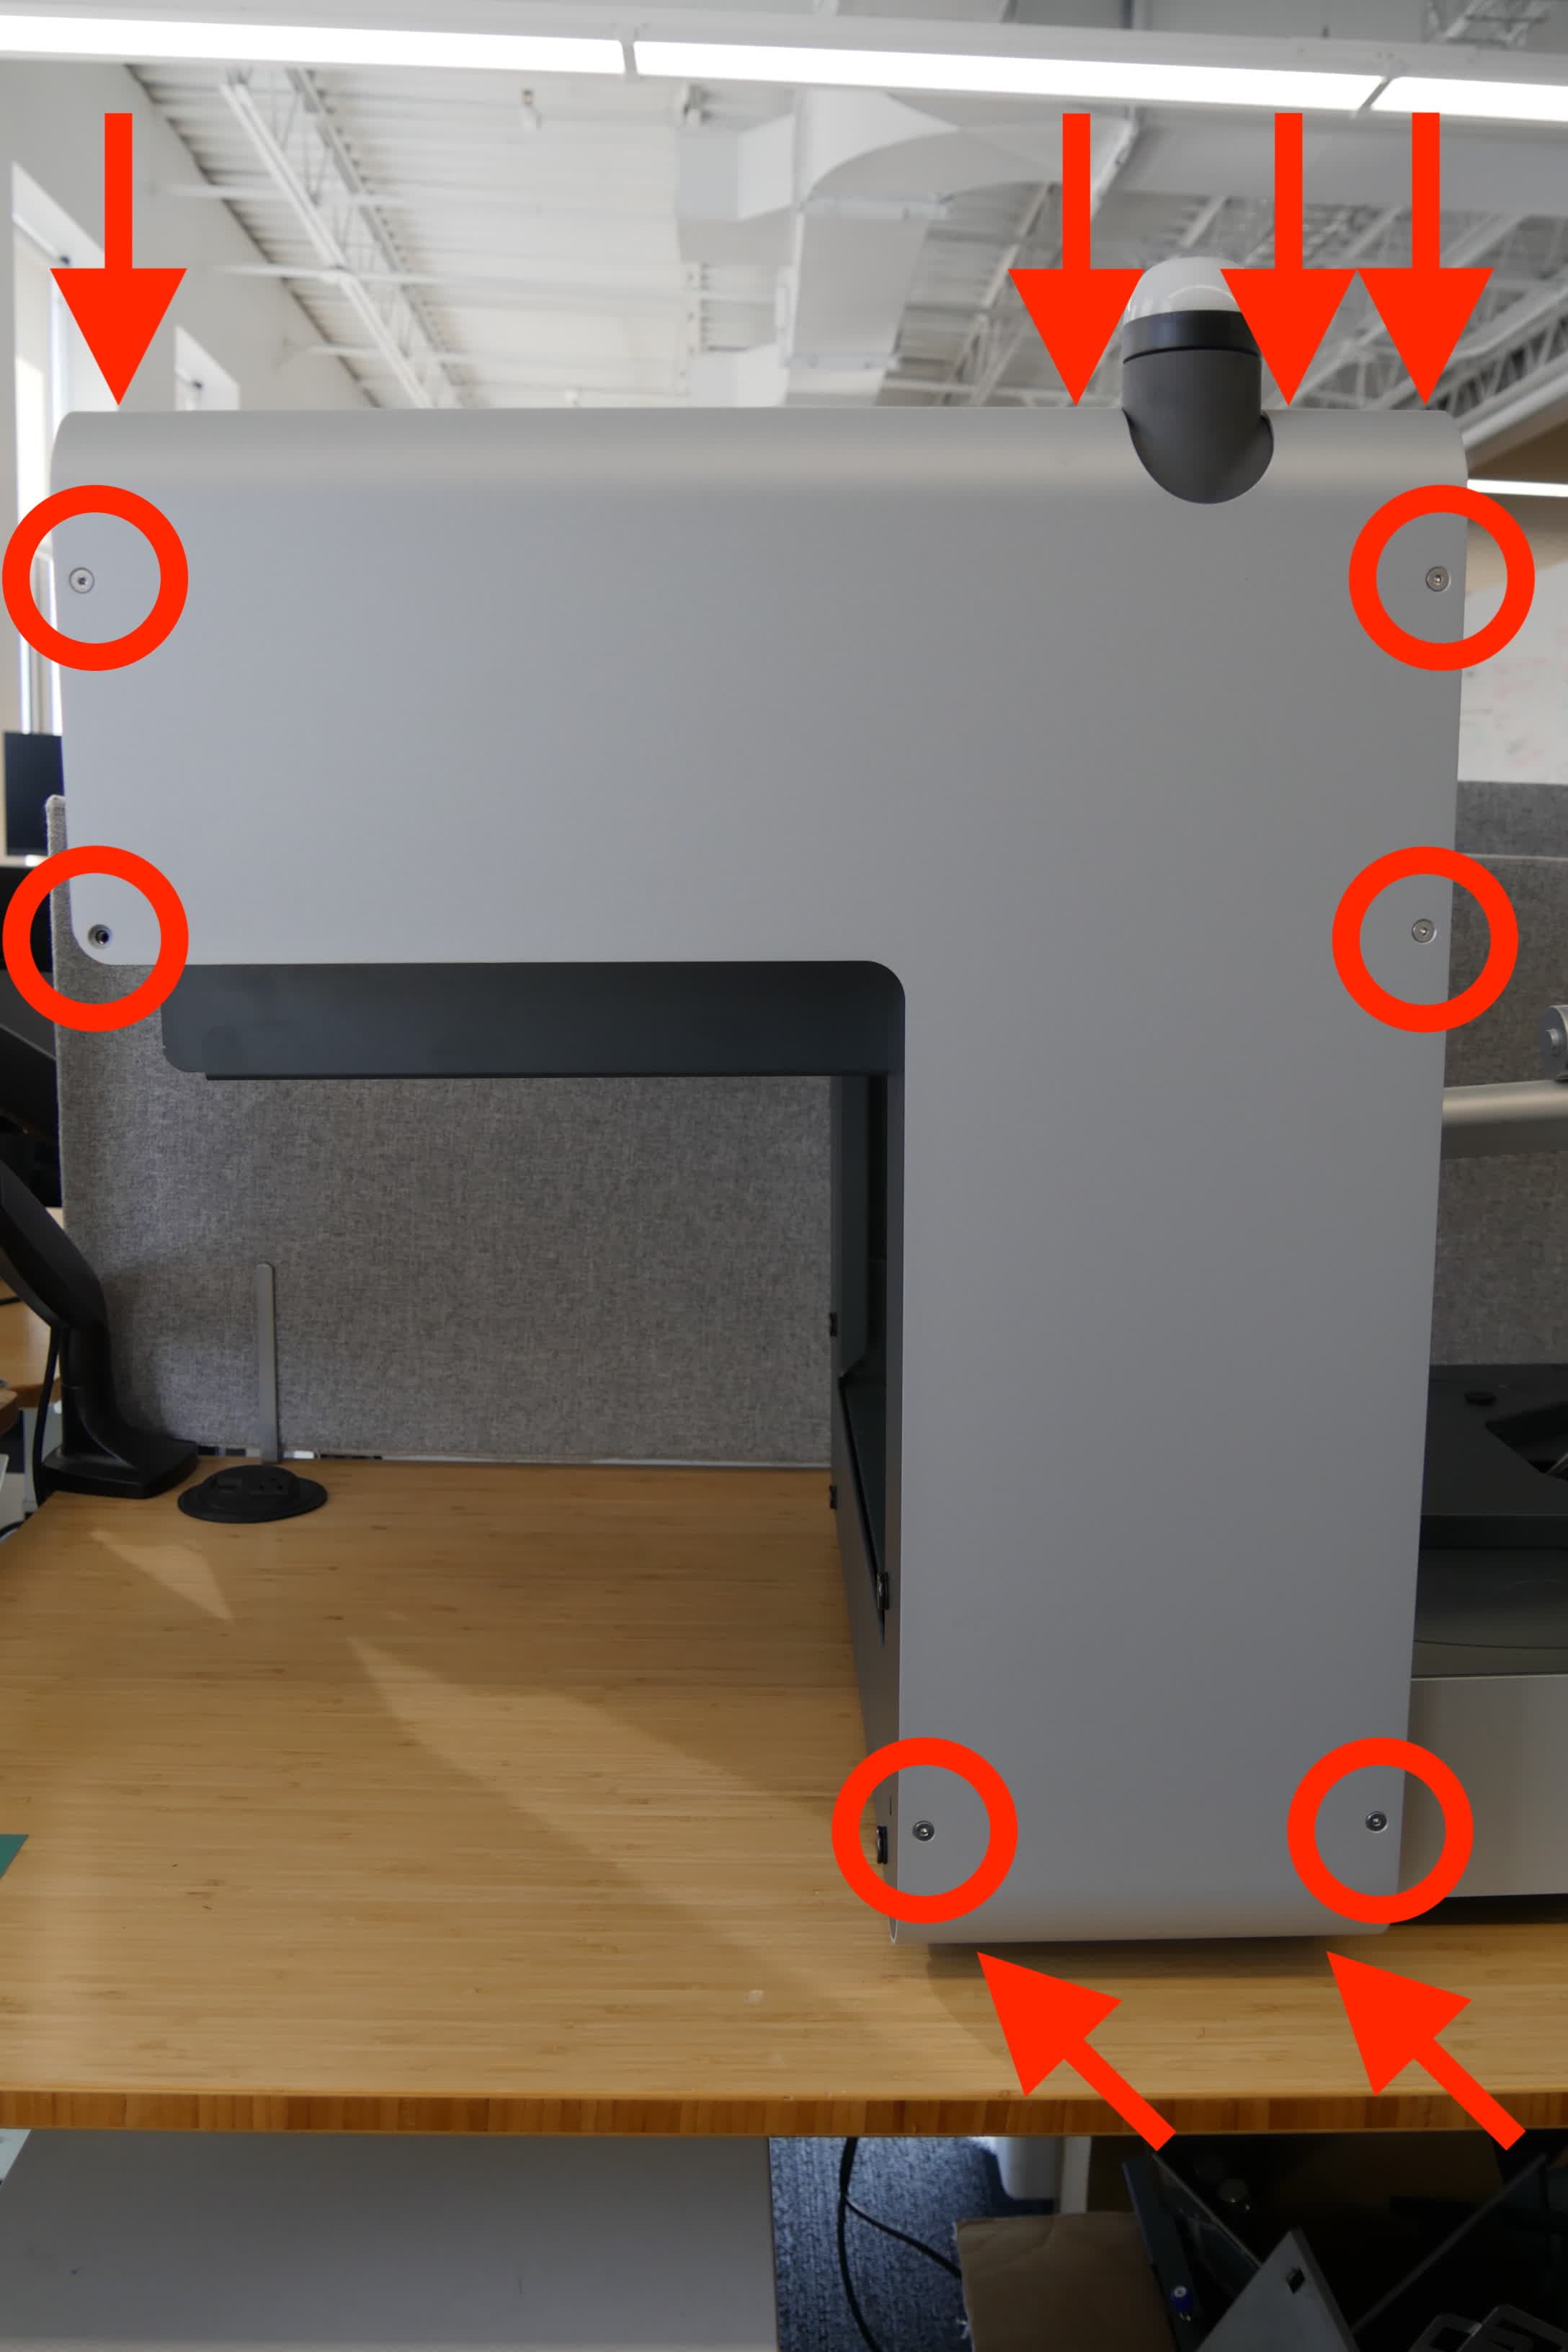
    1. If the part removal mechanism does move and the error appears while or after it squeezes the build platform part release paddles, there may be an issue with the motor encoder or limit switch. Power off and unplug the machine, remove the rear shell (on the same side as the power switch), and reseat both ends of the encoder and limit switch cables.
Form Auto rear shell screws
Form Auto print removal mechanism motor
    1. If the part removal mechanism stalls in an unusual place, power off and unplug the Form Auto and move the mechanism by hand to search for a physical obstruction. Replace the part removal mechanism if necessary.
    2. If the mechanism does not move, then the motor is likely the cause of the error. Power off and unplug the machine, remove the rear shell (on the same side as the power switch), and reseat both ends of the motor cable.
Form Auto rear shell screws
Form Auto print removal mechanism motor
  1. If the issue recurs, record a video of the print removal cycle showing the error and contact Formlabs Support or your authorized reseller. Include the video you recorded.

Error 357/2

Error 357/2 indicates an issue with the motor that moves the part removal mechanism towards and away from the printer (also known as the gantry motor) or its encoder.
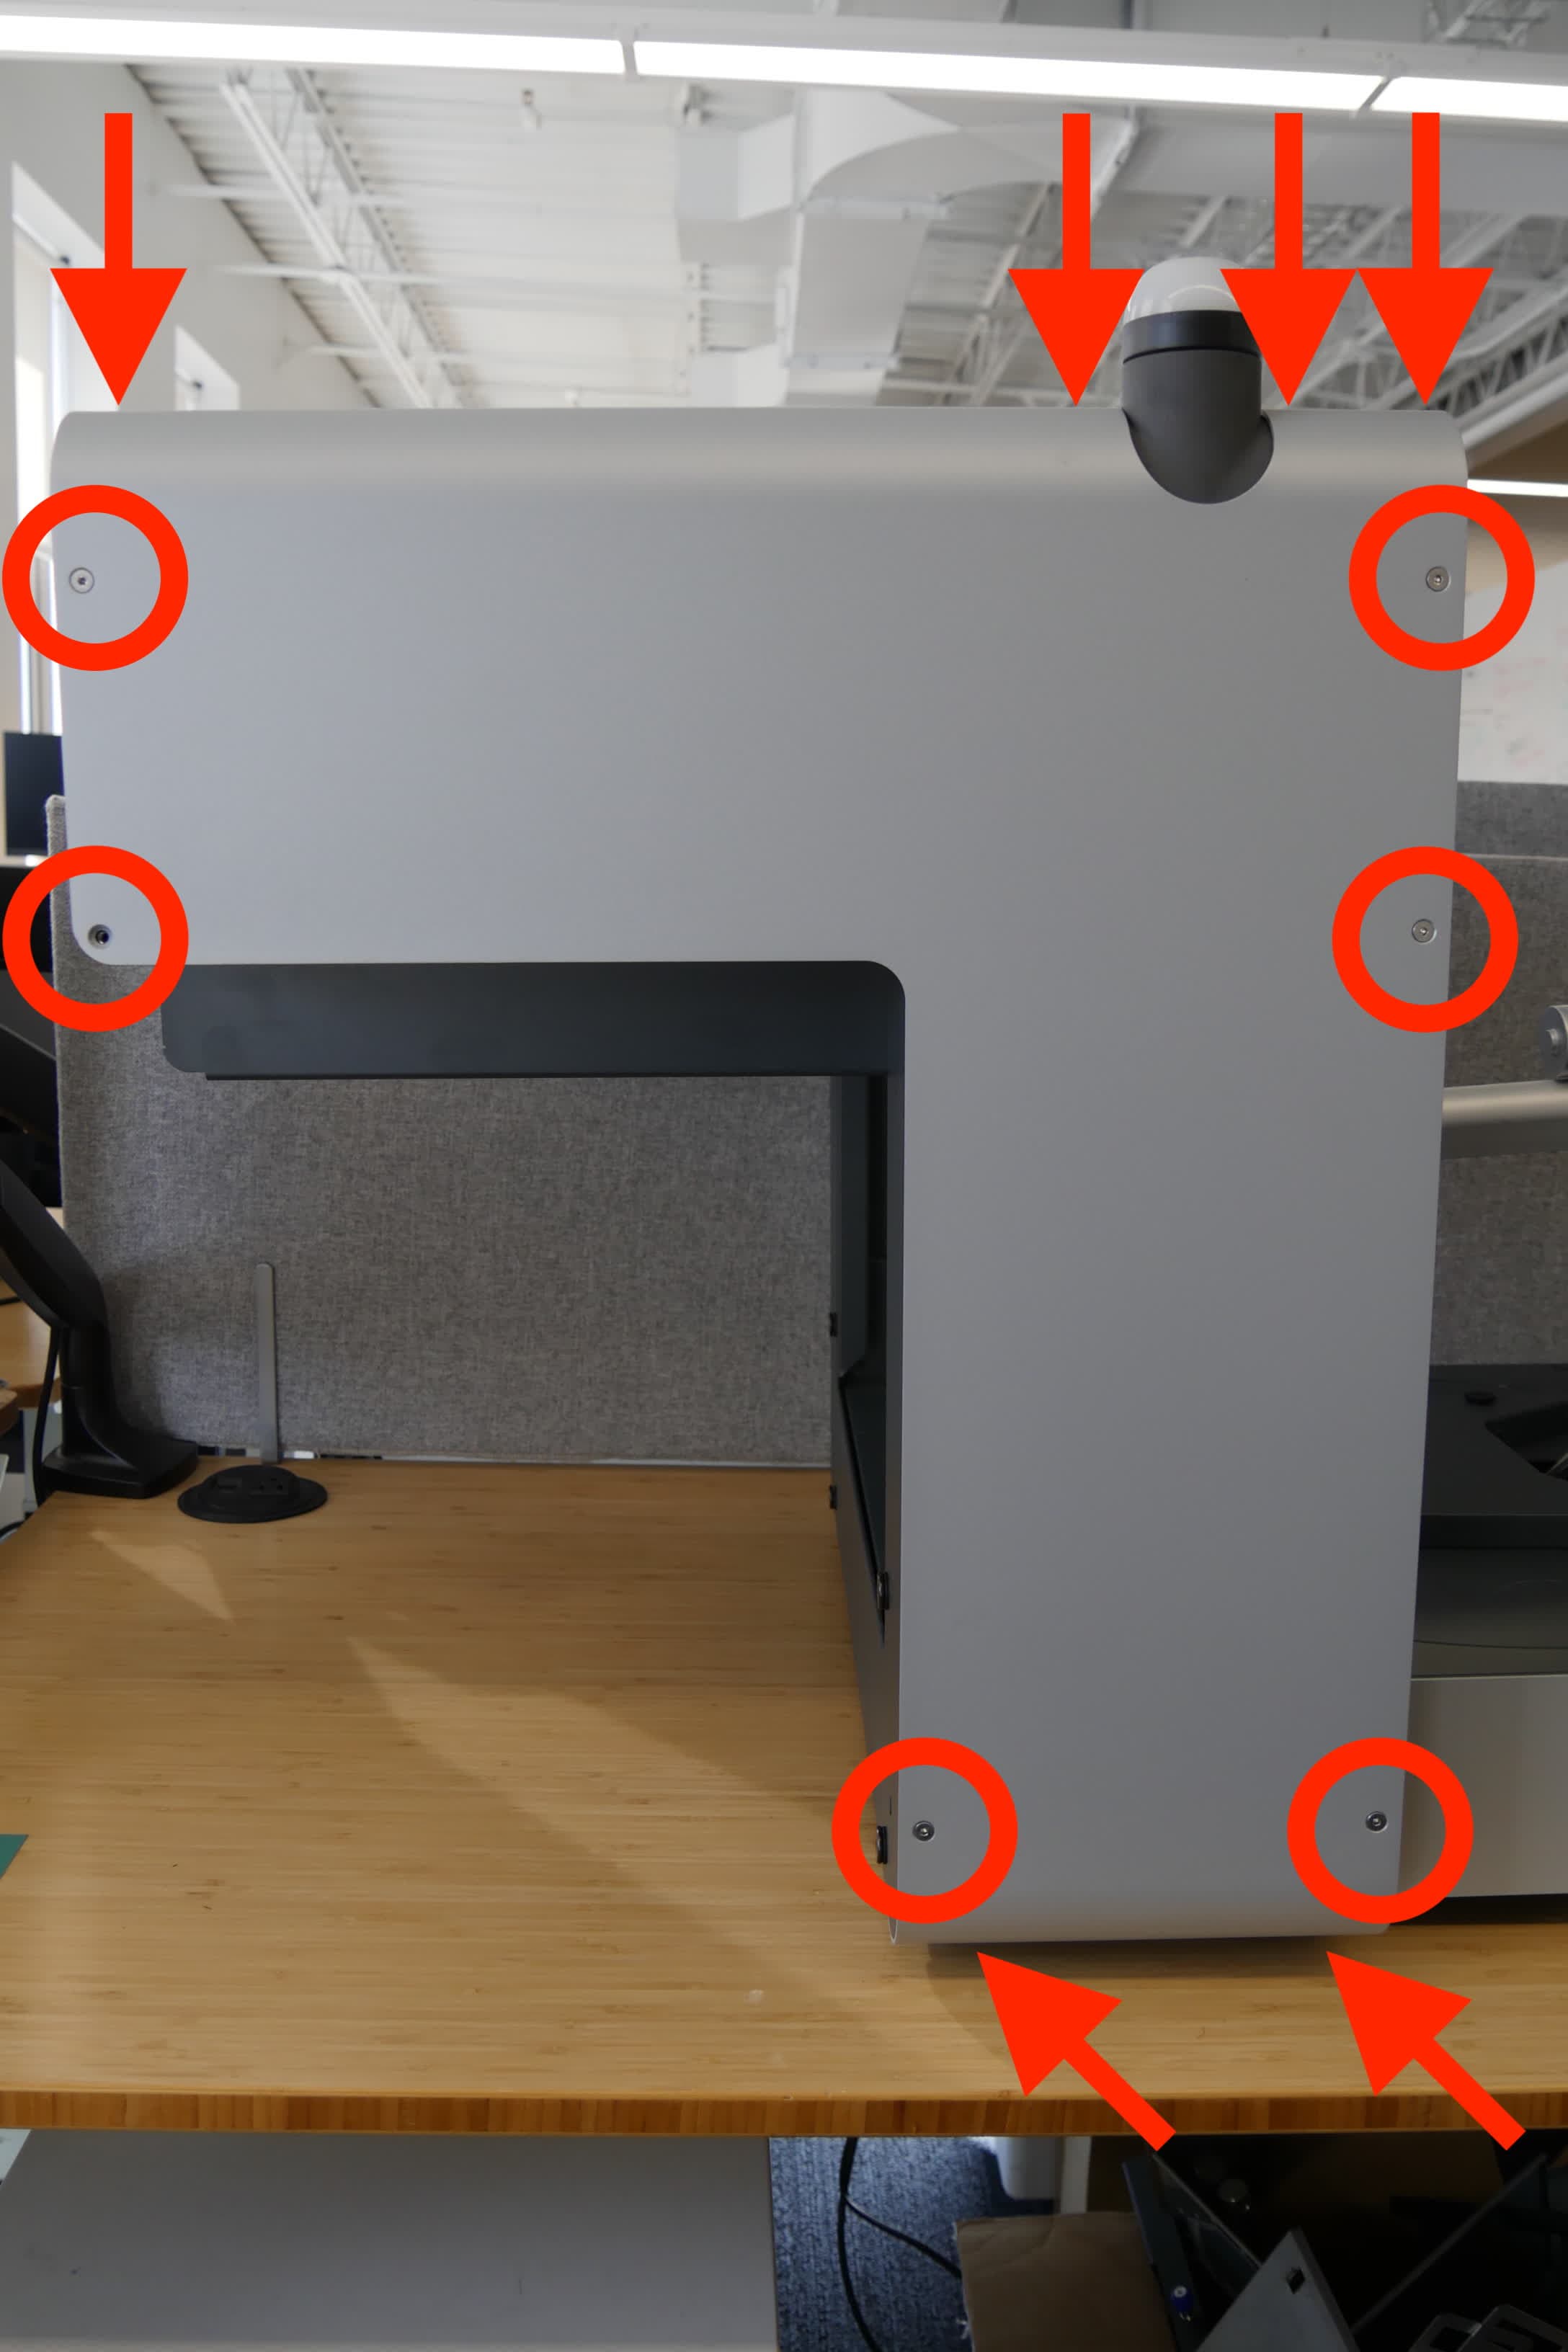
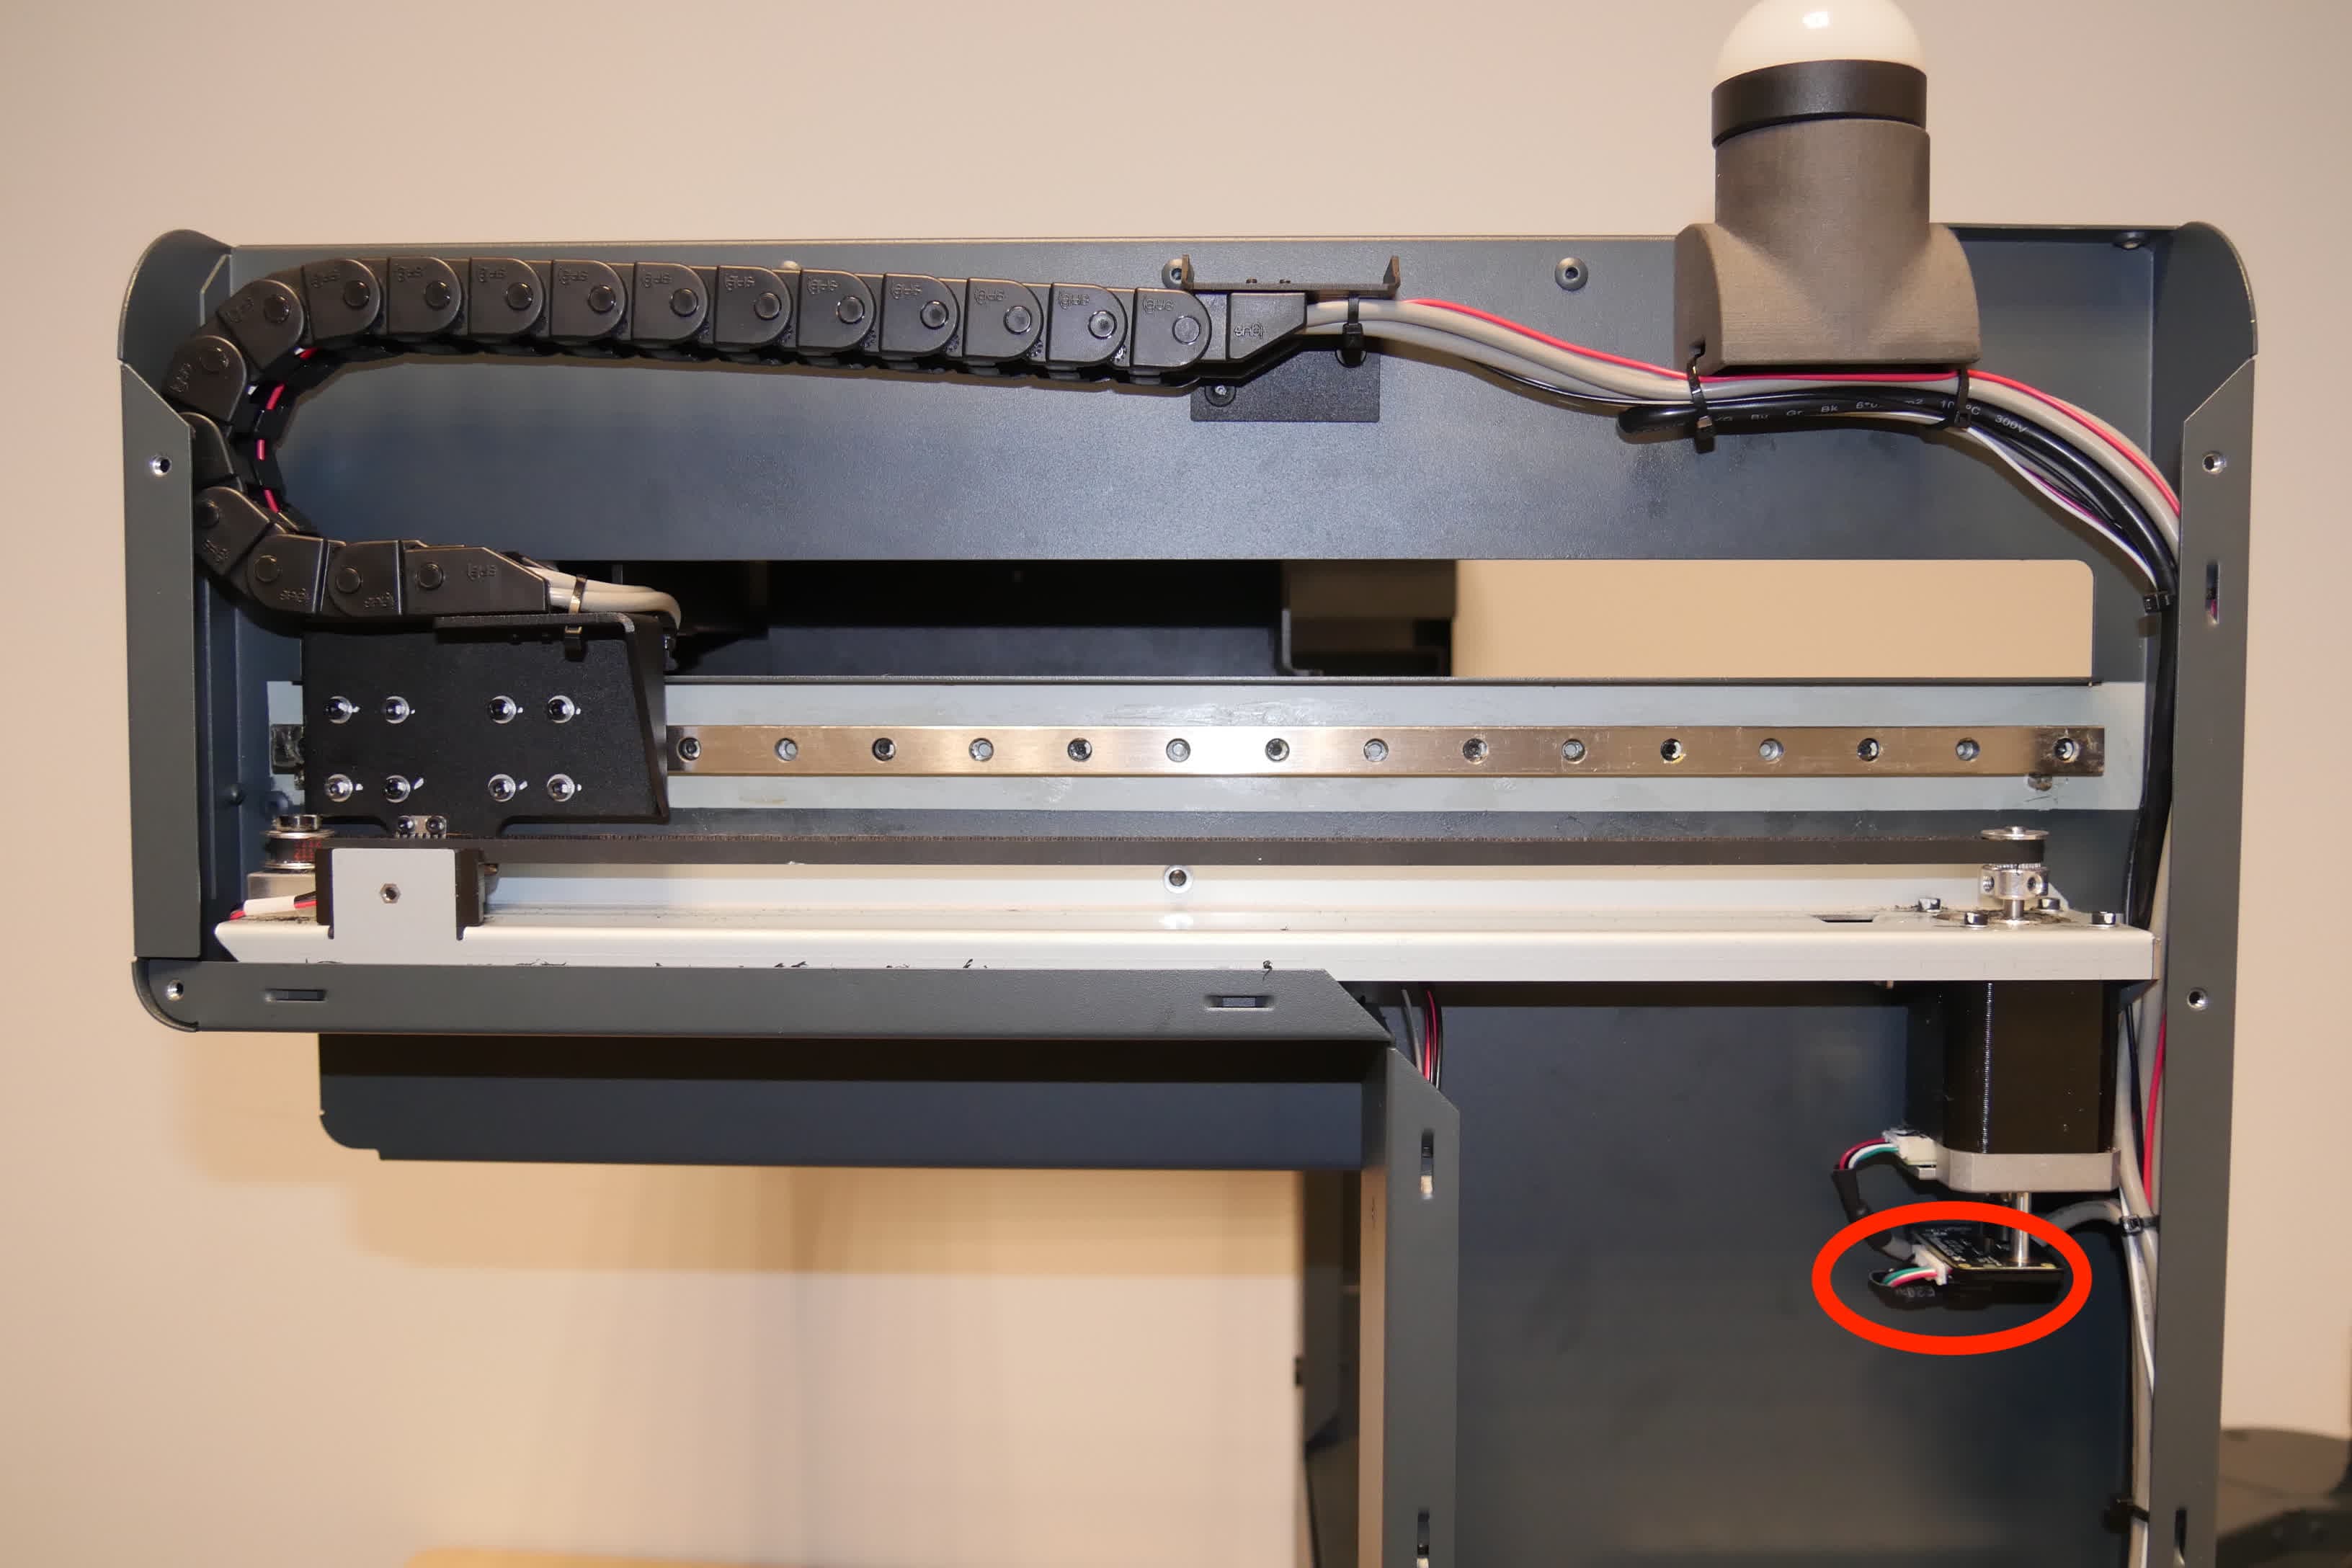
  1. Run a test harvest. On the printer’s touchscreen, tap Settings > Form Auto > Run Print Removal Cycle. Check if the gantry moves towards the printer at all during the cycle.
  2. If the gantry moves, the gantry motor encoder may be malfunctioning. Power off and unplug the machine, remove the rear shell (on the same side as the power switch), and reseat both ends of the encoder cable.
Form Auto rear shell screws
Form Auto gantry motor encoder
    1. If the gantry does not move, the motor may be malfunctioning. Power off and unplug the machine, remove the rear shell (on the same side as the power switch), and reseat both ends of the motor cable.
Form Auto rear shell screws
Form Auto gantry motor
  1. If there's any obvious physical issue with the gantry moving (e.g., a grinding noise, motor stalling noise, excessive resistance when moving the gantry by hand while the machine is powered off, etc.), the mechanism may be misaligned or the belt that drives the gantry may be damaged. Replace the gantry drive assembly if necessary.
  2. If the test harvest completes normally but the printer shows this error, contact Formlabs Support or your authorized reseller.

Error 358/1

Error 358/1 indicates that the motor that closes and opens the part removal mechanism failed to reach its home position.

  1. Check for obstructions around the printer and Form Auto.
  2. Re-rack the part removal mechanism by pulling the arms to the closed position, then reopening them.
  3. Inspect the part removal mechanism pulley and service it if it is slipping. Follow the instructions in the guide Proactively servicing the Form Auto part removal mechanism pulley [EN] [DE] [ES] [FR] [IT] [JA] [ZH].
  4. If the pulley axle is damaged, replace the part removal mechanism. Follow the instructions in the guide Replacing the Form Auto part removal mechanism [EN] [DE] [ES] [FR] [IT] [JA] [ZH]. Replacement part removal mechanisms are available on the Formlabs Store.

Error 358/2

Error 358/2 indicates that the motor that moves the part removal mechanism towards and away from the printer failed to reach its home position.

  1. Check for obstructions around the printer and Form Auto.
  2. Re-rack the part release gantry by pulling it fully towards the printer, then pushing it back to its home position.
  3. Inspect the gantry pulley and service it if it is slipping. Follow the instructions in the guide Repairing a slipping gantry pulley [EN] [DE] [ES] [FR] [IT] [JA] [ZH].
  4. If the pulley axle is damaged, replace the part release gantry. Follow the instructions in the guide Replacing the Form Auto gantry drive assembly [EN] [DE] [ES] [FR] [IT] [JA] [ZH]. Replacement part removal mechanisms are available on the Formlabs Store.

If you see any of these error messages repeatedly, contact Formlabs Support or your authorized reseller.

Form Autoが較正されていない
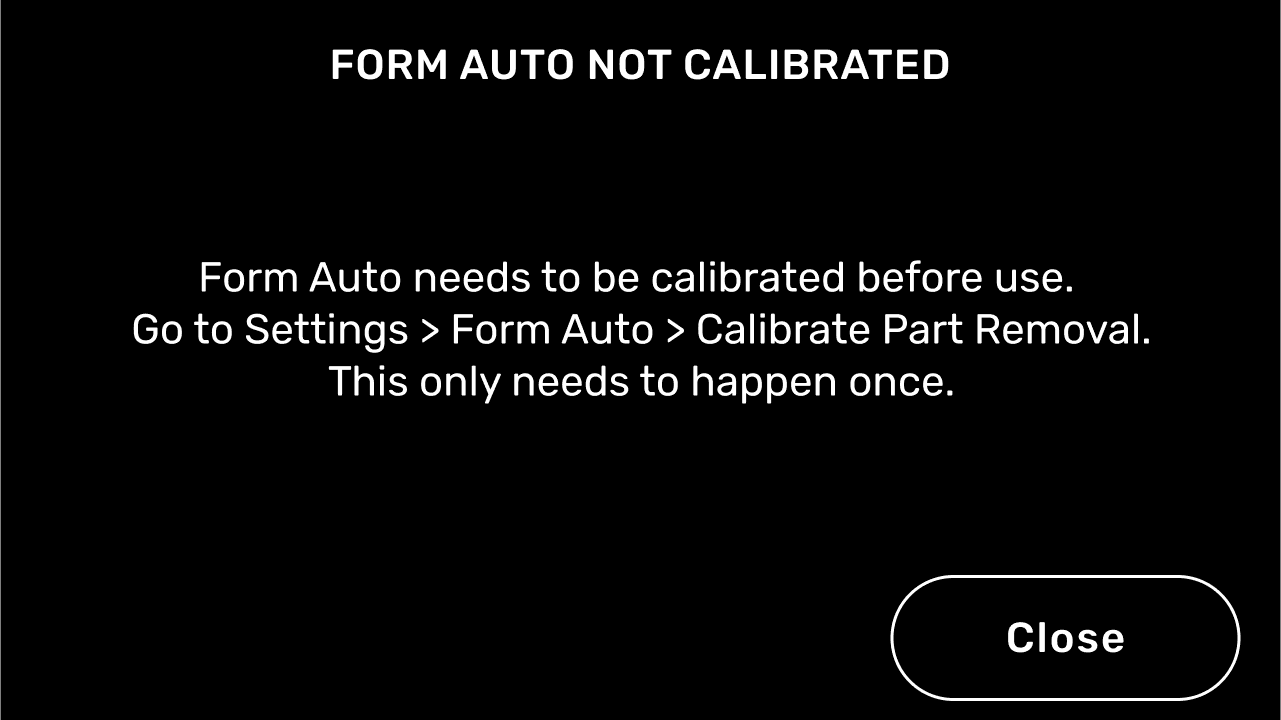
Form Autoのエラーメッセージ:Form Autoが較正されていません

Form Auto でプリントを開始する前に、レベリングと較正を行う必要があります。較正ルーチンで、パーツ取り外し装置に対するBuild Platform 2の正確な位置を検出できます。

  1. Home(ホーム)画面でレンチのアイコンをタップします。Settings(設定)画面が表示されます。
  2. Form Autoをタップします。Form Auto画面が表示されます。
  3. Calibrate Part Removal(造形品取り外しのキャリブレーション)をタップします。Calibration画面が表示されます。Build Platform 2がプリンターに挿入されていない状態で較正処理を開始しないでください。
  4. プリンターをプリント位置に合わせます。
  5. キャリブレーションプロセスを開始するには、Calibrate(キャリブレーション)をタップします。Form Autoの較正は、初期セットアップ時に一度だけ行う必要があります。