WHITE PAPER
Formlabs Logo

Form 4 and Form 4L generation error messages

Form 4 and Form 4L generation error messages

If the Form 4 or Form 4L encounters any abnormalities, the touchscreen displays error messages and displays more details about the error. This article outlines initial troubleshooting steps to resolve common error codes seen on Form 4 generation printers or that are expected during normal operation. If you encounter an error code not found in this article, refer to the general troubleshooting steps below.

Form 4 and Form 4L generation error codes have the format X.YY.ZZ, where X is the machine code, YY is the subsystem, and ZZ is the unique error code which signifies the relevant warning. The machine code for Form 4 generation printers is 1, so the full error code for all such printer errors starts with 1. The error group number describes the type of error, while the subcode designates a specific subsystem or failure mode. For example, all subcodes of Form 4 generation Error Group 3 relate to the heater and resin temperature, while Error 1.3.1 in particular relates to the resin failing to reach the target temperature.

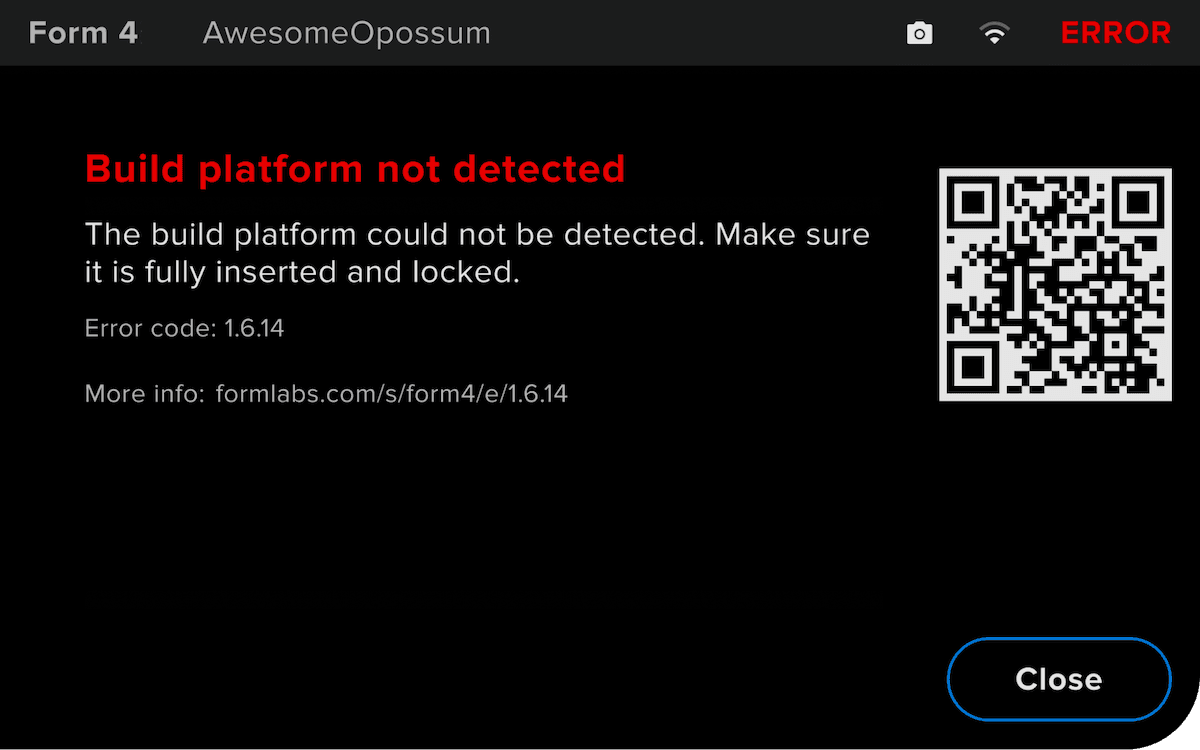
An example of a Form 4 error message

General troubleshooting steps

The following steps are recommended for most issues seen on Form 4 and Form 4L generation printers:

  1. Common steps for bugs, software issues, and electrical issues:
    1. Ensure that your printer's firmware is up to date.
    2. Update PreForm, then regenerate and reupload your print job.
    3. Power cycle the printer using the switch on the rear of the machine. Leave the unit powered off for at least 30 seconds before powering back on.
    4. If an issue persists and the printer’s firmware is already up to date, manually reinstall the latest firmware package.
    5. If an issue began immediately after updating the printer’s firmware, roll back the firmware package to the previous version.
  2. Best practices for opening a support case with Formlabs Support:
    1. Provide photos of the specific error code and any other symptoms you are seeing.
    2. Note the context of the issue (e.g., did the issue occur immediately after installation, after a software update, etc.).
    3. Note the frequency of this issue and whether it is persistent or intermittent.
    4. Note the resin and print settings you are printing with.
    5. Provide diagnostic logs from your printer.
    6. Note all troubleshooting steps already attempted.

Diagnostic logs

Form 4 and Form 4L generation printers maintain diagnostic logs to provide detailed information about the machine’s functionality. Include these diagnostic logs with other relevant observations and details when contacting Formlabs Support or your authorized reseller to speed up resolution.

For machines connected to the internet over an active Wi-Fi or Ethernet connection:

  1. Tap the gear icon on the bottom left of the printer’s Home screen. The Settings menu appears.
  2. Tap Support. The Support menu appears.
  3. Tap Send diagnostic information. A confirmation message to upload diagnostic information appears.
  4. Tap Upload to start the upload. A confirmation message appears when the upload is complete.

For printers not connected to the internet:

  1. Open PreForm.
  2. Click Edit Job Setup. The Job Setup window opens.
  3. Select the printer’s serial name.
  4. Click Download Logs. A confirmation window appears.
  5. Click Browse to download the diagnostic logs to a preferred location on your computer.
  6. Click OK. The diagnostic logs save and appear in the encrypted FORMLOGS format.
  7. Attach the file when contacting Formlabs Support or your authorized reseller.
  8. If PreForm displays the message ERROR_BAD_STATE, there may not be enough storage space on the printer for the upload. Delete print jobs from the Queue to clear enough storage space to upload the logs.
  9. Restart the printer and try again.

Learn more about options for network and non-network connections.

Control errors (Error Group 1)

All subcodes of Form 4 and Form 4L Error Group 1 (1–61) relate to subsystem communication and motor control in the machine.

Error 1.1.1: Could not home motor

Error 1.1.1 indicates that a motor failed to reach its home position. The motor may have stalled due to debris or the limit switch the printer uses to determine the motor’s position may be damaged. Check for and remove any debris in the resin tank or on the build platform, then check whether the build platform and mixer travel normally during a print. This error was removed in firmware version 1.4. If you see this error message repeatedly, update the printer's firmware.

Error 1.1.3: Internal error

Error 1.1.3 indicates an internal communication error between the printer’s subsystems. To resolve this issue:

  1. Perform a factory reset.
  2. If the error persists, replace the motherboard. Follow the instructions in the repair guide Replacing the Form 4 motherboard (post 2024-11-15), Replacing the Form 4 motherboard (pre 2024-11-15), or Replacing the Form 4L motherboard, depending on the type and date of manufacture of your printer. Replacement motherboards can be purchased from the Formlabs web store.

Error 1.1.4: Resin level sensor is not programmed

Error 1.1.4 indicates an issue with the LevelSense board in the printer. To resolve this issue:

  1. Reboot your printer.
  2. Ensure that the printer's firmware is up to date. If the firmware is up to date, manually reinstall the latest firmware package.
  3. Inspect and reseat the LevelSense cables.
  4. If the error persists, replace the LevelSense board. Follow the instructions in the repair guides Replacing the Form 4 LevelSense board or Replacing the Form 4L LevelSense board. Replacement LevelSense boards can be purchased from the Formlabs web store.

Error 1.1.5: Could not measure resin in the tank

Error 1.1.5 indicates an issue with the LevelSense board in the printer. If a print is in progress, monitor it to make sure that the resin tank does not run out of resin. To resolve this issue, follow the same troubleshooting steps for Error 1.1.4: Resin level sensor is not programmed.

Error 1.1.6: Mixer detected debris

Error 1.1.6 indicates that the mixer hit debris while moving across the resin tank. To resolve this issue:

  1. Ensure that your printer's firmware is up to date.
  2. Inspect and clean the resin tank to remove debris, including under the wear strips along the edge of the tank film.
  3. Print a cleaning sheet and filter the resin.
  4. Check the build platform for debris or damage, such as deep scratches or burrs. Clean or replace if necessary.
  5. Check the mixer for damage or debris. Clean or replace if necessary.
  6. The mixer rides along the lip of the resin tank. Ensure the lip of the resin tank is clean and free of debris.
  7. Ensure the mixer arm is fully seated in the mixer body.
  8. When using a more viscous resin such as Rigid 4000 Resin or Rigid 10K Resin:
    1. Manually mix the resin in the tank with the wiper or a spatula with rounded corners. It is good practice to manually mix any resin stored in the tank after several weeks.
    2. Turn on resin preheating to reduce resin viscosity at the beginning of the print. On the touchscreen, tap Settings > Configuration. Toggle Resin preheating to ON.
    3. Consider using the Print Settings Editor to increase the Start Temperature to be equal to the Operating Temperature. The increased initial temperature will reduce the viscosity of the resin, lowering the likelihood of a false debris detection error.
  9. Debris is generated from print failure. Review Formlabs best practices for printing with Form 4 and Form 4L generation printers to reduce your chance of print failure before attempting another print.
  10. If the error persists with a clean tank and build platform, power off the printer. Grip the mixer and slowly move it back and forth by hand, feeling for any changes in resistance. If there are changes in resistance, remove the resin tank and check again.
    1. If the changes in resistance are still present: replace the mixer drive assembly. Follow the instructions in the repair guides Replacing the Form 4 mixer drive assembly or Replacing the Form 4L mixer drive assembly. Replacement mixer drive assemblies can be purchased from the Formlabs web store.
    2. If the movement is now smooth: there was debris in the resin tank, damage or debris on the mixer, or the mixer was not fully seated. Repeat steps 2–7.
  11. Align the build platform.
  12. Try again with a different resin tank, if available.
  13. If the mixer was colliding with the build platform because the build platform stuck to the resin tank during the print, replace the Light Processing Unit, particularly if the LPU has exceeded its expected lifetime or is physically damaged. Replacement Light Processing Units can be purchased from the Formlabs Store.
  14. If you see this error message repeatedly, contact Formlabs Support or your authorized reseller.

If this error occurs immediately when the printer turns on or the mixer moves unexpectedly when using the Move motors tool (with no resin tank or mixer inserted), replace the mixer drive assembly. Follow the instructions in the repair guides Replacing the Form 4 mixer drive assembly or Replacing the Form 4L mixer drive assembly. Replacement mixer drive assemblies can be purchased from the Formlabs web store.

Error 1.1.7: Build platform detected debris

Error 1.1.7 indicates the build platform encountered debris while lowering into the resin tank. To resolve this issue:

  1. Ensure that your printer's firmware is up to date.
  2. Inspect and clean the resin tank to remove debris, including under the wear strips along the edge of the tank film.
  3. Print a cleaning sheet and filter the resin.
  4. Check the build platform for debris or damage, such as deep scratches or burrs. Clean or replace if necessary.
  5. Align the build platform.
  6. Try again with a different resin tank, if available.
  7. If you see this error message repeatedly, contact Formlabs Support or your authorized reseller.

Error 1.1.17: Cover opened

Error 1.1.17 indicates that the cover (Form 4 generation) or door (Form 4L generation) was opened during printing. For safety reasons, the print pauses whenever the cover or door is open. Close the cover or door to continue.

If the cover or door was not open or closing it does not resolve the issue:

  1. Open the cover (Form 4 generation) or door (Form 4L generation).
  2. Check for the interlock magnets.
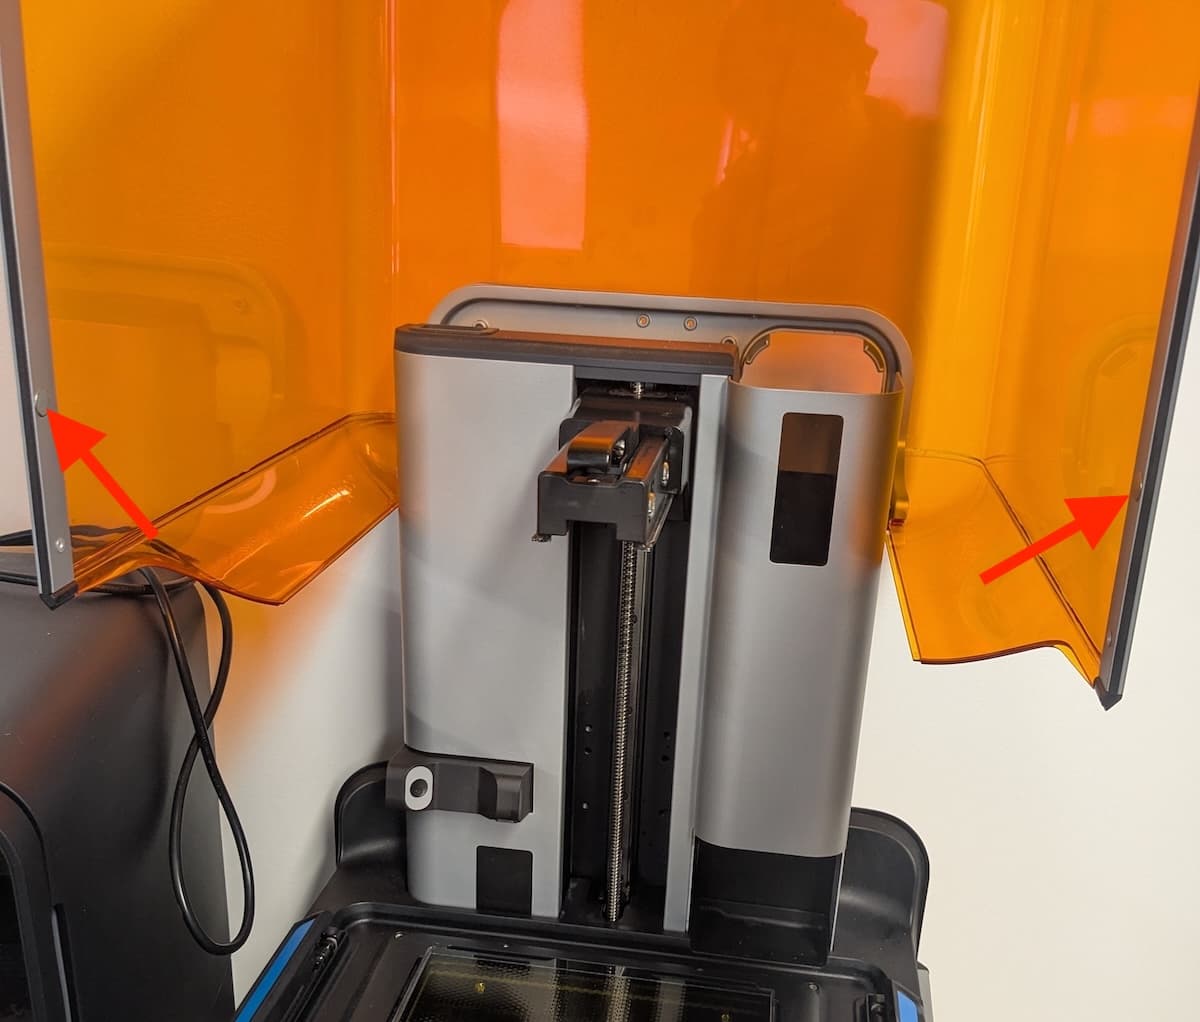
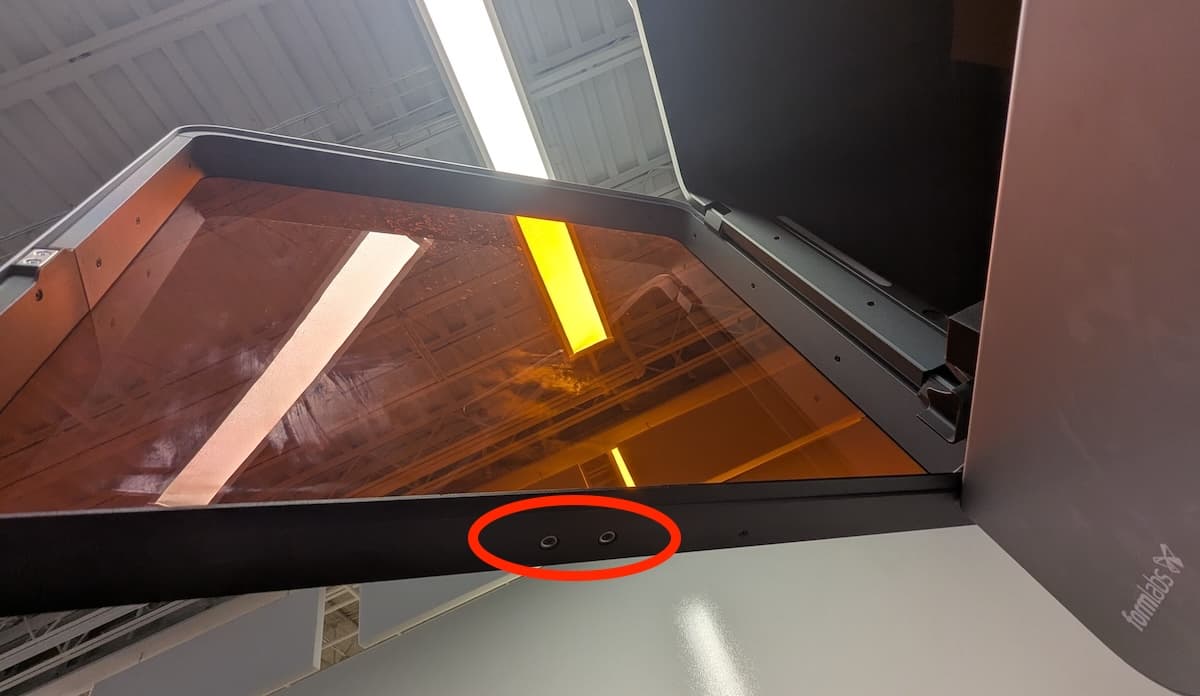
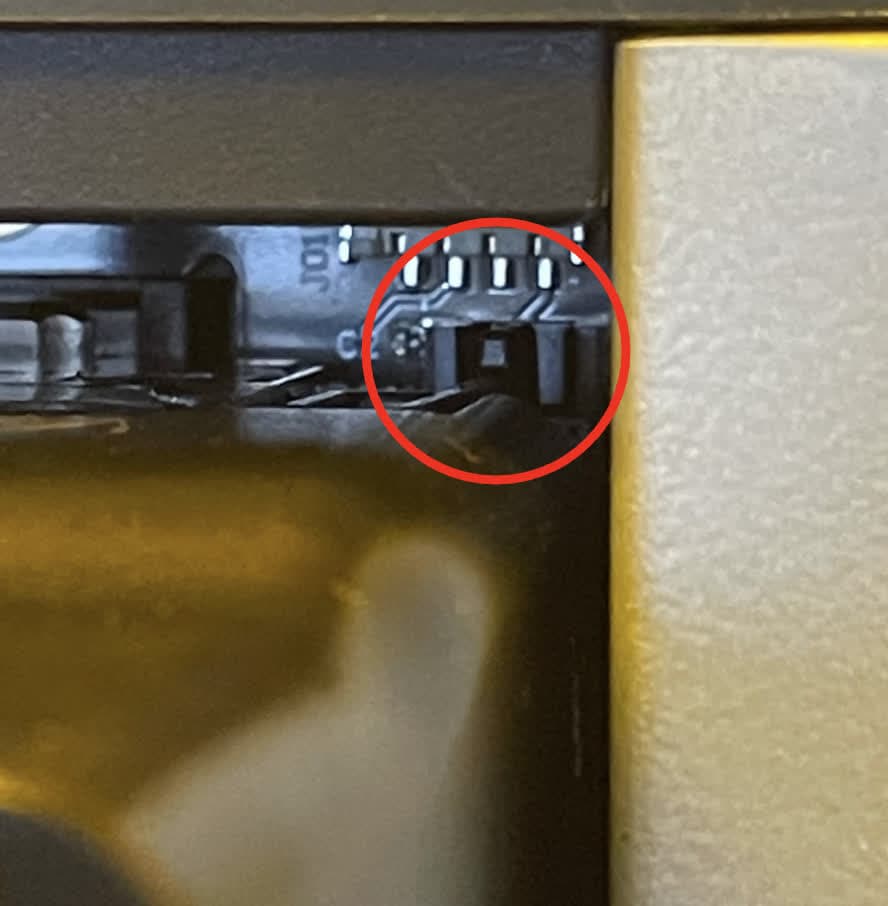
Form 4 generation: The printer has two round interlock magnets glued to the bottom edge of the cover.
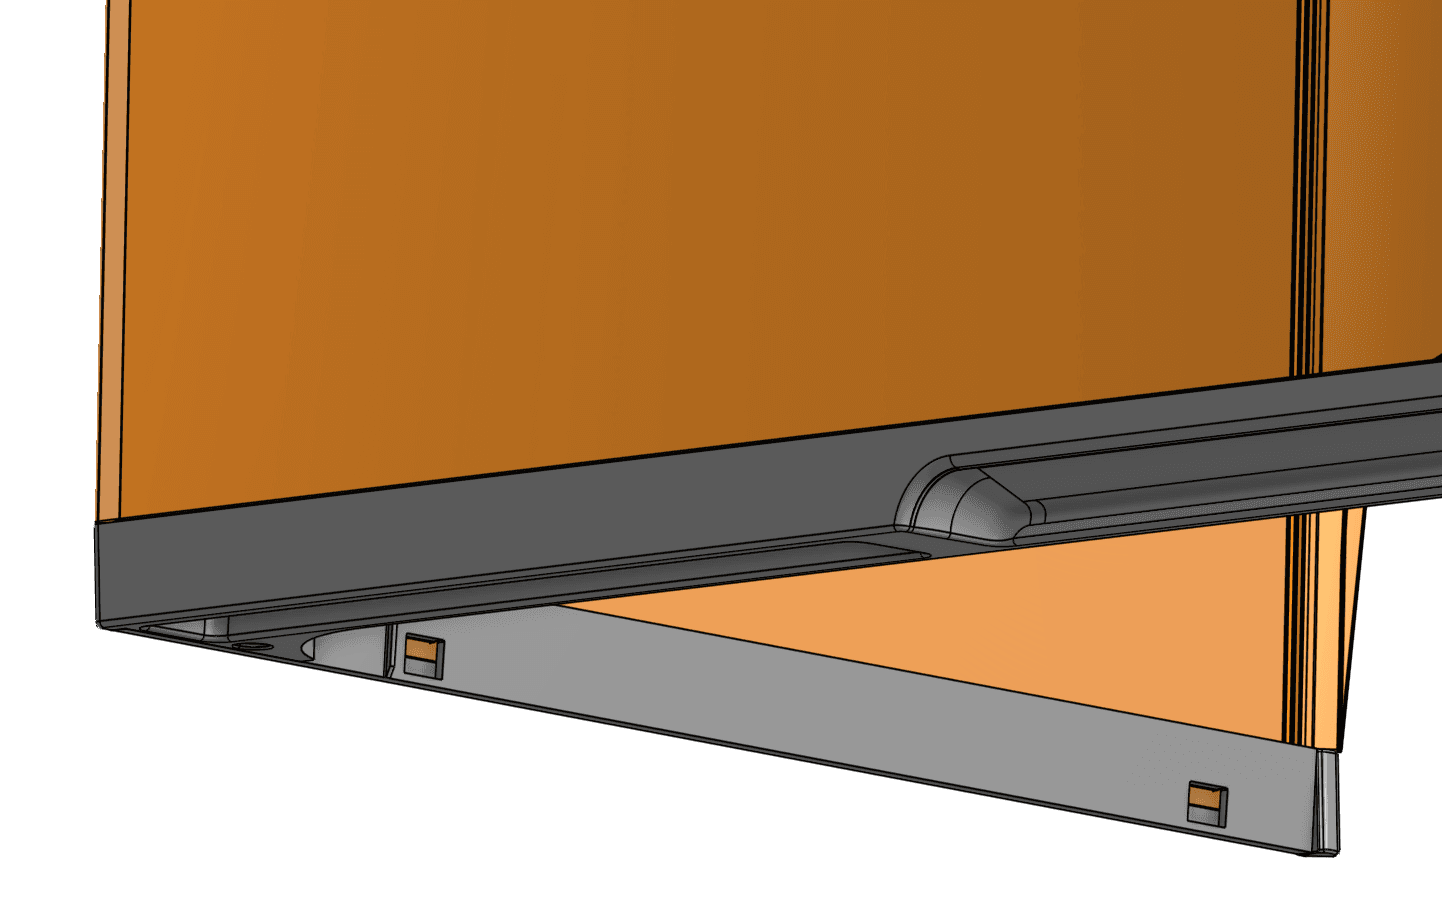
Form 4 generation: On newer Form 4 generation printers, the magnet is held in place under the cover trim. It is less likely that these magnets will become damaged or dislodged.
Form 4L generation: The printer has two round interlock magnets on the bottom edge of the door, each secured by a screw.
Form 4 generation: The printer has two round interlock magnets glued to the bottom edge of the cover. The magnets are N52 grade. 10 mm in diameter, and 2 mm thick.
Form 4 generation: On newer Form 4 generation printers, the magnet is held in place under the cover trim. It is less likely that these magnets will become damaged or dislodged.
Form 4L generation: The printer has two round interlock magnets on the bottom edge of the door, each secured by a screw.
  1. If any magnets are not present, contact Formlabs Support or your authorized reseller for assistance.
  2. Reboot your printer.

Error 1.1.23: Motherboard communication failed

Error 1.1.23 indicates that the printer failed to send a message to the motherboard. To resolve this issue:

  1. Reboot your printer.
  2. Ensure that your printer's firmware is up to date. If the printer’s firmware is already up to date, manually reinstall the latest firmware package.
  3. If this error occurs when the printer powers on, disconnect all USB devices from the printer’s USB-C port and power cycle the printer. If the printer boots up successfully, the devices may be plugged back in.
  4. Leave the printer unplugged overnight before attempting another print.
  5. If the error persists, contact Formlabs Support or your authorized reseller for assistance.

Error 1.1.31: Incompatible firmware

Error 1.1.31 indicates an issue with the firmware installed on the printer. Ensure that your printer's firmware is up to date. If the issue persists and the printer’s firmware is already up to date, manually reinstall the latest firmware package. Reboot your printer and try again.

Error 1.1.32: LPU fan failed

Error 1.1.32 indicates that the Light Processing Unit (LPU) cooling fan has failed. Continuing to use the printer may lead to damage to the LPU. To resolve this issue:

  1. Reboot your printer.
  2. Ensure that your printer's firmware is up to date. If the printer’s firmware is already up to date, manually reinstall the latest firmware package.
  3. If the error persists, replace the LPU cooling fan. Follow the instructions in the repair guides Replacing the Form 4 Light Processing Unit fan or Replacing the Form 4L Light Processing Unit fan. Replacement LPU fans are available from the Formlabs web store.

Error 1.1.33: Backlight fan failed

Error 1.1.33 indicates that the Backlight Unit cooling fan has failed. Continuing to use the printer may lead to damage to the Backlight Unit. To resolve this issue:

  1. Reboot your printer.
  2. Ensure that your printer's firmware is up to date. If the printer’s firmware is already up to date, manually reinstall the latest firmware package.
  3. If the error persists, replace the Backlight Unit. Follow the instructions in the repair guides Replacing the Form 4 Backlight Unit or Replacing the Form 4L Backlight Unit. Replacement Backlight Units are available from the Formlabs web store.

Error 1.1.34: PSU fan failed

Error 1.1.34 indicates that the power supply cooling fan has failed. Continuing to use the printer may lead to damage to the power supply. Reboot your printer, reflash its firmware, and try again. If you see this error message repeatedly, contact Formlabs Support or your authorized reseller.

Error 1.1.40: Printer voltage lower than expected

Error 1.1.40 indicates that the power supply is outputting a lower voltage than expected. If your prints are successful, ignore this error message. However, low voltage may impact printing, including preventing the Backlight Unit from lighting up. To resolve this issue:

  1. Replace the power supply. Follow the instructions in the repair guides Replacing the Form 4 power supply or Replacing the Form 4L power supply. Replacement power supply units for the Form 4 are available from the Formlabs web store. Contact Formlabs Support or your authorized reseller for the Form 4L power supply and additional assistance.

Error 1.1.47: Could not home build platform

Error 1.1.47 indicates the build platform failed to return to its home position properly.

  1. Check for any obstructions blocking the build platform from reaching the top of the Z-axis.
  2. Inspect and reseat the Z-axis limit switch cable.
    1. Form 4: Follow the instructions in the repair guide Replacing the Form 4 Z-axis limit switch to Step 2: Disconnect the Z-axis limit switch cable.
    2. Form 4L: Follow the instructions in the repair guide Replacing the Form 4L Z-axis limit switch cable to Step 1: Disconnect the Z-axis limit switch cable.
  3. If the error persists, replace the Z-axis limit switch. Contact Formlabs Support or your authorized reseller for the replacement part and additional assistance.

Error 1.1.48: Could not home mixer

Error 1.1.48 indicates the mixer failed to return to its home position properly.

  1. Check for any obstructions blocking the mixer from reaching the sides of the resin tank.
  2. Inspect and reseat the mixer encoder board cable.
    1. Form 4: Follow the instructions in the repair guide Replacing the Form 4 mixer drive assembly to Step 2: Unplug the mixer encoder board cable.
    2. Form 4L: Follow the instructions in the repair guide Replacing the Form 4L mixer drive assembly to Step 1: Uninstall the mixer encoder board.
  3. If the error persists, replace the mixer drive assembly. Follow the instructions in the repair guides Replacing the Form 4 mixer drive assembly or Replacing the Form 4L mixer drive assembly. Replacement mixer drive assemblies are available from the Formlabs web store.

Heater errors (Error Group 3)

All subcodes of Form 4 and Form 4L Error Group 3 (1–12) relate to the heater.

Error 1.3.1: Resin could not be heated

Error 1.3.1 indicates that the resin did not reach its target temperature after a period of time. To resolve this issue:

  1. Ensure that the ambient temperature around your printer is above 18 °C (64 °F). If your operating environment is particularly cold, consider relocating the printer or heating the print environment.
  2. Update PreForm, then regenerate and reupload your print job.
  3. Reboot your printer.
  4. Ensure that your printer's firmware is up to date. If the printer’s firmware is already up to date, manually reinstall the latest firmware package.
  5. The tank heaters are part of the Light Processing Unit (LPU). Inspect and reseat the heater cable(s).
  6. If the error persists, replace the LPU. Follow the instructions in the repair guides Replacing the Form 4 Light Processing Unit or Replacing the Form 4L Light Processing Unit. Replacement LPUs are available from the Formlabs web store.

For more information, read the support article Maintaining resin temperature.

Error 1.3.3: Resin is overheated

Error 1.3.3 indicates that the resin in the resin tank has exceeded its target temperature. To resolve this issue:

  1. Ensure that the ambient temperature around your printer is below 28 °C (82 °F). If your operating environment is particularly hot, consider relocating the printer or cooling the print environment.
  2. Update PreForm, then regenerate and reupload your print job. Let the resin tank cool down for 30 minutes or use another tank before retrying the print.
  3. Reboot your printer.
  4. Ensure that your printer's firmware is up to date. If the printer’s firmware is already up to date, manually reinstall the latest firmware package.
  5. Inspect and clean the mesh filter. Follow the instructions in the support articles Cleaning the rear mesh filter (Form 4 generation) or Cleaning the mesh filter (Form 4L generation).
  6. Check that the fan grate on the bottom of the printer is clear of any debris or cured resin.
  7. Inspect and clean the Light Processing Unit (LPU) fan filter.
    1. Form 4: Follow the instructions in the repair guide Replacing the Form 4 Light Processing Unit fan filter to Step 3: Removing the filter. Vacuum the filter.
    2. Form 4L: Follow the instructions in the repair guide Replacing the Form 4L Light Processing Unit fan filter to Step 4: Vacuum the fan filter (optional). Vacuum the filter.
  8. If the LPU fan filter cannot be cleaned, replace it. Replacement LPU fan filters are available on the Formlabs web store.
  9. The tank heaters are part of the Light Processing Unit. Inspect and reseat the heater cable(s).
    1. Form 4: Follow the instructions in the repair guide Replacing the Form 4 Light Processing Unit to Step 3: Disconnect the tank heater cable.
    2. Form 4L: Follow the instructions in the repair guide Replacing the Form 4L Light Processing Unit to Step 3: Disconnect the tank heater cables.
  10. If the error persists, replace the LPU. Follow the instructions in the repair guides Replacing the Form 4 Light Processing Unit or Replacing the Form 4L Light Processing Unit. Replacement LPUs are available from the Formlabs web store.

For more information, read the support article Maintaining resin temperature.

Error 1.3.4: Heater is overheated

Error 1.3.4 indicates that the heater temperature has exceeded its safe operating range. Stop any current print jobs, as continuing may damage your printer and result in a print failure. To resolve this issue, follow the same troubleshooting steps for Error 1.3.3: Resin is overheated.

For more information, read the support article Maintaining resin temperature.

Error 1.3.5: Heater is not connected

Error 1.3.5 indicates that the heater may not be connected. The heater is located in the frame of the LPU assembly.

  1. Reboot your printer.
  2. Ensure that your printer's firmware is up to date. If the printer’s firmware is already up to date, manually reinstall the latest firmware package.
  3. The tank heaters are part of the Light Processing Unit. Inspect and reseat the heater cable(s).
    1. Form 4: Follow the instructions in the repair guide Replacing the Form 4 Light Processing Unit to Step 3: Disconnect the tank heater cable.
    2. Form 4L: Follow the instructions in the repair guide Replacing the Form 4L Light Processing Unit to Step 3: Disconnect the tank heater cables.
  4. If the error persists, replace the LPU. Follow the instructions in the repair guides Replacing the Form 4 Light Processing Unit or Replacing the Form 4L Light Processing Unit. Replacement LPUs are available from the Formlabs web store.

Error 1.3.6 and Error 1.3.7: Could not measure resin temperature

Error 1.3.6 and Error 1.3.7 indicate that the printer could not measure the current temperature of the resin in the resin tank and may need to disable the heater. To resolve this issue:

  1. Reboot your printer.
  2. Ensure that your printer's firmware is up to date. If the printer’s firmware is already up to date, manually reinstall the latest firmware package.
  3. The printer uses an IR sensor mounted underneath the Light Processing Unit to measure resin temperature in the resin tank. Inspect and reseat the resin temperature sensor cable.
    1. Form 4: Follow the instructions in the repair guide Replacing the Form 4 resin temperature sensor to Step 2: Disconnect the resin temperature sensor cable.
    2. Form 4L: Follow the instructions in the repair guide Replacing the Form 4L resin temperature sensor to Step 3: Disconnect the heater cables.
  4. If the error persists, replace the resin temperature sensor. Follow the instructions in the repair guides Replacing the Form 4 resin temperature sensor or Replacing the Form 4L resin temperature sensor. Replacement resin temperature sensors are available from the Formlabs web store.

Error 1.3.8 and Error 1.3.9: Could not measure heater temperature

Error 1.3.8 and Error 1.3.9 indicate that the printer could not measure the current temperature of the heater. The heater is located under the frame of the LPU assembly.

  1. Reboot your printer.
  2. Ensure that your printer's firmware is up to date. If the printer’s firmware is already up to date, manually reinstall the latest firmware package.
  3. The tank heaters are part of the Light Processing Unit (LPU). Inspect and reseat the heater cable(s).
    1. Form 4: Follow the instructions in the repair guide Replacing the Form 4 Light Processing Unit to Step 3: Disconnect the tank heater cable.
    2. Form 4L: Follow the instructions in the repair guide Replacing the Form 4L Light Processing Unit to Step 3: Disconnect the tank heater cables.
  4. If the error persists, replace the LPU. Follow the instructions in the repair guides Replacing the Form 4 Light Processing Unit or Replacing the Form 4L Light Processing Unit. Replacement LPUs are available from the Formlabs web store.

Error 1.3.10 and Error 1.3.11: Heater current is too high

Error 1.3.10 and Error 1.3.11 indicate that the heater encountered an issue during the preprint process or the print itself. The heater is located in the frame of the LPU assembly. To resolve this issue, follow the same troubleshooting steps for Error 1.3.8 and Error 1.3.9: Could not measure heater temperature.

Error 1.3.12: Heating resin to printing temperature

The printer may show Error 1.3.12 to inform you that it is heating the resin in the resin tank. It does not necessarily indicate that there is an issue. If the printer fails to heat the resin after a prolonged length of time, check the resin cartridge as you would for a heater-related error.

Accelerometer errors (Error Group 4)

All subcodes of Form 4 and Form 4L Error Group 4 (1–7) relate to the accelerometer.

Error 1.4.1: Printer is out of level

Formlabs SLA printers operate best when perfectly level. The touchscreen prompts you to level the printer when necessary, showing Error 1.4.1. Tap Settings > Tools > Level printer on the printer’s touchscreen to view the current level status. Follow the touchscreen prompts and use the leveling tool to level the printer. If the error persists, reflash your printer's firmware.

Error 1.4.2 and Error 1.4.3: Accelerometer is not connected

Error 1.4.2 and Error 1.4.3 indicate an issue with the accelerometer in the printer. Reboot your printer, reflash its firmware, and try again. If you see this error message repeatedly, contact Formlabs Support or your authorized reseller.

Error 1.4.7: Accelerometer recalibration failed

Error 1.4.7 indicates the accelerometer calibration routine failed. To resolve this issue:

  1. Ensure the printer is level and not moving.
  2. Reboot your printer.
  3. Ensure that your printer's firmware is up to date. If the printer’s firmware is already up to date, manually reinstall the latest firmware package.

Backlight error (Error Group 5)

All subcodes of Form 4 and Form 4L Error Group 5 (1–11) relate to the UV Backlight Unit.

Error 1.5.1: Backlight overheating

Error 1.5.1 indicates that the Backlight Unit is overheating. Printing will resume when the Backlight Unit has cooled down. To resolve this issue:

  1. Ensure that the ambient temperature around your printer is below 18 °C (64 °F). If your operating environment is particularly hot, consider relocating the printer or cooling the print environment.
  2. Update PreForm, then regenerate and reupload your print job. Let the Backlight Unit cool down for 30 minutes before retrying the print.
  3. Reboot your printer.
  4. Ensure that your printer's firmware is up to date. If the printer’s firmware is already up to date, manually reinstall the latest firmware package.
  5. Inspect and clean the mesh filter. Follow the instructions in the support articles Cleaning the rear mesh filter (Form 4 generation) or Cleaning the mesh filter (Form 4L generation).
  6. Check that the fan grate on the bottom of the printer is clear of any debris or cured resin.
  7. Inspect and reseat the Backlight Unit cable.
  8. If the error persists, replace the Backlight Unit. Follow the instructions in the repair guides Replacing the Form 4 Backlight Unit or Replacing the Form 4L Backlight Unit. Replacement Backlight Units are available from the Formlabs web store.

Error 1.5.2: Backlight is not detected

Error 1.5.2 indicates that the Backlight Unit could not be detected. To resolve this issue:

  1. Reboot your printer.
  2. Ensure that your printer's firmware is up to date. If the printer’s firmware is already up to date, manually reinstall the latest firmware package.
  3. Inspect and reseat the Backlight Unit cable.
    1. Form 4: Follow the instructions in the repair guide Replacing the Form 4 Backlight Unit to Step 5: Unhook the backlight driver cable.
    2. Form 4L: Follow the instructions in the repair guide Replacing the Form 4L Backlight Unit to Step 5: Unplug the backlight cable.
  4. If the error persists, replace the Backlight Unit. Follow the instructions in the repair guides Replacing the Form 4 Backlight Unit or Replacing the Form 4L Backlight Unit. Replacement Backlight Units are available from the Formlabs web store.

In some rare cases, a replacement Form 4L generation Backlight Unit may cause your printer to display this error immediately after installation. If this happens, enable Remote Assistance and contact Formlabs Support.

Error 1.5.5: Backlight is not recognized

Error 1.5.5 indicates that the Backlight Unit could not be recognized. To resolve this issue, follow the same troubleshooting steps for Error 1.5.2: Backlight is not detected.

In some rare cases, a replacement Form 4L generation Backlight Unit may cause your printer to display this error immediately after installation. If this happens, enable Remote Assistance and contact Formlabs Support.

Error 1.5.6: Backlight is on too long

Error 1.5.6 indicates that the Backlight Unit was on for more than five minutes, so the printer shut it off as a self-protection mechanism. To resolve this issue:

  1. Update PreForm, then regenerate and reupload your print job.
  2. Reboot your printer.
  3. Ensure that your printer's firmware is up to date. If the printer’s firmware is already up to date, manually reinstall the latest firmware package.
  4. Inspect and reseat the Backlight Unit cable.
    1. Form 4: Follow the instructions in the repair guide Replacing the Form 4 Backlight Unit to Step 5: Unhook the backlight driver cable.
    2. Form 4L: Follow the instructions in the repair guide Replacing the Form 4L Backlight Unit to Step 5: Unplug the backlight cable.
  5. If the error persists, replace the Backlight Unit. Follow the instructions in the repair guides Replacing the Form 4 Backlight Unit or Replacing the Form 4L Backlight Unit. Replacement Backlight Units are available from the Formlabs web store.

Error 1.5.7: Backlight is not responsive

Error 1.5.7 indicates that the Backlight Unit did not respond to a command from the printer. To resolve this issue, follow the same troubleshooting steps for Error 1.5.2: Backlight is not detected.

Error 1.5.9 and Error 1.5.10: Could not measure backlight temperature

Error 1.5.9 and Error 1.5.10 indicate that the printer could not measure the temperature of the Backlight Unit. To resolve this issue, follow the same troubleshooting steps for Error 1.5.2: Backlight is not detected.

Error 1.5.11: Could not turn on backlight

Error 1.5.11 indicates that the printer could not turn on the Backlight Unit. To resolve this issue, follow the same troubleshooting steps for Error 1.5.2: Backlight is not detected.

Consumables errors (Error Group 6)

All subcodes of Form 4 and Form 4L Error 6 (1–32) relate to issues with consumables (the resin cartridge, resin tank, and build platform).

Error 1.6.2: Cartridge is missing

If the resin cartridge is removed during printing, the print can still continue for a period of time using the resin stored in the resin tank. The printer displays Error 1.6.2 to indicate this. Reinsert the resin cartridge to continue. If that does not resolve the issue:

  1. Reboot your printer.
  2. Ensure that your printer's firmware is up to date. If the printer’s firmware is already up to date, manually reinstall the latest firmware package.
  3. Try again with another resin cartridge, if any are available.
  4. Test the original resin cartridge in another printer, if any are available.
  5. Inspect and reseat the cartridge RFID cable.
  6. If the error persists, replace the resin cartridge RFID board(s). Follow the instructions in the repair guides Replacing the Form 4 resin cartridge RFID board or Replacing the Form 4L resin cartridge RFID boards. Replacement resin cartridge RFID boards are available from the Formlabs web store.

Error 1.6.3: Printing paused because of missing cartridge

If the resin cartridge is removed during printing, the print can still continue for a period of time using the resin stored in the resin tank. After that, the print pauses. The printer displays Error 1.6.3 to indicate the print has paused due to the resin cartridge being removed. Reinsert the resin cartridge to continue. If that does not resolve the issue, follow the same troubleshooting steps for Error 1.6.2: Cartridge is missing.

Error 1.6.4: Left cartridge mismatch (Form 4L generation only)

The printer checks the resin type in the tank and cartridge to ensure they match the current print job. If the resin type in the left hand resin cartridge does not match the resin type identified in the print job, the printer displays Error 1.6.4 and prompts you to insert a resin cartridge that matches the print job settings. Make sure the resin in the resin cartridge matches the job's resin type, with the same material version number. If that does not resolve the issue:

  1. Reboot your printer.
  2. Ensure that your printer's firmware is up to date. If the printer’s firmware is already up to date, manually reinstall the latest firmware package.
  3. Update PreForm, then regenerate and reupload your print job.
  4. Try again with another resin cartridge, if any are available.
  5. Test the original resin cartridge in another printer, if any are available.
  6. Inspect and reseat the left resin cartridge RFID cable. Follow the instructions in the repair guide Replacing the Form 4L resin cartridge RFID boards to Step 6: Disconnect the resin cartridge RFID cable.
  7. If the error persists, replace the left resin cartridge RFID board. Follow the instructions in the repair guide Replacing the Form 4L resin cartridge RFID boards. Replacement resin cartridge RFID boards are available from the Formlabs web store.

Error 1.6.5: Left cartridge has exceeded limit (Form 4L generation only)

Each cartridge contains and can reliably dispense one liter of resin. If the cartridge has exceeded its lifetime, the printer displays Error 1.6.5. After the full liter dispenses, dispose of the cartridge and continue printing with a new cartridge. Restart the print once the depleted cartridge has been replaced. If this error is incorrectly thrown, follow the same troubleshooting steps for Error 1.6.4: Left cartridge mismatch.

Error 1.6.6: Right cartridge mismatch (Form 4L generation only)

The printer checks the resin type in the tank and cartridge to ensure they match the current print job. If the resin type in the right hand resin cartridge does not match the resin type identified in the print job, the printer displays Error 1.6.6 and prompts you to insert a resin cartridge that matches the print job settings. Make sure the resin in the resin cartridge matches the job's resin type, with the same material version number. If that does not resolve the issue:

  1. Reboot your printer.
  2. Ensure that your printer's firmware is up to date. If the printer’s firmware is already up to date, manually reinstall the latest firmware package.
  3. Update PreForm, then regenerate and reupload your print job.
  4. Try again with another resin cartridge, if any are available.
  5. Test the original resin cartridge in another printer, if any are available.
  6. Inspect and reseat the right resin cartridge RFID cable. Follow the instructions in the repair guide Replacing the Form 4L resin cartridge RFID boards to Step 6: Disconnect the resin cartridge RFID cable.
  7. If the error persists, replace the right resin cartridge RFID board. Follow the instructions in the repair guide Replacing the Form 4L resin cartridge RFID boards. Replacement resin cartridge RFID boards are available from the Formlabs web store.

Error 1.6.7: Right cartridge has exceeded limit (Form 4L generation only)

Each cartridge contains and can reliably dispense one liter of resin. If the cartridge has exceeded its lifetime, the printer displays Error 1.6.7. After the full liter dispenses, dispose of the cartridge and continue printing with a new cartridge. Restart the print once the depleted cartridge has been replaced. If this error is incorrectly thrown, follow the same troubleshooting steps for Error 1.6.6: Right cartridge mismatch.

Error 1.6.9: Tank is missing

Error 1.6.9 indicates that the resin tank is missing or has been removed during the print. Reinsert and secure the resin tank to continue. If that does not resolve the issue:

  1. Reboot your printer.
  2. Ensure that your printer's firmware is up to date. If the printer’s firmware is already up to date, manually reinstall the latest firmware package.
  3. Try again with another resin tank, if any are available.
  4. Test the original resin tank in another printer, if any are available.
  5. Inspect and reseat the tank RFID cable.
    1. Form 4: Follow the instructions in the repair guide Replacing the Form 4 resin tank RFID board to Step 4: Disconnect the resin tank RFID cable.
    2. Form 4L: Follow the instructions in the repair guide Replacing the Form 4L resin tank RFID board to Step 3: Disconnect the resin tank RFID board.
  6. If the error persists, replace the resin tank RFID board. Follow the instructions in the repair guides Replacing the Form 4 resin tank RFID board or Replacing the Form 4L resin tank RFID board. Replacement resin tank RFID boards are available from the Formlabs web store.

Error 1.6.10: Incorrect tank is inserted

The printer displays Error 1.6.10 when the type of resin in the tank does not match what is required for the job. Remove the resin tank and replace it with one that matches the job.

Note:

Tap Ignore to reprogram the resin tank to match the resin type of the print job.

Error 1.6.11: Tank has exceeded lifetime

Error 1.6.11 indicates that the resin tank has exceeded its recommended lifetime. Consider replacing your resin tank to ensure successful printing.

Error 1.6.12: Tank is not locked

Error 1.6.12 indicates that the resin tank is not locked in place using the tank latches. Press down on the sides of the resin tank with your thumbs and close the latches to secure the tank. If that does not resolve the issue:

  1. Reboot your printer.
  2. Ensure that your printer's firmware is up to date. If the printer’s firmware is already up to date, manually reinstall the latest firmware package.
  3. Remove the resin tank and inspect the tank latches for damage.
    1. If either is damaged, replace the tank latches. Follow the instructions in the repair guide Replacing the Form 4 resin tank latch. Replacement resin tank latches are available from the Formlabs web store.

Error 1.6.14: Could not detect build platform

Error 1.6.14 indicates that the printer could not detect a build platform. Insert and secure a build platform to continue. If you are certain that a clean build platform is inserted in the printer, you can also tap Ignore to continue.

If that does not resolve the issue, open the printer cover, remove the build platform, and inspect the plunger pin in the top-right corner of the build platform mount.
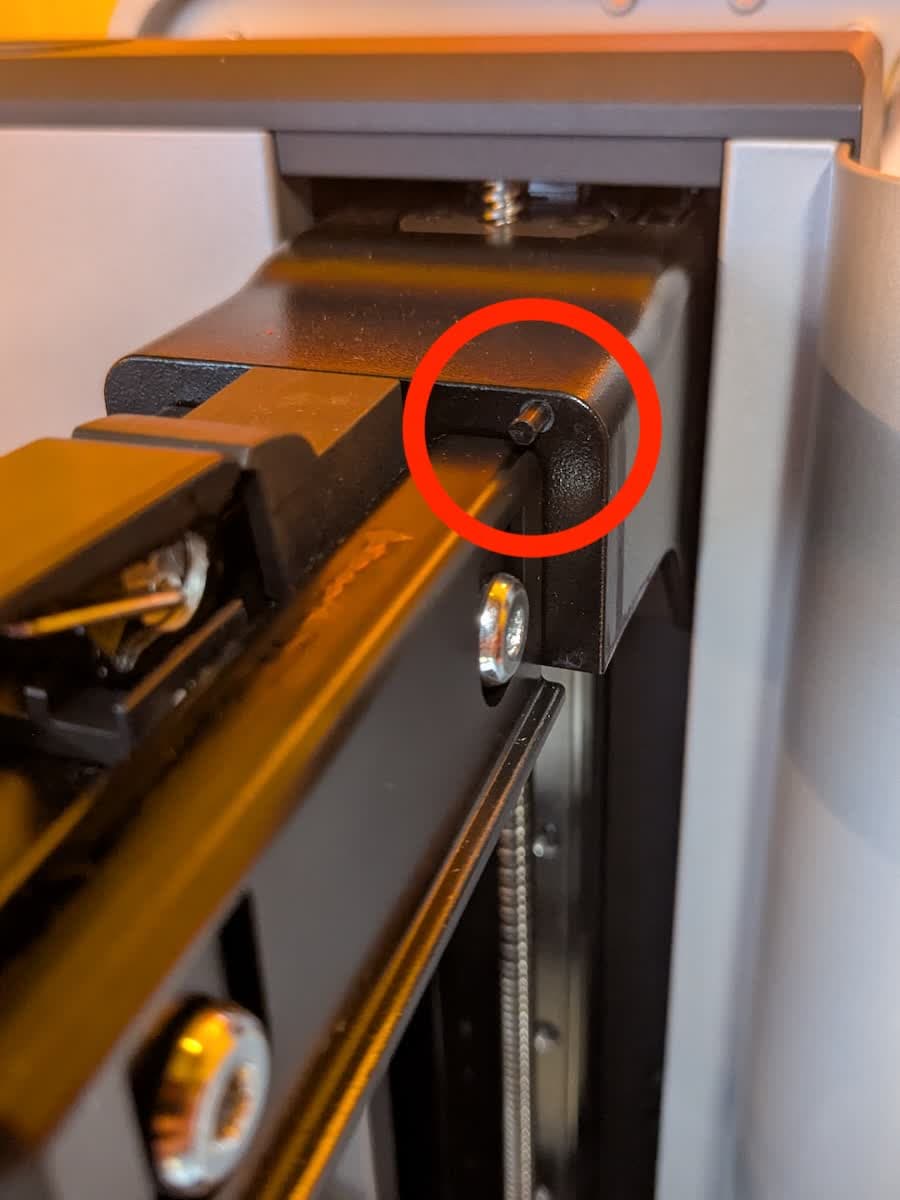
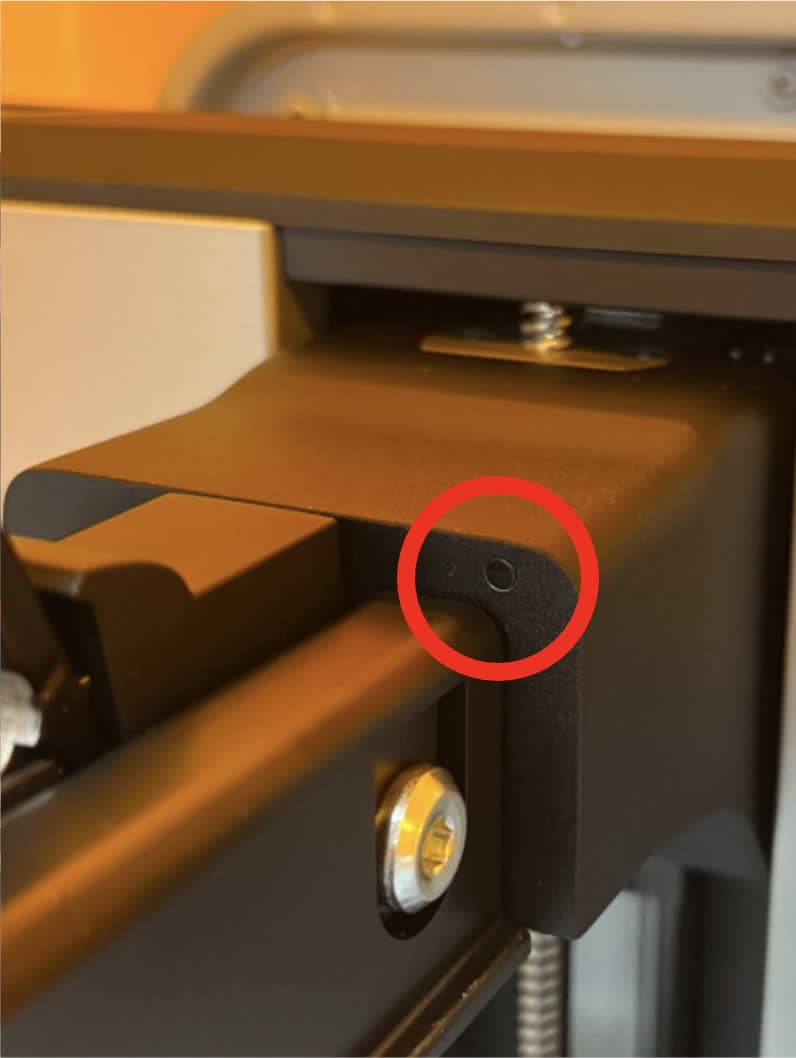
Normal Form 4 build platform detection plunger
Stuck Form 4 build platform detection plunger
Normal Form 4 build platform detection plunger
Stuck Form 4 build platform detection plunger

If the plunger is visible:

  1. Manually push the plunger in. If the printer detects that a build platform has been inserted, try again with another build platform (if available).
  2. Reboot your printer.
  3. Ensure that your printer's firmware is up to date. If the printer’s firmware is already up to date, manually reinstall the latest firmware package.
  4. Check if the U-shaped limit switch on the far side of the plunger is undamaged.
Form 4 build platform detection limit switch location

If the plunger is stuck inside the build platform mount:

  1. Download the plunger trim tool. You can also contact Formlabs Support for the tool.
  2. Print the tool in any inflexible resin, such as Grey Resin, Tough 1500 Resin, or Rigid 10K Resin. Do not use Elastic 50A Resin, Flexible 80A Resin, or another resin with similar material properties.
    • If you see the Could not detect build platform error, tap Ignore to continue.
  3. Wash and post-cure the parts appropriately for the material you use.
  4. Remove the resin tank and build platform. Close the printer cover.
  5. On the printer touchscreen, tap the gear icon. The Settings screen appears. Tap Tools > Move motors > Start.
  6. Under Z Axis, tap Mid. The build platform mount moved to the middle of the Z-axis lead screw.
  1. Insert a clean build platform into the printer. Close the printer cover.
  2. Tap Close. The build platform mount returns to its home position.
  3. If you see a notification that the build platform was detected, the fix was successful.

If the error persists, contact Formlabs Support or your authorized reseller for assistance.

Error 1.6.27: Cartridge mismatch (Form 4 generation only)

The printer checks the resin type in the tank and cartridge to ensure they match the current print job. If they do not match the resin type identified in the print job, the printer displays Error 1.6.27 and prompts you to insert a resin cartridge that matches the print job settings. Make sure the resin in the resin cartridge matches the job's resin type, with the same material version number. If that does not resolve the issue:

  1. Reboot your printer.
  2. Ensure that your printer's firmware is up to date. If the printer’s firmware is already up to date, manually reinstall the latest firmware package.
  3. Update PreForm, then regenerate and reupload your print job.
  4. Try again with another resin cartridge, if any are available.
  5. Test the original resin cartridge in another printer, if any are available.
  6. Inspect and reseat the resin cartridge RFID cable. Follow the instructions in the repair guide Replacing the Form 4 resin cartridge RFID board to Step 3: Disconnect the resin cartridge RFID cable.
  7. If the error persists, replace the resin cartridge RFID board. Follow the instructions in the repair guide Replacing the Form 4 resin cartridge RFID board. Replacement resin cartridge RFID boards are available from the Formlabs web store.

Error 1.6.28: Cartridge has exceeded limit (Form 4 generation only)

Each cartridge contains and can reliably dispense one liter of resin. If the cartridge has exceeded its lifetime, the printer displays Error 1.6.28. After the full liter dispenses, dispose of the cartridge and continue printing with a new cartridge. Restart the print once the depleted cartridge has been replaced. If this error is incorrectly thrown, follow the same troubleshooting steps for Error 1.6.27: Cartridge mismatch (Form 4 generation only).

Error 1.6.33: Unrecognized tank inserted

Formlabs has multiple resin tank types for its SLA printers. Error 1.6.33 indicates that the printer could not recognize the inserted resin tank. To resolve this issue:

  1. Reboot your printer.
  2. Ensure that your printer's firmware is up to date. If the printer’s firmware is already up to date, manually reinstall the latest firmware package.
  3. Try again with another resin tank, if any are available.
  4. Test the original resin tank in another printer, if any are available.
  5. Inspect and reseat the resin tank RFID cable.
  6. If the error persists, replace the resin tank RFID board. Follow the instructions in the repair guides Replacing the Form 4 resin tank RFID board or Replacing the Form 4L resin tank RFID board. Replacement resin tank RFID boards are available from the Formlabs web store.

Debris detection errors (Error Group 7)

All subcodes of Form 4 and Form 4L Error Group 7 (1–7) relate to the printer detecting debris in the resin tank or build platform during print preparation.

Error 1.7.2: Mixer detected debris

Error 1.7.2 indicates the mixer encountered debris during the preprint build platform scrape. Use a scraper to remove any cured resin from the build platform and try again. If the issue persists, follow the same troubleshooting steps for Error 1.1.6: Mixer detected debris.

Error 1.7.3: Build platform detected debris

Error 1.7.3 indicates the build platform encountered debris while lowering into the resin tank during preprint. Use a scraper to remove any cured resin from the build platform and try again. If the issue persists, follow the same troubleshooting steps for Error 1.1.7: Build platform detected debris.

Mixer errors (Error Group 8)

All subcodes of Form 4 and Form 4L Error Group 8 (1) relate to the mixer.

Error 1.8.1: Mixer not detected

Error 1.8.1 indicates that the printer did not detect the mixer. To resolve this issue:

  1. Ensure that the mixer is inserted and latched in place.
  2. Inspect and reseat the mixer encoder board.
  3. If the error persists, replace the mixer drive assembly. Follow the instructions in the repair guides Replacing the Form 4 mixer drive assembly or Replacing the Form 4L mixer drive assembly. Replacement mixer drive assemblies are available from the Formlabs web store.

Dispenser errors (Error Group 9)

All subcodes of Form 4 and Form 4L Error Group 9 (1–25) relate to the resin dispensing system.

Error 1.9.4: Could not measure resin level

Error 1.9.4 indicates that the printer could not measure the amount of resin in the resin tank. To resolve this issue:
  1. Retry the print. If the error does not reoccur, it may have been caused by bubbles in the resin.
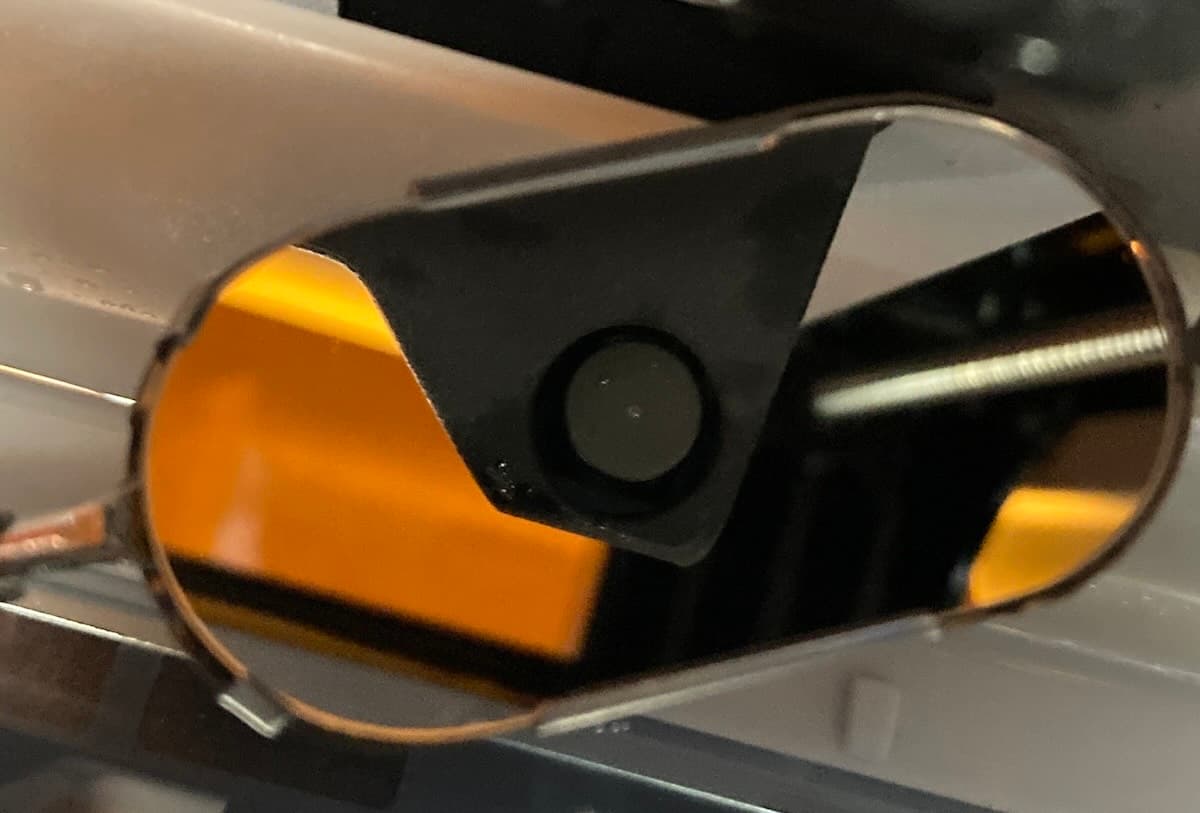
  2. Check for obstructions blocking the resin sensor, either on the sensor or between the sensor and the resin tank. It is located next to the camera, pointing down at the back-left corner of the resin tank.
  3. Check for any drops of resin on the sensor. You may need to use a mirror to look upwards at the sensor. If you see any resin, clean it with a lint-free cloth dampened with isopropyl alcohol.
Contamination on a Form 4 LevelSense board
  1. On the printer’s touchscreen, tap Settings > Tools > Level printer to view the current level status of your printer. Follow the touchscreen prompts and use the leveling tool to level the printer.
  2. Recalibrate the resin level sensor.
  3. Reboot your printer.
  4. Ensure that your printer's firmware is up to date. If the printer’s firmware is already up to date, manually reinstall the latest firmware package.
  5. Inspect and reseat LevelSense board cables.
  6. If the error persists, replace the LevelSense board. Follow the instructions in the repair guides Replacing the Form 4 LevelSense board or Replacing the Form 4L LevelSense board. Replacement LevelSense boards are available from the Formlabs web store.

Error 1.9.5: Tank is overfilled with resin

If the resin tank is overfilled, the printer displays Error 1.9.5. Use a syringe or small disposable cup to remove small amounts of resin, and pour it into a separate container. If the printer incorrectly warns of a resin tank overfill:

  1. Check for obstructions blocking the resin sensor, either on the sensor or between the sensor and the resin tank. It is located next to the camera, pointing down at the back-left corner of the resin tank.
  2. On the printer’s touchscreen, tap Settings > Tools > Level printer to view the current level status of your printer. Follow the touchscreen prompts and use the leveling tool to level the printer.
  3. Recalibrate the resin level sensor.
  4. Reboot your printer.
  5. Ensure that your printer's firmware is up to date. If the printer’s firmware is already up to date, manually reinstall the latest firmware package.
  6. Inspect and reseat LevelSense board cables.
  7. If the error persists, replace the LevelSense board. Follow the instructions in the repair guides Replacing the Form 4 LevelSense board or Replacing the Form 4L LevelSense board. Replacement LevelSense boards are available from the Formlabs web store.

Error 1.9.6: Not enough resin to finish print

Error 1.9.6 indicates that the current print job requires more resin than is available in the resin tank and resin cartridge. You may need to replace the resin cartridge during the print. The printer will pause and display Error 1.9.6 when the cartridge is empty. To resolve this issue:

  1. Make sure the resin tank and resin cartridge have enough resin to finish print.
  2. Try another resin cartridge if any are available.
  3. On the printer’s touchscreen, tap Settings > Tools > Level printer to view the current level status of your printer. Follow the touchscreen prompts and use the leveling tool to level the printer.
  4. Recalibrate the resin level sensor.
  5. Recalibrate the cartridge floor load cell.
  6. Reboot your printer.
  7. Ensure that your printer's firmware is up to date. If the printer’s firmware is already up to date, manually reinstall the latest firmware package.
  8. Inspect and reseat LevelSense board cables.
  9. Inspect and reseat the cartridge floor cables.
  10. Replace the LevelSense board. Follow the instructions in the repair guides Replacing the Form 4 LevelSense board or Replacing the Form 4L LevelSense board. Replacement LevelSense boards are available from the Formlabs web store.
  11. Replace the cartridge floor(s). Follow the instructions in the repair guides Replacing the Form 4 cartridge floor or Replacing the Form 4L cartridge floor. Replacement cartridge floors are available from the Formlabs web store.
  12. If the error persists, contact Formlabs Support or your authorized reseller.

Error 1.9.7: Printing paused due to low resin

Formlabs SLA printers have a component known as LevelSense that measures the amount of resin in the resin tank during a print. By monitoring the resin level, the printer can automatically dispense resin from the cartridge into the tank whenever the resin in the tank begins to run low. Error 1.9.7 indicates that the printer has paused to refill the resin tank. If you see this message repeatedly:

  1. Make sure that the resin cartridge is not empty and the vent cap is open.
  2. Check the bite valve on the underside of the cartridge to make sure it opens when squeezed.
  3. If the issue persists, follow the same troubleshooting steps for Error 1.9.6: Not enough resin to finish print.

Error 1.9.9: Left cartridge is empty (Form 4L generation only)

The printer displays Error 1.9.9 if there is no more resin in the left hand cartridge. Each cartridge contains and can reliably dispense one liter of resin. After the full liter dispenses, dispose of the cartridge and continue printing with a new cartridge.

If a cartridge is not empty but the printer displays this error:

  1. Try another resin cartridge if any are available.
  2. Reboot your printer.
  3. Ensure that your printer's firmware is up to date. If the printer’s firmware is already up to date, manually reinstall the latest firmware package.
  4. Recalibrate the cartridge floor load cell.
  5. Inspect and reseat the left cartridge floor cables. Follow the instructions in the repair guide Replacing the Form 4L cartridge floor to Step 2: Disconnect the cartridge floor cables.
  6. If the error persists, replace the left cartridge floor. Follow the instructions in the repair guide Replacing the Form 4L cartridge floor. Replacement cartridge floors are available from the Formlabs web store.

Error 1.9.10: Right cartridge is empty (Form 4L generation only)

The printer displays Error 1.9.10 if there is no more resin in the right hand cartridge. Each cartridge contains and can reliably dispense one liter of resin. After the full liter dispenses, dispose of the cartridge and continue printing with a new cartridge.

If a cartridge is not empty but the printer displays this error:

  1. Try another resin cartridge if any are available.
  2. Reboot your printer.
  3. Ensure that your printer's firmware is up to date. If the printer’s firmware is already up to date, manually reinstall the latest firmware package.
  4. Recalibrate the cartridge floor load cell.
  5. Inspect and reseat the right cartridge floor cables. Follow the instructions in the repair guide Replacing the Form 4L cartridge floor to Step 2: Disconnect the cartridge floor cables.
  6. If the error persists, replace the right cartridge floor. Follow the instructions in the repair guide Replacing the Form 4L cartridge floor. Replacement cartridge floors are available from the Formlabs web store.

Error 1.9.11: Left cartridge is dispensing slowly (Form 4L generation only)

Error 1.9.11 indicates that resin is dispensing from the left hand resin cartridge at a slower rate than expected. If a cartridge is not empty but the printer is unable to dispense resin, an issue with the cartridge may be preventing resin from dispensing:

  1. The newest Tough family of resins cause the resin cartridge bite valve to swell over time. A swollen bite valve dispenses resin more slowly, especially towards the end of a cartridge’s life. If you are printing with a resin in the Tough family, print and install a cartridge shim, especially if you’ve seen Error 1.227.5 or Error 1.227.6.
  2. Check the bite valve on the underside of the cartridge to make sure it opens when squeezed.
  3. Shake the resin cartridge to ensure that the resin is mixed thoroughly.
  4. Check the temperature around the printer and your resin storage area. The recommended operating temperature range for Form 4L generation printers is 18–28 °C (64–82 °F).
  5. Try another resin cartridge if any are available.
  6. Reboot your printer.
  7. Ensure that your printer's firmware is up to date. If the printer’s firmware is already up to date, manually reinstall the latest firmware package.
  8. Inspect and reseat the left cartridge floor cables. Follow the instructions in the repair guide Replacing the Form 4L cartridge floor to Step 2: Disconnect the cartridge floor cables.
  9. If the error persists, replace the left cartridge floor. Follow the instructions in the repair guide Replacing the Form 4L cartridge floor. Replacement cartridge floors are available from the Formlabs web store.

Note:

The printer may dispense resin slowly without showing an error message. Follow the above troubleshooting steps to address slow dispensing whether or not you see an error message.

Error 1.9.12: Right cartridge is dispensing slowly (Form 4L generation only)

Error 1.9.12 indicates that resin is dispensing from the right hand resin cartridge at a slower rate than expected. If a cartridge is not empty but the printer is unable to dispense resin, an issue with the cartridge may be preventing resin from dispensing:

  1. The newest Tough family of resins cause the resin cartridge bite valve to swell over time. A swollen bite valve dispenses resin more slowly, especially towards the end of a cartridge’s life. If you are printing with a resin in the Tough family, print and install a cartridge shim, especially if you’ve seen Error 1.227.5 or Error 1.227.6.
  2. Check the bite valve on the underside of the cartridge to make sure it opens when squeezed.
  3. Shake the resin cartridge to ensure that the resin is mixed thoroughly.
  4. Check the temperature around the printer and your resin storage area. The recommended operating temperature range for Form 4L generation printers is 18–28 °C (64–82 °F).
  5. Try another resin cartridge if any are available.
  6. Reboot your printer.
  7. Ensure that your printer's firmware is up to date. If the printer’s firmware is already up to date, manually reinstall the latest firmware package.
  8. Inspect and reseat the right cartridge floor cables. Follow the instructions in the repair guide Replacing the Form 4L cartridge floor to Step 2: Disconnect the cartridge floor cables.
  9. If the error persists, replace the right cartridge floor. Follow the instructions in the repair guide Replacing the Form 4L cartridge floor. Replacement cartridge floors are available from the Formlabs web store.

Note:

The printer may dispense resin slowly without showing an error message. Follow the above troubleshooting steps to address slow dispensing whether or not you see an error message.

Error 1.9.13, Error 1.9.14, Error 1.9.15, and Error 1.9.19: LevelSense recalibration distance errors

Formlabs SLA printers have a component known as LevelSense that measures the amount of resin in the resin tank during a print. On Form 4 and Form 4L generation printers, the printer does this by measuring the distance from the LevelSense sensor to the liquid resin. If the printer is incorrectly measuring resin level, recalibrate the LevelSense. If the printer cannot measure this distance or it is out of the expected range, the printer displays Error 1.9.13, Error 1.9.14, Error 1.9.15, or Error 1.9.19. To resolve these issues:

  1. Make sure a plastic card is placed under the resin level sensor, flat on the LPU, as prompted by the onscreen instructions.
  2. Check for obstructions blocking the resin sensor, either on the sensor or between the sensor and the resin tank. It is located next to the camera, pointing down at the back-left corner of the resin tank.
  3. Check for any resin contamination on the sensor. You may need to use a mirror to look upwards at the sensor. If you see any resin, clean it with a lint-free cloth dampened with isopropyl alcohol (IPA).
Contamination on a Form 4 LevelSense board
  1. Reboot your printer.
  2. Ensure that your printer's firmware is up to date. If the printer’s firmware is already up to date, manually reinstall the latest firmware package.
  3. Inspect and reseat LevelSense board cables.
  4. Replace the LevelSense board. Follow the instructions in the repair guides Replacing the Form 4 LevelSense board or Replacing the Form 4L LevelSense board. Replacement LevelSense boards are available from the Formlabs web store.


Error 1.9.16, Error 1.9.17, and Error 1.9.18: LevelSense temperature errors

Formlabs SLA printers have a component known as LevelSense that measures the amount of resin in the resin tank during a print. On Form 4 and Form 4L generation printers, the LevelSense system also measures the ambient temperature to accurately measure the resin level. If the printer is incorrectly measuring resin level, recalibrate the LevelSense. During recalibration, if the printer cannot measure the ambient temperature or it is out of the expected range, the printer displays Error 1.9.16, Error 1.9.17, or Error 1.9.18. To resolve these issues:

  1. Ensure that the ambient temperature around the LevelSense board is between 10–40 °C (50–104 °F). Consider relocating the printer or cooling or heating the print environment if necessary.
  2. Reboot your printer.
  3. Ensure that your printer's firmware is up to date. If the printer’s firmware is already up to date, manually reinstall the latest firmware package.
  4. Inspect and reseat LevelSense board cables.
  5. Replace the LevelSense board. Follow the instructions in the repair guides Replacing the Form 4 LevelSense board or Replacing the Form 4L LevelSense board. Replacement LevelSense boards are available from the Formlabs web store.

Error 1.9.20: Filling tank

The printer may show Error 1.9.20 to inform you that it is filling the resin tank. It does not necessarily indicate that there is an issue. If the printer fails to fill the resin tank after a prolonged length of time, check the resin cartridge as you would for a dispense-related error.

Error 1.9.21: Could not determine offset

Error 1.9.21 indicates that the cartridge sensor readings were not stable during cartridge floor load cell calibration. Make sure that nothing is sitting on the cartridge floor(s) and retry the cartridge floor calibration process. If the issue persists:

  1. Reboot your printer.
  2. Ensure that your printer's firmware is up to date. If the printer’s firmware is already up to date, manually reinstall the latest firmware package.
  3. Inspect and reseat the cartridge floor cables.
  4. Replace the cartridge floor(s). Follow the instructions in the repair guides Replacing the Form 4 cartridge floor or Replacing the Form 4L cartridge floor. Replacement cartridge floors are available from the Formlabs web store.

Error 1.9.22: Cartridge is empty (Form 4 generation only)

The printer displays Error 1.9.22 if there is no more resin in the cartridge. Each cartridge contains and can reliably dispense one liter of resin. After the full liter dispenses, dispose of the cartridge and continue printing with a new cartridge.

If a cartridge is not empty but the printer displays this error:

  1. Try another resin cartridge if any are available.
  2. Reboot your printer.
  3. Ensure that your printer's firmware is up to date. If the printer’s firmware is already up to date, manually reinstall the latest firmware package.
  4. Recalibrate the cartridge floor load cell.
  5. Inspect and reseat the cartridge floor cables. Follow the instructions in the repair guide Replacing the Form 4 cartridge floor to Step 2: Disconnect the dispense motor and load cell cables.
  6. Replace the cartridge floor. Follow the instructions in the repair guide Replacing the Form 4 cartridge floor. Replacement cartridge floors are available from the Formlabs web store.

Note:

The printer may fail to dispense resin without showing an error message. Follow the above troubleshooting steps to address resin dispensing issues whether or not you see an error message.

Error 1.9.23: Cartridge is dispensing slowly (Form 4 generation only)

Error 1.9.23 indicates that resin is dispensing from the resin cartridge at a slower rate than expected. If a cartridge is not empty but the printer is unable to dispense resin, an issue with the cartridge may be preventing resin from dispensing:

  1. The newest Tough family of resins cause the resin cartridge bite valve to swell over time. A swollen bite valve dispenses resin more slowly, especially towards the end of a cartridge’s life. If you are printing with a resin in the Tough family, print and install a cartridge shim, especially if you’ve seen Error 1.227.5 or Error 1.227.6.
  2. Check the bite valve on the underside of the cartridge to make sure it opens when squeezed.
  3. Shake the resin cartridge to ensure that the resin is mixed thoroughly.
  4. Check the temperature around the printer and your resin storage area. The recommended operating temperature range for Form 4 generation printers is 18–28 °C (64–82 °F).
  5. Try another resin cartridge if any are available.
  6. Reboot your printer.
  7. Ensure that your printer's firmware is up to date. If the printer’s firmware is already up to date, manually reinstall the latest firmware package.
  8. Inspect and reseat the cartridge floor cables. Follow the instructions in the repair guide Replacing the Form 4 cartridge floor to Step 2: Disconnect the dispense motor and load cell cables.
  9. Replace the cartridge floor. Follow the instructions in the repair guide Replacing the Form 4 cartridge floor. Replacement cartridge floors are available from the Formlabs web store.

Note:

The printer may dispense resin slowly without showing an error message. Follow the above troubleshooting steps to address slow dispensing whether or not you see an error message.

Error 1.9.24: Printing paused due to low resin

Formlabs SLA printers have a component known as LevelSense that measures the amount of resin in the resin tank during a print. By monitoring the resin level, the printer can automatically dispense resin from the cartridge into the tank whenever the resin in the tank begins to run low.

However, printers with Open Material Mode cannot automatically dispense from the resin cartridge. Error 1.9.24 indicates that the printer has paused to allow the user to manually refill the resin tank. If you see this message repeatedly:

  1. On the printer’s touchscreen, tap Settings > Tools > Level printer to view the current level status of your printer. Follow the touchscreen prompts and use the leveling tool to level the printer.
  2. Recalibrate the resin level sensor.
  3. Recalibrate the cartridge floor load cell.
  4. Reboot your printer.
  5. Ensure that your printer's firmware is up to date. If the printer’s firmware is already up to date, manually reinstall the latest firmware package.
  6. Inspect and reseat LevelSense board cables.
  7. Replace the LevelSense board. Follow the instructions in the repair guides Replacing the Form 4 LevelSense board or Replacing the Form 4L LevelSense board. Replacement LevelSense boards are available from the Formlabs web store.

Light Processing Unit errors (Error Group 10)

All subcodes of Form 4 and Form 4L Error Group 10 (1–9) relate to the Light Processing Unit (LPU).

Error 1.10.1 and Error 1.10.4: LPU is not connected

Error 1.10.1 and Error 1.10.4 indicate that the Light Processing Unit (LPU) is not connected. To resolve these issues:

  1. Reboot your printer.
  2. Ensure that your printer's firmware is up to date. If the printer’s firmware is already up to date, manually reinstall the latest firmware package.
  3. Inspect and reseat the HDMI cable.
  • Reseat the System on Module (SOM).
  1. Form 4L only: Replace the HDMI cable. Follow the instructions in the repair guide Replacing the Form 4L HDMI cable. Replacement HDMI cables are available from the Formlabs web store.
  2. If the error persists, contact Formlabs Support or your authorized reseller.

Error 1.10.3: LPU is not detected

Error 1.10.3 indicates that the Light Processing Unit (LPU) could not be detected. To resolve this issue, follow the same troubleshooting steps for Error 1.10.1 and Error 1.10.4: LPU is not connected.

Error 1.10.5: Could not load print file

Error 1.10.5 indicates an issue with a file in the uploaded print job. Update PreForm and the printer’s firmware, then reupload the print job.

Error 1.10.8: LPU has exceeded lifetime

Error 1.10.8 indicates that the Light Processing Unit has been used beyond its recommended lifetime. Continuing to print may lead to print failures. Replace the LPU. Follow the instructions in the repair guides Replacing the Form 4 Light Processing Unit or Replacing the Form 4L Light Processing Unit. Replacement LPUs are available from the Formlabs web store.

Camera errors (Error Group 12)

All subcodes of Form 4 and Form 4L Error Group 12 (1–5) relate to the camera system.

Error 1.12.2: Camera is not connected

Error 1.12.2 indicates that the camera, which is used to capture post-print photos, is not connected. If you purposefully disconnected or removed the camera, ignore this message. To resolve this issue:

  1. Reboot your printer.
  2. Ensure that your printer's firmware is up to date. If the printer’s firmware is already up to date, manually reinstall the latest firmware package.
  3. Inspect and reseat the camera ribbon cable.
  4. If the error persists, replace the camera. Follow the instructions in the repair guides Replacing the Form 4 camera or Replacing the Form 4L camera. Replacement cameras are available from the Formlabs web store.

Error 1.12.3: Photo capture failed

Error 1.12.3 indicates that the camera failed to take a photo. To resolve this issue, follow the same troubleshooting steps for Error 1.12.2: Camera is not connected.

Squish phase errors (Error Group 13)

The squish phase of each layer refers to the build platform’s descent into the resin tank. All subcodes of Form 4 and Form 4L Error Group 13 relate to the squish phases.

Error 1.13.1: Build platform detected debris

Error 1.13.1 indicates that the printer detected debris in the resin tank or on the build platform during the squish phase. To resolve this issue, follow the same troubleshooting steps for Error 1.1.7: Build platform detected debris.

Print status errors (Error Group 15)

All subcodes of Form 4 and Form 4L Error Group 15 (1–6) relate to an issue with the print state.

Error 1.15.1: Could not load print job

Error 1.15.1 indicates an issue with the uploaded print job. Update PreForm and the printer’s firmware, then reupload the print job.

Error 1.15.2: Job already printing

Error 1.15.2 indicates that a new print job did not start because one was already in progress. Wait for the current print to finish before starting a new one. If no job is currently running, reboot your printer, reflash its firmware, and try again.

Error 1.15.3: Print job is invalid

Error 1.15.3 indicates an issue with the uploaded print job. It may have been generated using a version of PreForm that is incompatible with the firmware on the printer. Update PreForm and the printer’s firmware, then reupload the print job.

Error 1.15.5: Fit tuning incompatible

Error 1.15.5 indicates the printer’s Fit Tuning values were updated after this job was uploaded. To resolve this issue, reupload the job through PreForm.

Error 1.15.6: Not enough storage space to print

Error 1.15.6 indicates there is not enough storage on the printer to store print data even after auto-deleting jobs from history. Delete jobs from the queue and reupload the job without the timelapse feature via PreForm.

Resin Pumping System errors (Error Group 20)

All subcodes of Form 4 and Form 4L Error Group 20 (1–15) relate to an issue with the Resin Pumping System.

Error 1.20.1: Check resin container

The Resin Pumping System pumps resin from a 5 L container into the printer. If the container is empty, replace it to continue your print. If the container is not empty, there may be an issue with the resin card inserted into the pump. Contact Formlabs Support or your authorized reseller for assistance.

Error 1.20.4: Resin pump is not connected

The Resin Pumping System (Form 4) communicates with Form 4 and Form 4L generation printers via a USB connection. Error 1.20.4 indicates that the printer recognized a resin pump through the resin cartridge RFID sensor but wasn't able to communicate with the pump through the USB cable. To resolve this issue:

  1. Inspect and reseat the pump’s USB-C cable, ensuring that the cable is fully plugged into the printer.
  2. Replace the USB-C cable. Follow the instructions in the repair guide Replacing the Form 4 Resin Pumping System USB-C cable. Purchase a replacement cable that transmits both power and data from a third-party supplier.
  3. Reboot your printer.
  4. With the resin pump connected to the printer, update your printer's firmware.

Error 1.20.6: Could not update resin pump firmware

Error 1.20.6 indicates that the printer tried to update the resin pump's firmware but failed. This can happen if the pump is disconnected while it is being updated. To resolve this issue, follow the same troubleshooting steps for Error 1.20.4: Resin pump is not connected.

Error 1.20.14: Resin pump connection problem

Error 1.20.14 indicates that there is a problem with the connection to the resin pump. Make sure the pump is connected directly to the printer using the integrated USB cable. Do not connect the resin pump to the printer via a hub, adapter, or other USB accessory. If the error persists, follow the same troubleshooting steps for Error 1.20.4: Resin pump is not connected.

Error 1.20.15: Resin pump power problem

Error 1.20.15 indicates an issue with the power being delivered to the resin pump. To resolve this issue, follow the same troubleshooting steps for Error 1.20.4: Resin pump is not connected. If the error persists, replace the resin pump.

Color Resin errors (Error Group 22)

All subcodes of Form 4 and Form 4L Error Group 22 (1–4) relate to an issue with Color Resin.

Error 1.22.1: Tank color mismatch

The printer displays Error 1.22.1 when the resin color in the tank does not match what is required for the job. Remove the resin tank and replace it with one that matches the job.

Note:

Tap Ignore to reprogram the resin tank to match the resin color of the print job.

Error 1.22.2: Cartridge color mismatch (Form 4 generation only)

The printer displays Error 1.22.2 when the resin color in the cartridge does not match what is required for the job. Remove the cartridge and replace it with one that matches the job. If that does not resolve the issue, follow the same troubleshooting steps for Error 1.6.27: Cartridge mismatch (Form 4 generation only).

Error 1.22.3: Left cartridge color mismatch (Form 4L generation only)

The printer displays Error 1.22.3 when the resin color in the left cartridge does not match what is required for the job. Remove the left cartridge and replace it with one that matches the job. If that does not resolve the issue, follow the same troubleshooting steps for Error 1.6.4: Left cartridge mismatch (Form 4L generation only).

Error 1.22.4: Right cartridge color mismatch (Form 4L generation only)

The printer displays Error 1.22.4 when the resin color in the right cartridge does not match what is required for the job. Remove the right cartridge and replace it with one that matches the job. If that does not resolve the issue, follow the same troubleshooting steps for Error 1.6.6: Right cartridge mismatch (Form 4L generation only).

Consumables errors (Error Group 227)

All subcodes of Form 4 and Form 4L Error Group 227 (1–4) relate to an issue with an inserted resin cartridge.

Error 1.227.1: Resin cartridge is incompatible (Form 4 generation only)

The printer displays Error 1.227.1 when the resin in the cartridge is incompatible with the printer. Specifically, this occurs when a resin for biocompatible applications is inserted into a Form 4 printer rather than a Form 4B printer. If you inserted the cartridge into the wrong printer type, move it to the correct printer. Otherwise, follow the instructions for setting up the Form 4B to register a Formlabs biocompatible materials lifetime license to the printer.

Error 1.227.2: Right resin cartridge is incompatible (Form 4L generation only)

The printer displays Error 1.227.2 when the resin in the right cartridge is incompatible with the printer. Specifically, this occurs when a resin for biocompatible applications is inserted into a Form 4L printer rather than a Form 4BL printer. If you inserted the cartridge into the wrong printer type, move it to the correct printer. Otherwise, follow the instructions for setting up the Form 4BL to register a Formlabs biocompatible materials lifetime license to the printer.

Error 1.227.3: Left resin cartridge is incompatible (Form 4L generation only)

The printer displays Error 1.227.3 when the resin in the left cartridge is incompatible with the printer. Specifically, this occurs when a resin for biocompatible applications is inserted into a Form 4L printer rather than a Form 4BL printer. If you inserted the cartridge into the wrong printer type, move it to the correct printer. Otherwise, follow the instructions for setting up the Form 4BL to register a Formlabs biocompatible materials lifetime license to the printer.

Error 1.227.4: Resin cartridges are incompatible (Form 4L generation only)

The printer displays Error 1.227.4 when the resin in both cartridges is incompatible with the printer. Specifically, this occurs when a resin for biocompatible applications is inserted into a Form 4L printer rather than a Form 4BL printer. If you inserted the cartridges into the wrong printer type, move them to the correct printer. Otherwise, follow the instructions for setting up the Form 4BL to register a Formlabs biocompatible materials lifetime license to the printer.

Error 1.227.5: Cartridge check recommended

The newest Tough family of resins cause the resin cartridge bite valve to swell over time. A swollen bite valve dispenses resin more slowly, especially towards the end of a cartridge’s life. In a limited and contained number of cases, the bite valve can ultimately fall off the resin cartridge entirely, leading to a significant resin spill. The printer displays Error 1.227.5 after the resin cartridge has been through 50 dispense cycles and may have reduced dispense performance. To prevent dispense issues and resin spills:

  1. Remove the resin cartridge from the printer.
    • On the Form 4L, Error 1.227.5 corresponds to the resin cartridge in the left-hand cartridge slot.
  2. Open the printer cover (Form 4 generation) or door (Form 4L generation).
  3. Pour resin from the cartridge into the resin tank until the resin level reaches the maximum fill line marked on the resin tank frame. Do not overfill the resin tank.
  4. Screw the vent cap back onto the resin cartridge.
  5. If the resin cartridge is empty or nearly empty, insert a new resin cartridge to continue printing. If no other resin cartridge is available, reinsert the original resin cartridge. The printer may report that the cartridge is empty, but you can continue your print using the resin in the resin tank.
  6. If there is still a significant amount of resin left in the resin cartridge, check the lot number, located on the underside of the cartridge. The lot number is an eight digit number, in the format YYYYMMDD. Lot numbers 20251022 and onward have a hardware change that prevents the bite valve from falling off of the resin cartridge.
    • If your resin cartridge is from lot number 20251022 or later, reinsert the resin cartridge into the printer to continue printing. Resin may dispense slowly but you are not at risk for a resin spill. If you have not already, you can prevent dispense interruptions caused by valve swelling by printing and installing a shim.
    • If your resin cartridge’s lot number is earlier than 20251022, discontinue use of the resin cartridge and contact Formlabs Support.

Error 1.227.6: Cartridge check recommended (Form 4L generation only)

The newest Tough family of resins cause the resin cartridge bite valve to swell over time. A swollen bite valve dispenses resin more slowly, especially towards the end of a cartridge’s life. In a limited and contained number of cases, the bite valve can ultimately fall off the resin cartridge entirely, leading to a significant resin spill. On Form 4L generation printers, the printer displays Error 1.227.6 after the resin cartridge in the right-hand cartridge slot has been through 50 dispense cycles and may have reduced dispense performance. To prevent dispense issues and resin spills:/p>

  1. Remove the resin cartridge from the right-hand cartridge slot.
  2. Open the printer door.
  3. Pour resin from the cartridge into the resin tank until the resin level reaches the maximum fill line marked on the resin tank frame. Do not overfill the resin tank.
  4. Screw the vent cap back onto the resin cartridge.
  5. If the resin cartridge is empty or nearly empty, insert a new resin cartridge to continue printing. If no other resin cartridge is available, reinsert the original resin cartridge. The printer may report that the cartridge is empty, but you can continue your print using the resin in the resin tank.
  6. If there is still a significant amount of resin left in the resin cartridge, check the lot number, located on the underside of the cartridge. The lot number is an eight digit number, in the format YYYYMMDD. Lot numbers 20251022 and onward have a hardware change that prevents the bite valve from falling off of the resin cartridge.
    • If your resin cartridge is from lot number 20251022 or later, reinsert the resin cartridge into the printer to continue printing. Resin may dispense slowly but you are not at risk for a resin spill. If you have not already, you can prevent dispense interruptions caused by valve swelling by printing and installing a shim.
    • If your resin cartridge’s lot number is earlier than 20251022, discontinue use of the resin cartridge and contact Formlabs Support.

Printer does not initialize

If the printer does not initialize when powered on, ensure that the cover is closed. If it is closed, open the cover and check for the two round interlock magnets located along the bottom edge of the cover. If one of the magnets has detached from the cover, it may have attached itself to the printer shell or become lodged underneath one of the resin tank latches. Attach the magnet to the cover with a strong adhesive. Once the adhesive is dry, close the cover to continue.

If the issue persists, contact Formlabs Support or your authorized reseller for assistance. If both magnets are present, reboot your printer, update its firmware, and try again.

Miscellaneous and internal errors

On rare occasions, the printer may display Internal error with an associated error code. If you see an internal error, upload your printer’s diagnostic logs and contact Formlabs Support for specific guidance.

Error 1.196.3

Error 1.196.3 can be caused by insufficient free storage on the printer. Delete old print jobs from the Queue and retry your print.

Error 1.225.1

Error 1.225.1 indicates that the printer encountered an error connecting to the selected Wi-Fi network. Restart the printer and the Wi-Fi router (if possible) and try again.

Error 1.226.5: Printer reset while printing

Error 1.226.5 indicates that the printer restarted during the print, most likely due to a power issue. If power to the printer is interrupted during a print job, the printer does not resume the print job when it restarts. To resolve this issue:

  1. Plug the printer into another outlet or power supply.
  2. Try using another power cable, if one is available.
  3. If your building regularly experiences brownouts, blackouts, or other power issues, consider connecting your printer to an uninterruptible power supply (UPS).
  4. If this error persists, the printer power supply may be faulty.

Error 1.240.5

Error 1.240.5 indicates that the printer received a corrupted print job. This can happen if there were issues with your network connection while you sent the print job to the printer. Reupload the print job. If the issue reoccurs, reupload via a more stable connection, such as USB.

Enabling Remote Assistance for troubleshooting

During troubleshooting, Formlabs Support may need additional information from or access to your printer. You may be asked to enable Remote Assistance on your machine.

To prepare your printer for remote assistance:

  1. Ensure that your printer's firmware is up to date.
  2. Tap the gear icon to access the Settings screen. The Settings screen appears.
  3. Tap Support. The Support screen appears.
  4. Tap Remote Assistance. The toggle turns blue when it is enabled.

Enabling Analytics for troubleshooting

During troubleshooting, Formlabs Support may need additional information from or access to your printer. You may be asked to enable Analytics on your machine.

To prepare your printer for dashboard logging:

  1. Ensure that your printer's firmware is up to date.
  2. Tap the gear icon to access the Settings screen. The Settings screen appears.
  3. Tap Analytics. The Analytics screen appears.
  4. Tap Share print logs and Share post-print photos. The toggles turn blue when enabled.

Factory reset instructions

On some occasions, a factory reset may correct unusual printer behavior. Unusual behavior may include unknown error messages, incomplete firmware updates, an unresponsive touchscreen, or trouble connecting to PreForm. A factory reset erases custom settings, including prints saved in the Queue and network connections.

Notice:

A factory reset erases all print job information, custom settings, and diagnostic logs. Upload diagnostic logs before performing a factory reset.

To perform a factory reset:
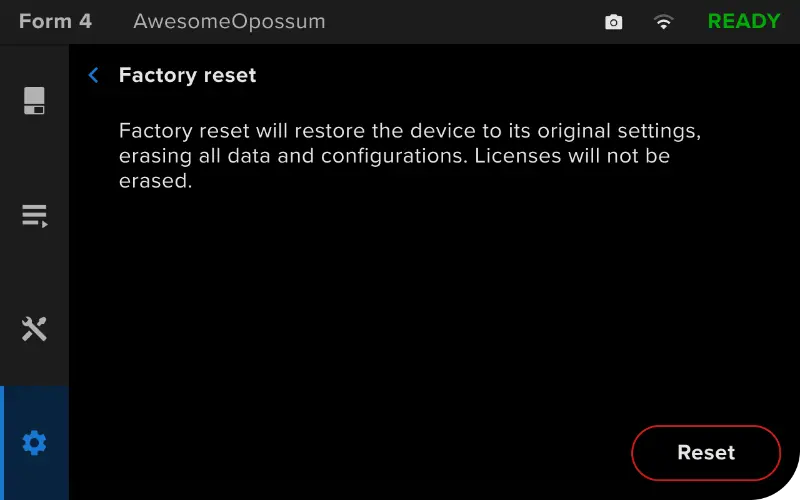
  1. Tap Settings > General > Factory reset. The Factory reset screen appears.
  2. Tap Reset. A confirmation screen appears.
  3. Tap Reset. The printer is restored to its original settings.
Form 4 factory reset screen

If you cannot perform a factory reset using the touchscreen, use the physical button on the back of the machine:
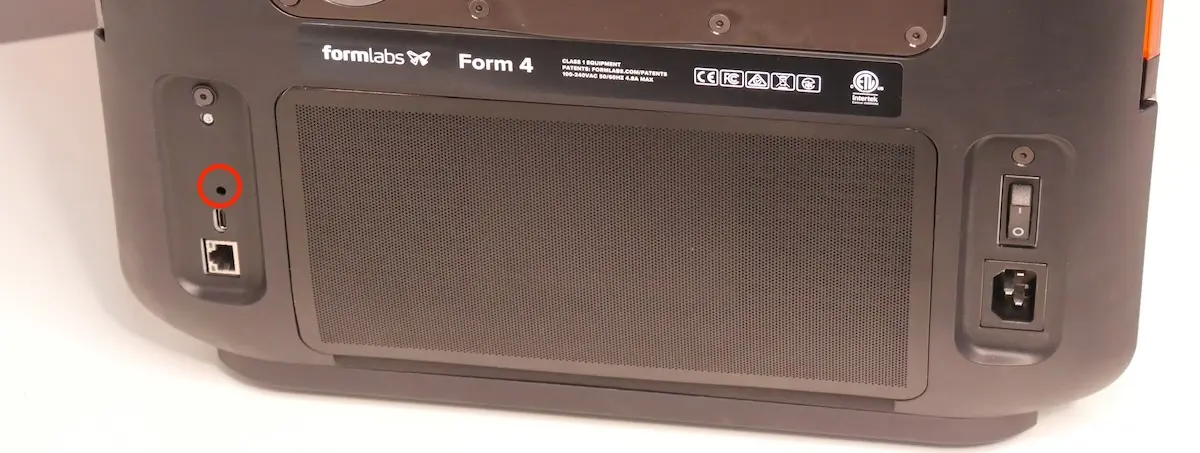
  1. Turn the printer off using the power switch at the back of the machine.
  2. Turn the printer back on.
The factory reset button on a Form 4 generation printer
  1. When the Formlabs logo appears, push and hold the reset button located above the USB port in the rear of the printer. If you press the button too early, the printer will not boot and the touchscreen will flash until you power cycle the printer. Hold the button for at least 10 seconds, until Resetting to factory defaults appears on the touchscreen. You may need to use a paperclip or other small tool to push the reset button.
  2. Release the button. If you release the button too early, power cycle the machine and try again.
  3. The touchscreen displays Factory reset complete before initializing the printer.

To confirm a successful factory reset, tap Queue on the printer’s touchscreen. After a successful reset, the print queue is empty. If the reset does not resolve the behavior, contact Formlabs Support or your authorized reseller.