

Fuse Blast error messages
Fuse Blast error messages
The touchscreen on the Fuse Blast displays error messages if the machine encounters any abnormalities and displays more details about the error. This article outlines initial troubleshooting steps to resolve common error codes that have been seen on Fuse Blast units or are expected during normal operation. If you encounter an error code not found in this article, refer to the general troubleshooting steps below.
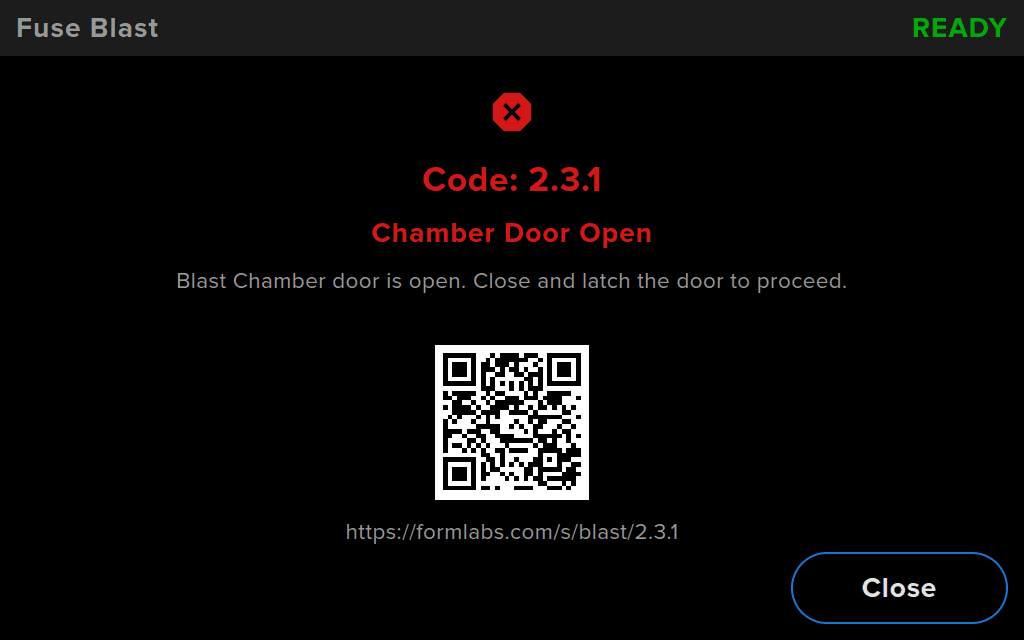
Fuse Blast error codes have the format X.YY.ZZ, where X is the machine code, YY is the error number, and ZZ is the unique error subcode which signifies the relevant warning. YY.ZZ can then be considered the “error code”. The machine code for the Fuse Blast is 2, so the full error code for all Fuse Blast errors starts with 2. That machine code is omitted in the error descriptions below. The error group number describes the type of error, while the subcode designates a specific subsystem or failure mode. For example, all subcodes of Fuse Blast Error Group 3 relate to door interlocks, while Error 3.1 in particular relates to the blast chamber door being open.
General troubleshooting steps
The following steps are recommended for most issues seen on Fuse Blast units:
- Common steps for bugs, software issues, and electrical issues:
- Ensure that your Fuse Blast’s firmware is up to date.
- Power cycle the Fuse Blast using the breaker switch on the rear of the machine. Leave the unit powered off for at least 30 seconds before powering back on.
- If an issue persists and the Fuse Blast firmware is already up to date, manually reinstall the latest firmware package.
- If an issue began immediately after updating the Fuse Blast firmware, roll back the firmware package to the previous version.
- Best practices for opening a support case with Formlabs Support:
- Provide photos of the specific error code and any other symptoms you are seeing.
- Note the context of the issue (e.g., did the issue occur immediately after installation, after a software update, etc.).
- Note the frequency of this issue and whether it is persistent or intermittent.
- Note the blasting cycle preset used for blasting and if you are using the Fuse Blast with a compressed air supply.
- Provide diagnostic logs from your Fuse Blast unit
- Note all troubleshooting steps already attempted.
Diagnostic logs
The Fuse Blast maintains diagnostic logs to provide detailed information about the machine’s functionality. Include these diagnostic logs with other relevant observations and details when contacting Formlabs Support or your authorized reseller to speed up resolution.
For machines connected to the internet over an active Wi-Fi or Ethernet connection:
- Tap the gear icon on the bottom left of the Fuse Blast’s Home screen. The Settings menu appears.
- Tap System. The System menu appears.
- Tap Upload Diagnostic Info. A confirmation message to upload diagnostic information appears.
- Tap Next to start the upload. A confirmation message appears when the upload is complete.
To upload diagnostic logs via PreForm:
- Open the latest version of PreForm.
- Click File > Accessories in the menu bar. The Accessory List window appears.
- Select the Fuse Blast’s serial name. The Device Details window for the selected Fuse Blast appears.
- Click Download Logs. A confirmation window appears.
- Click Browse to download the diagnostic logs to a preferred location on your computer.
- Click OK. The diagnostic logs save and appear in the encrypted FORMLOGS format.
- Attach the file when contacting Formlabs Support or your authorized reseller.
Interlock errors (Error Group 3)
All subcodes of Fuse Blast Error Group 3 (1–8) relate to interlocks in the machine. The interlocks prevent the Fuse Blast from being used in an unsafe manner.
There are five interlocks on the Fuse Blast:
- Two magnetic interlock switches on the blasting chamber door
- One interlock switch on the media filter door
- One magnetic interlock switch on the HEPA filter cabinet door
- One interlock switch behind the HEPA filter
Error 3.1: Chamber Door Open
Error 3.1 indicates that both blasting chamber door interlocks are open. Close the chamber door latch to resolve.
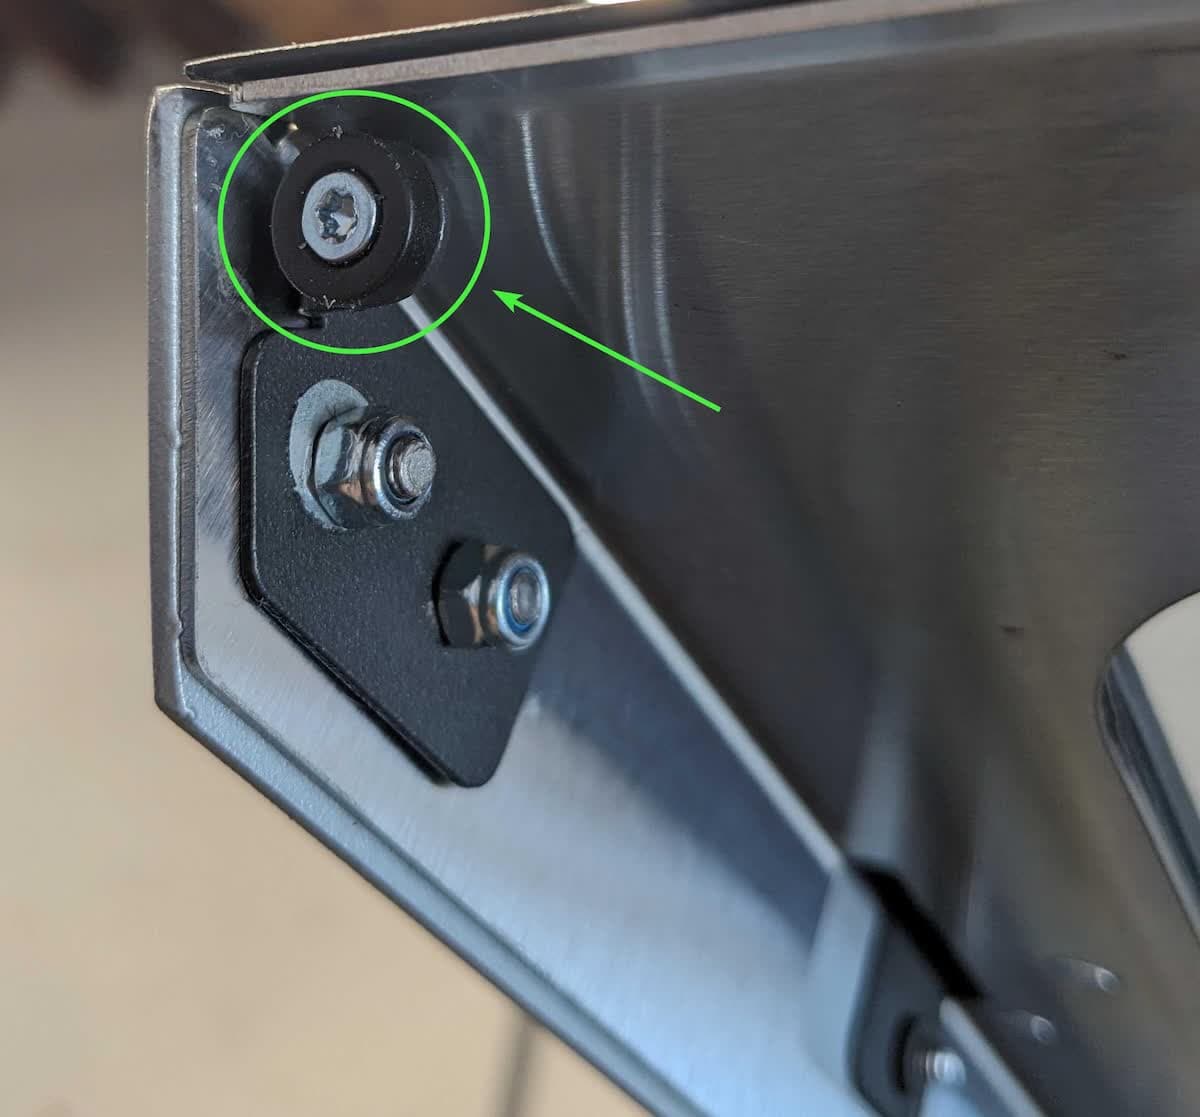
If the machine continues to show this error message when the door is closed, check the two interlock magnets for damage. The blasting chamber door interlock magnets are located on the bottom corners of the door and are visible when the door is open. The magnets are circular and are held in place with a screw. If either is missing or damaged, replace it with a similar magnet or contact Formlabs Support or your certified service provider for assistance.
Error 3.2 and Error 3.3: Chamber Door Open
Error 3.2 and Error 3.3 indicate that only one of the chamber door interlocks is open. Ensure that the chamber door is closing fully and sits flush with the blasting chamber.
Error 3.4: Media Filter Door Open
Error 3.4 indicates the media filter door interlock is open. Close the door on the right hand side of the machine to proceed.
Error 3.5: HEPA Filter Door Open
Error 3.5 indicates the HEPA air filter door interlock is open. Close the air filter door at the bottom-front of the machine to proceed.
Error 3.6: HEPA Filter Not Detected
Error 3.6 indicates the HEPA air filter interlock is open and the HEPA filter cannot be detected, whether or not the air filter door is closed.
To resolve this issue:
- Install or reseat the filter to proceed.
- Make sure the filter brackets are pressing into the filter, rather than slipping past it. Adjust the filter brackets if needed.
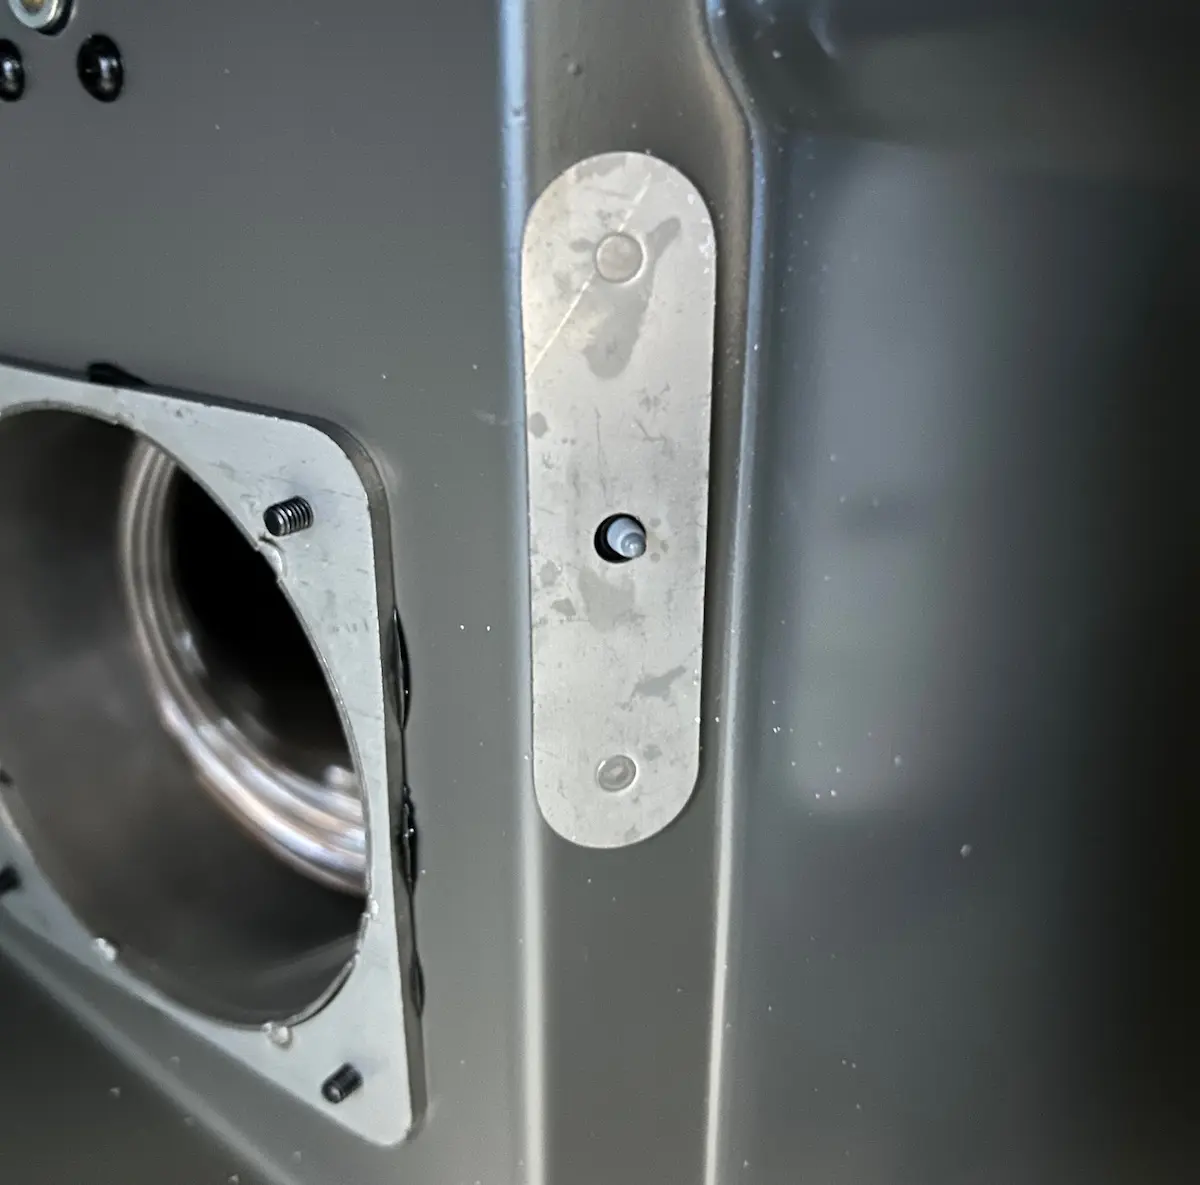
- Remove the filter, manually depress the interlock pin, then tape or otherwise secure it in place. Reinstall the filter and close the air filter door. Test the Fuse Blast again.
- If the Fuse Blast works normally without displaying an error message, remove the tape from the interlock pin. Add tape, cardboard, or a similar thin material to the portion of the filter frame that touches the interlock pin to thicken the filter so it makes firmer contact with the interlock pin.
- If the error message persists, contact Formlabs Support or your certified service provider for assistance.
Error 3.8: Water Level Low
Error 3.8 indicates the Fuse Blast Polishing System’s water level sensor does not detect sufficient water in the tank.
- Refill the water bottle to continue polishing.
- Ensure the Polishing Module is fully plugged in. The electrical cable must be securely connected at both ends, with the locking rings tightened.
- Prime the water pump and check if water is flowing.
- Power off and unplug the Fuse Blast. Following the steps in the first section of the guide for replacing the Fuse Blast display assembly, remove the upper sidecar panel on the right side of the machine. Make sure all visible cables are properly connected. Reinstall the panel.
If you continue to see this message, contact Formlabs Support or your certified service provider for assistance.
Blasting chamber light errors (Error Group 4)
All subcodes of Fuse Blast Error Group 4 (1–2) relate to the blasting chamber light. If the blasting chamber light does not power on after rebooting the unit, contact Formlabs Support or your certified service provider. The blasting chamber light assembly may need to be replaced.
Pedal error (Error Group 5)
Error 5.1 indicates that there was an issue with the foot pedal being detected by the Fuse Blast. The pedals are used to manually control the air rinse and media blasting. Reseat the foot pedal cable and reboot the unit. If you continue to see this message, contact Formlabs Support for assistance.
Ionizer errors (Error Group 6)
All subcodes of Fuse Blast Error 6 (1–3) relate to issues with the ionizer. The ionizer on the blast gun generates ionized air for the part rinse cycle to remove abrasive dust and residual powder from printed parts.
Error 6.1: Invalid Parameter
Error 6.1 indicates an internal error occurred when operating the ionizer. This can occur due to internal software or electrical issues, and does not generally indicate an issue with the ionizer itself.
To resolve this error:
- Disconnect the Fuse Blast from power for at least 30 seconds, then reconnect the unit to power and turn it back on.
- Update or reinstall your Fuse Blast firmware.
Error 6.2: Ionizer Cleaning Recommended
Error 6.2 indicates there was a problem with the ionizer for a short period of time.
To resolve this error:
- Clean the ionizer tips with a cotton swab. See the maintenance menu or scan the QR code on the touchscreen for cleaning instructions
- Reseat the ionizer cable above the blast gun.
Error 6.3: Ionizer Malfunction
Error 6.3 indicates there was a problem with the ionizer that has persisted for a long period of time. This error means that the ionizer is likely disconnected or broken, not just in need of a cleaning. Inspect and clean the ionizer to make sure it is free of debris and reseat the ionizer cable above the blast gun.
If the issue persists, start a manual cleaning cycle, activate the ionizer, and check if the LED on the ionizer lights up. If not, contact Formlabs Support for next steps if the issue persists. The Fuse Blast can still be used without a functional ionizer, but part rinsing performance will be significantly reduced.
Pneumatic errors (Error Group 7)
Error Group 7 and its subcodes (1-7) all indicate an issue with the machine’s pressure regulators or compressed air supply. Ensure a compressed air supply is property installed and pressurized before operating the Fuse Blast.
Error 7.3 and Error 7.4: Regulator Communication Error
Error 7.3 and Error 7.4 indicate an issue with the motherboard communicating with the pressure regulator.
To resolve this error:
- Disconnect the Fuse Blast from power for at least 30 seconds, then reconnect the unit to power and turn it back on.
- Update or reinstall your Fuse Blast firmware.
If you continue to see this message there may be an issue with your Fuse Blast pressure regulator or motherboard. Contact Formlabs Support for assistance.
Error 7.5: No Air Supply
Error 7.5 indicates the pressure regulator’s output pressure is nearly zero, although the requested setpoint is not set to zero. Make sure the compressed air supply is properly connected and pressurized. If you continue to see this message, replace the Fuse Blast’s pneumatic cassette assembly, which contains the pressure regulator. The part is available from the Formlabs Store. To perform the repair, follow the repair guide Fuse Blast - Replacing the Pneumatic Cassette [EN]. For additional assistance, contact Formlabs Support.
Error 7.6: Low Air Supply Pressure
Error 7.6 indicates that the pressure regulator’s output pressure dropped at least 4 psi below the requested setpoint. Make sure the compressed air supply is properly connected, adequately pressurized, or lower the pressure setting.
As of firmware version 1.0.2, Fuse Blast automatically manages airflow interruptions with Adaptive Airflow. Adaptive Airflow monitors the inlet supply pressure and pauses the cleaning cycle, allowing the compressed air supply to recharge without aborting the procedure. Update the firmware to version 1.0.2 to access Adaptive Airflow.
While the default settings are sufficient for cleaning most printed parts, users can configure the Adaptive Airflow settings to best suit their blasting needs.
To change the Adaptive Airflow settings:
- Update the firmware to version 1.0.2 or newer.
- Tap the gear icon on the bottom left of the Fuse Blast’s Home screen. The Settings menu appears.
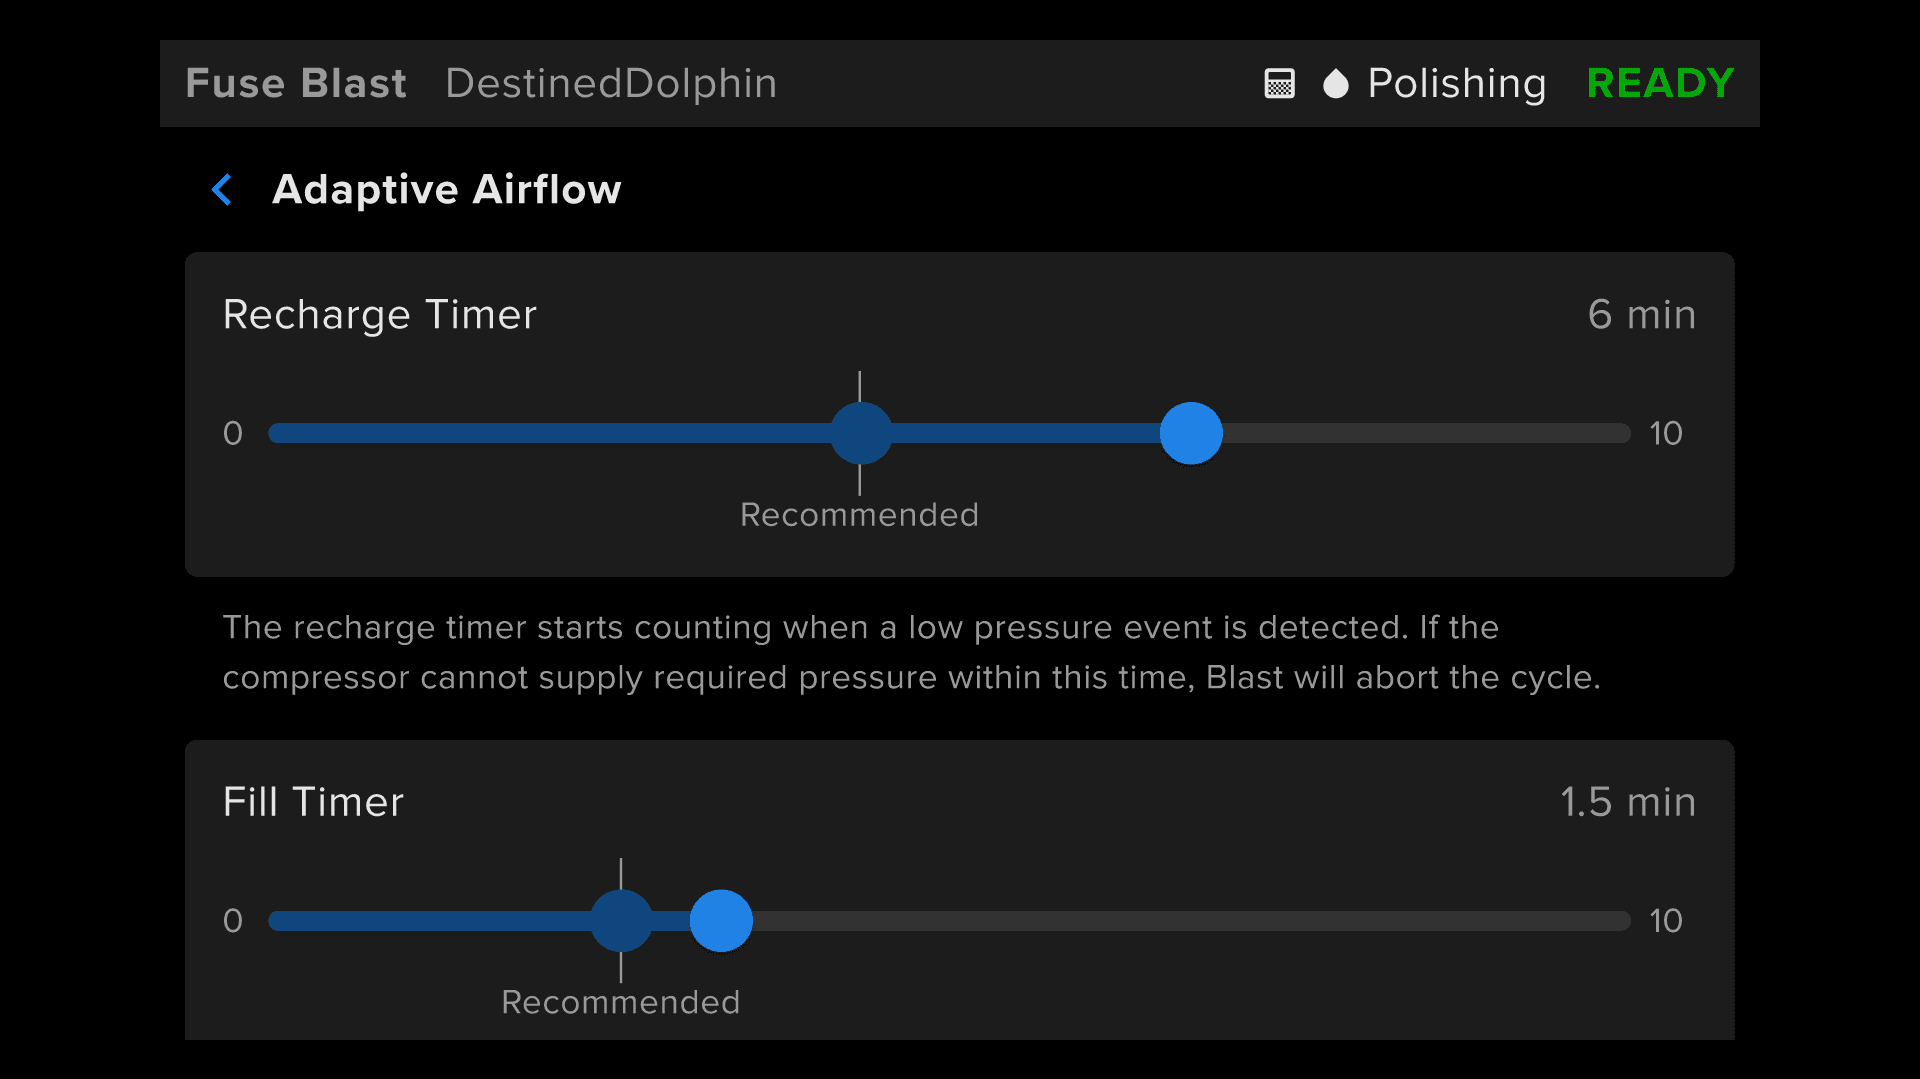
- Tap Maintenance > Adaptive Airflow. The Adaptive Airflow screen appears.
- Select your desired recharge time:
- Recharge Timer: This sets the amount of time the Fuse Blast waits for the compressed air supply to reach the required pressure to continue the cycle. Drag the slider left or right to set the length of recovery time to recharge the air compressor in the event of a supply interruption. If the compressed air supply does not reach the required pressure before the timer expires, the Fuse Blast stops the cleaning cycle and displays Error 7.6.
- Fill Timer: This sets the amount of time the Fuse Blast waits after the compressed air supply reaches the required pressure before continuing. For example, this allows time for a compressed air tank to fill enough so that the supply pressure does not drop immediately when the cycle resumes. Drag the slider left or right to set the time given to refill the compressor once it has met the cleaning cycle required pressure.
If you continue to see this message, contact Formlabs Support for assistance.
More information regarding setting up a compressed air supply for Fuse Blast can be found here. More detailed troubleshooting steps for Error 2.7.6 can be found here.
Fan errors (Error Group 8)
Error Group 8 and its subcodes (1–3) all indicate an issue with the machine’s fans.
Error 8.2: Fan Speed Timeout Error
The machine displays Error 8.2 when the fan does not reach the required fan speed within the required amount of time for the Fuse Blast to start a blasting cycle. If the fan appears to spin, the tachometer may be disconnected or the motherboard may be faulty. If the fan does not spin at all, the fan may be disconnected from power or faulty.
- Follow the instructions in the guide for replacing the Fuse Blast motherboard and display assembly until you can access the motherboard, in the section “Removing the motherboard and display assembly.” Do not actually remove the motherboard.
- Unplug and reseat the cables labeled C124 and C125, plugged into the connectors labeled J124 and J125 on the motherboard. These cables are for blower fan power and blower fan control, respectively.
- Continue to follow the motherboard replacement guide from step 4 in the section “Installing the replacement motherboard and display assembly.”
- Once the Fuse Blast is fully reassembled, reconnect it to power and test the machine.
If you continue to see this message, contact Formlabs Support for assistance.
Air handling errors (Error 16)
All subcodes of Fuse Blast Error Group 16 (1–27) relate to air handling issues within the machine, including clogs and pressure sensor errors. There are five pressure sensors on the Fuse Blast motherboard with five corresponding pressure tap tubes connecting to the points inside the machine listed below. A pressure alarm occurs when the measurement from one sensor, or the difference between the measurement of two sensors, sits outside the allowable range.
The sensors and hoses are numbered as follows:
- Cyclone separator inlet
- Media metering valve
- Post-air filter
- Pre-air filter
- Waste hopper
Error 16.3: Hopper Valve Open
Error 16.3 indicates that, according to pressure measurements within the machine, a hopper valve is open. Ensure that both the media and waste hopper knife valves are closed. If you continue to see this message, contact Formlabs Support for assistance.
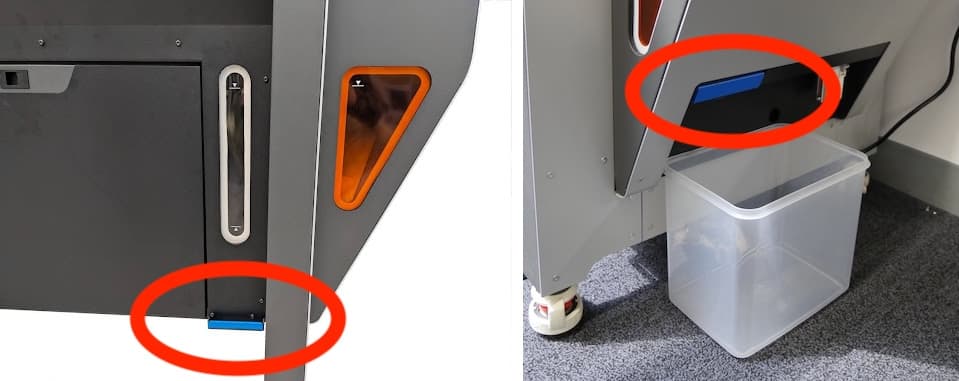
This error can also occur if the knife valve does not seal tightly against its gasket, even if it is visibly closed. The knife valve assemblies are secured with a set of Torx screws: five on the bottom of the media hopper valve and four on the bottom of the waste hopper valve. Tighten these screws to squeeze the valve more firmly against its gasket. To access the bottom of the waste hopper knife valve, first remove the lower sidecar panel.
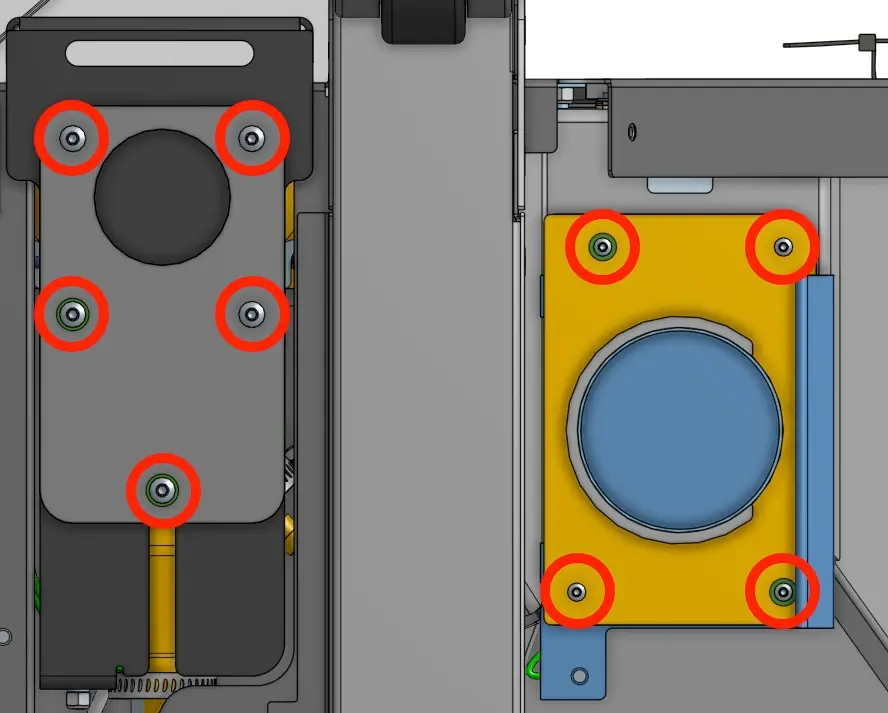
Error 16.4: Exhaust Port Blocked
Error 16.4 indicates that, according to pressure measurements within the machine, the exhaust port is blocked. Ensure there is at least 77 cm (30 in) of space clear behind the machine. If you continue to see this message, contact Formlabs Support for assistance.
Error 16.5: HEPA Filter Not Detected
Error 16.5 indicates that, according to pressure measurements within the machine, the HEPA air filter is missing,not properly installed, or leaking to the point that there is no significant pressure difference between the sensors located on both sides of the filter. This is distinct from Error 3.6, as the HEPA filter interlock is still registered as closed.
To resolve this error:
- Install or reseat the filter.
- Inspect the air filter for damage and for media collecting behind the filter. If the filter is damaged or allowing blasting media to pass by, replace it.
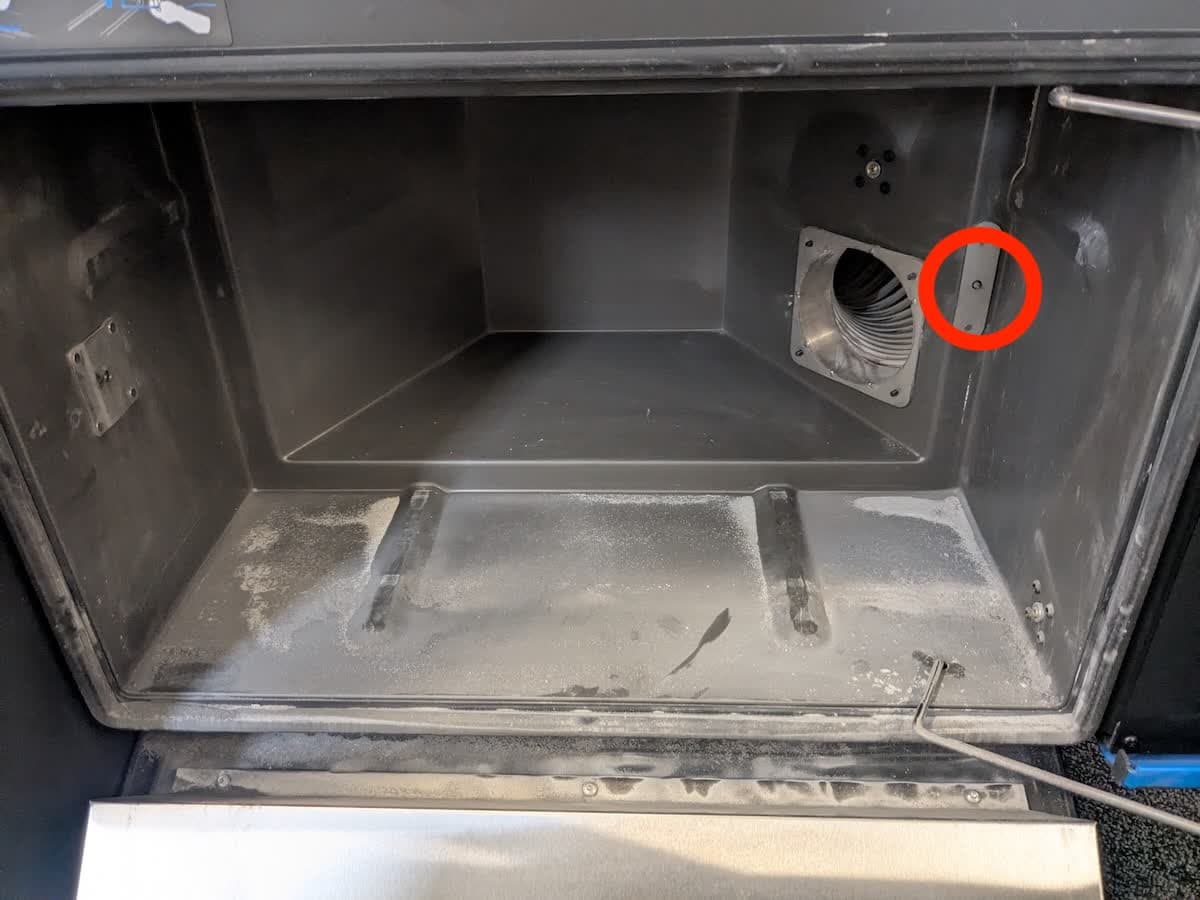
- When properly inserted, the air filter presses a button behind it. The Fuse Blast uses this to determine whether the filter has been installed. Locate the button behind the air filter. Adjust the portion of the filter gasket that presses the button, such as by adding a small shim.
If you continue to see this message, contact Formlabs Support for assistance.
Error 16.6: HEPA Filter Cleaning Recommended
Error 16.6 indicates that, according to pressure measurements within the machine, the HEPA air filter needs to be cleaned. See maintenance menu or scan QR code for cleaning instructions. If you continue to see this message, contact Formlabs Support for assistance.
Error 16.7: Clog Detected - HEPA Filter
Error 16.7 indicates that, according to pressure measurements within the machine, the HEPA air filter is clogged and needs to be cleaned. See maintenance menu or scan QR code for cleaning instructions. If you continue to see this message, contact Formlabs Support for assistance.
Error 16.8: Clog Detected - Cyclone Inlet Or Snorkel
Error 16.8 indicates that, according to pressure measurements within the machine, the cyclone inlet hose, air metering valve, or snorkel are clogged.
The snorkel is an air tube that connects to the duct under the parts catcher. It helps the machine clear clogs, but can itself be blocked by excess blasting media. Lift the access hatch in the work surface grate. The snorkel inlet is located on the left side.
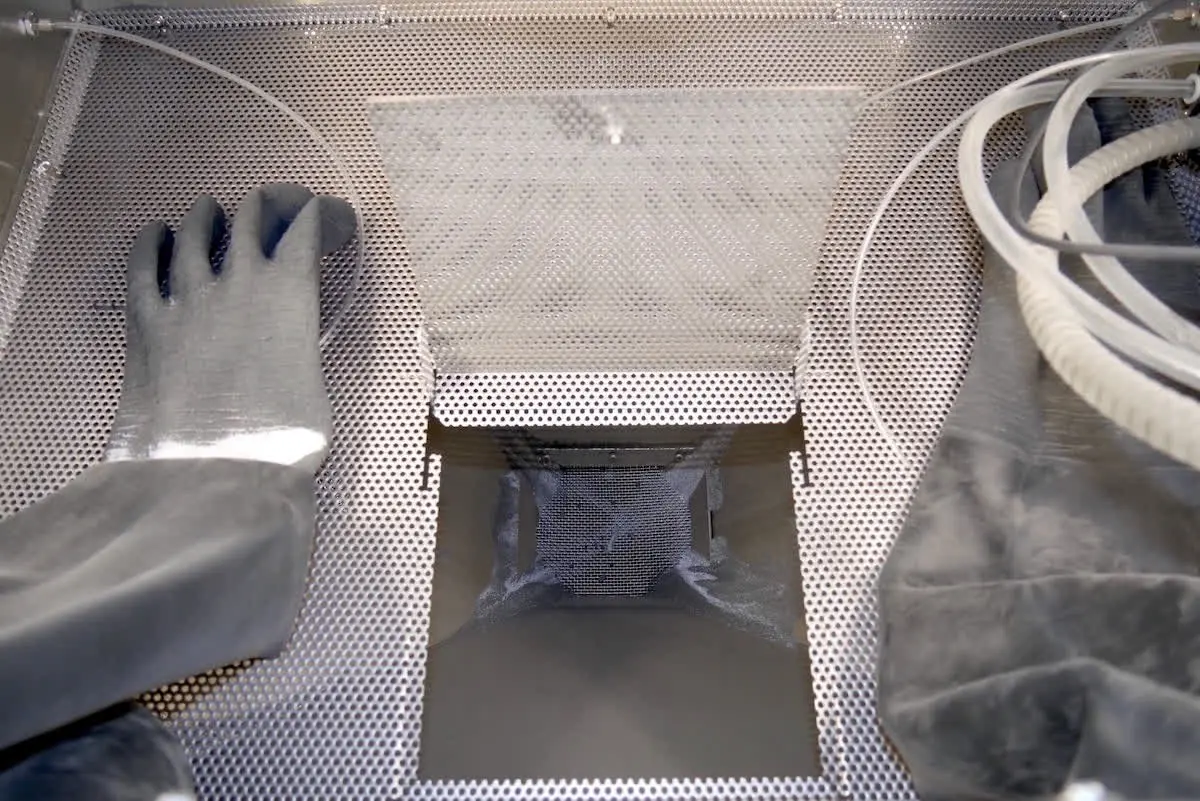
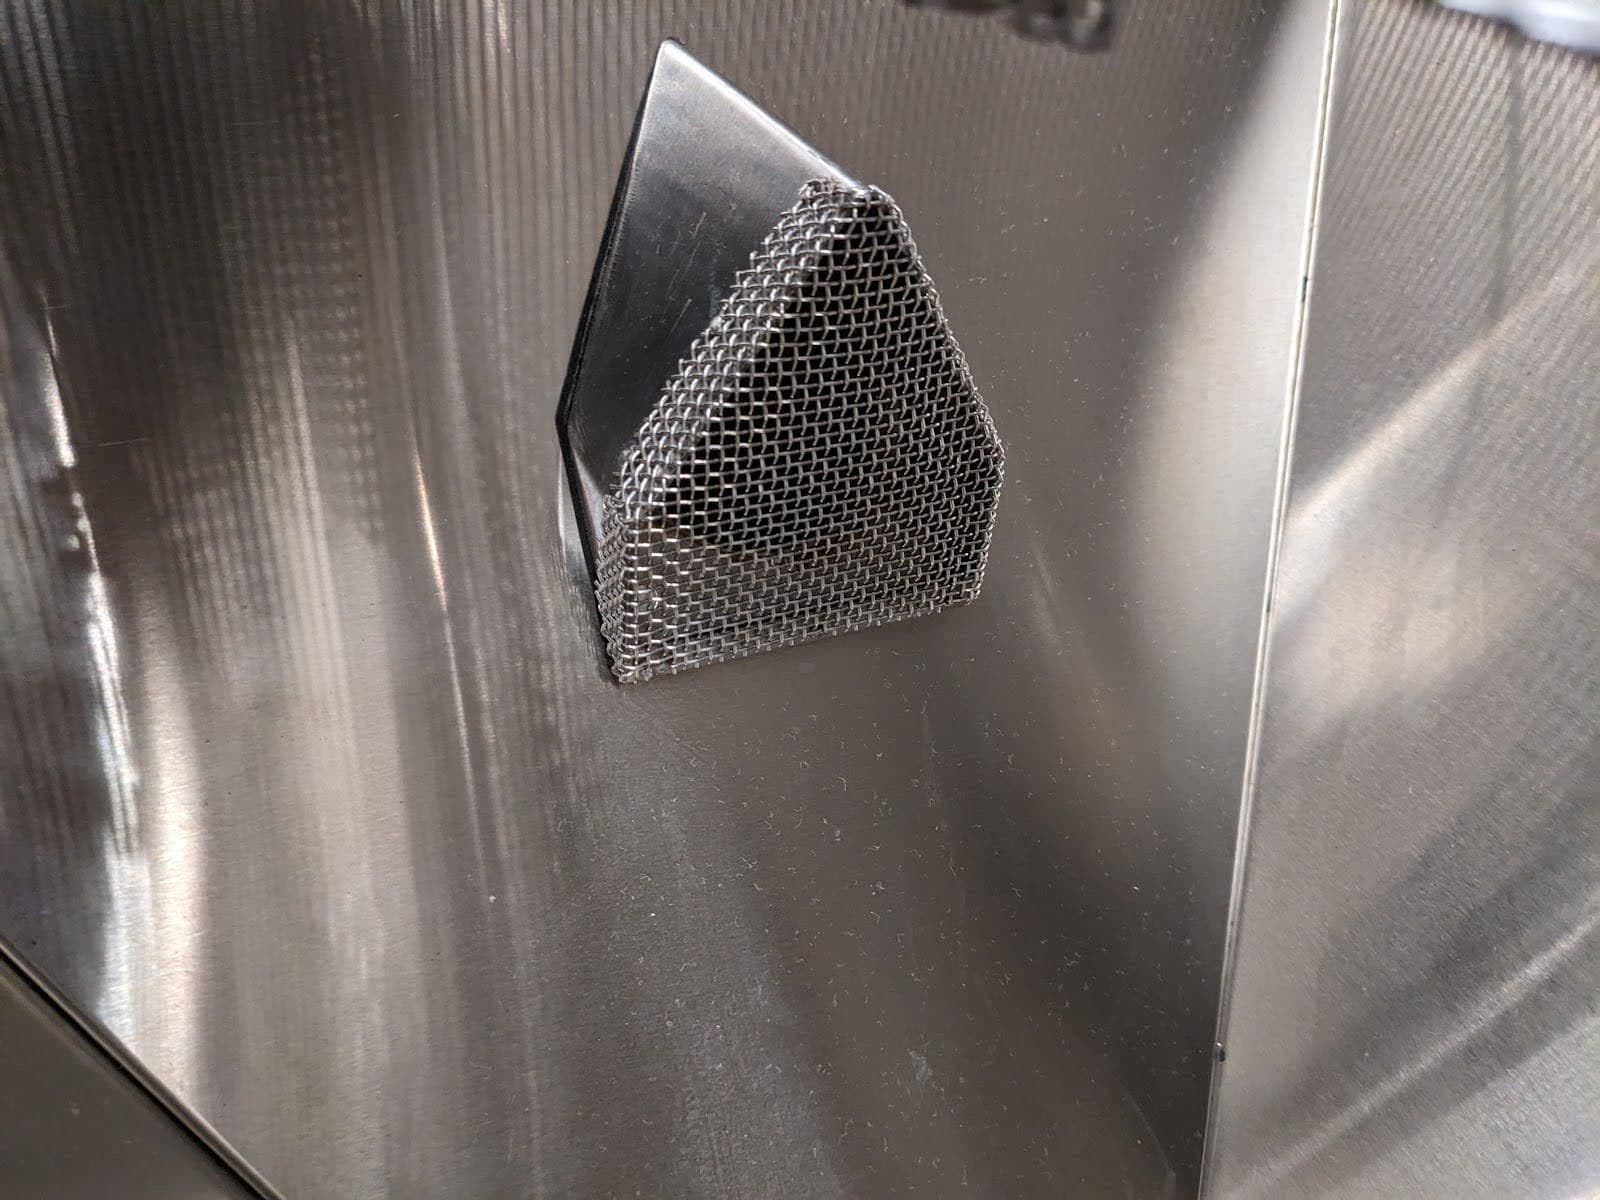
To resolve this:
- Remove as much media from the parts catcher as possible.
- Run the fan for several minutes and observe if media is slowly draining from the parts catcher. If it is, leave the fan running until the clog is cleared.
- Disconnect the cyclone inlet hose from the cyclone separator and vacuum out the cyclone inlet hose. [EN]
If you continue to see this message, contact Formlabs Support for assistance.
Error 16.9: Clog Detected - Cyclone Outlet
Error 16.9 indicates that, according to pressure measurements within the machine, the cyclone outlet hose is clogged.
To resolve this:
- Run the fan for several minutes and try another cycle.
- Inspect and clean the cyclone outlet hose.
- Inspect the cyclone and pre-air filter pressure tap tubes.
If you continue to see this message, contact Formlabs Support for assistance.
Error 16.10: Leak Detected - Filter Plenum
Error 16.10 indicates that, according to pressure measurements within the machine, there is a leak in the air filter box.
To resolve this:
- Inspect the cyclone outlet hose.
- Inspect the filter box.
- Inspect the cyclone, pre-air filter and post-air filter pressure tap tubes.
If you continue to see this message, contact Formlabs Support for assistance.
Error 16.11: Leak Detected - Tubing
Error 16.11 indicates that, according to pressure measurements within the machine, there is a leak in the air filter handling tubing.
To resolve this:
- Inspect all air handling tubing.
- Inspect the cyclone and pre-air filter pressure tap tubes.
If you continue to see this message, contact Formlabs Support for assistance.
Error 16.12: Clog or Leak Detected - Media Hose
To resolve this:
- Run a blast cycle for several minutes and observe if media is flowing from the blast gun.
- With the blast gloves, cover the blast nozzle and run the blast gun manually.
- Inspect and clean the media hose.
- Inspect the media metering valve pressure tap tube.
If you continue to see this message, contact Formlabs Support for assistance.
Error 16.13: Clog Detected - Metering Hose
Error 16.13 indicates that, according to pressure measurements within the machine, there is clog in the regurgitator line. Follow the steps outlined here to unclog the regurgitator line.
Error 16.14: Waste Hopper Pressure Sensor - Tared Measurement Is High
Error 16.14 indicates that the corrected pressure sensor reading for the waste hopper was too high. This generally means that the sensor failed to calibrate properly or the pressure tap in question is disconnected.
To resolve this error:
- Turn off the fan and wait a minimum of 60 seconds before trying again.
- If the issue persists, inspect the waste hopper pressure tap.
If you continue to see this message, contact Formlabs Support for assistance.
Error 16.15: Post-Filter Pressure Sensor - Tared Measurement Is High
Error 16.15 indicates that the corrected pressure sensor reading for the post-air filter sensor was too high. This generally means that the sensor failed to calibrate properly, or the pressure tap in question is disconnected.
To resolve this error:
- Turn off the fan and wait a minimum of 60 seconds before trying again.
- If the issue persists, inspect the post-air filter pressure tap.
If you continue to see this message, contact Formlabs Support for assistance.
Error 16.16: Pre-Filter Pressure Sensor - Tared Measurement Is High
Error 16.16 indicates that the corrected pressure sensor reading for the pre-air filter sensor was too high. This generally means that the sensor failed to calibrate properly, or the pressure tap in question is disconnected.
To resolve this error:
- Turn off the fan and wait a minimum of 60 seconds before trying again.
- If the issue persists, inspect the pre-air filter pressure tap.
If you continue to see this message, contact Formlabs Support for assistance.
16.17: Cyclone Pressure Sensor - Tared Measurement Is High
Error 16.17 indicates that the corrected pressure sensor reading for the cyclone separator sensor was too high. This generally means that the sensor failed to calibrate properly, or the pressure tap in question is disconnected.
To resolve this error:
- Turn off the fan and wait a minimum of 60 seconds before trying again.
- If the issue persists, inspect the cyclone pressure tap.
If you continue to see this message, contact Formlabs Support for assistance.
Tumbler motor errors (Error 17)
All subcodes of Fuse Blast Error 17 (1–17) relate to issues encountered while actuating the tumbler.
Error 17.3: Tumbler Stalled
Error 17.3 indicates that the tumbler motor stalled during use. Clear any obstructions around the tumbler or retry with a lower speed setting. Formlabs recommends a maximum tumbler speed of 15 rpm, but 5–10 rpm is generally sufficient for normal use. If you continue to see this message, please contact Formlabs Support for assistance.
Error 17.4: Tumbler Malfunction
Error 17.4 indicates that the tumbler motor stopped unexpectedly. Power cycle the Fuse Blast using the breaker switch on the rear of the machine. Leave the unit powered off for at least 30 seconds before powering back on. Clear any obstructions around the tumbler and retry. If you continue to see this message, please contact Formlabs Support for assistance.
Other errors and messages
Machine Is Starting
If the Fuse Blast fails to initialize and only displays the message Machine Is Starting, there is a hardware failure on the motherboard. Replace the motherboard and display assembly to resolve the issue. Replacement motherboard and display assemblies are available on the Formlabs Store. Follow the instructions in the guide Fuse Blast - Replacing the motherboard and display assembly to replace the component.