WHITE PAPER
Formlabs Logo

Fuse 1 generation error messages

Fuse 1 generation error messages

The touchscreen on Fuse 1 generation printers displays error messages if the machine encounters any abnormalities and displays more details about the error. Configure Dashboard settings to receive SMS or email notifications for the errors listed in this article and for other print events.

This article outlines initial troubleshooting steps to resolve common error codes that have been seen on Fuse 1 generation units. If you encounter an error code not found in this article, refer to the general troubleshooting steps below.

General troubleshooting steps

The following steps are recommended for most issues seen on Fuse 1 generation printers:

  1. Common steps for bugs, software issues, and electrical issues:
    1. Ensure that PreForm and your printer’s firmware are up to date.
    2. Power cycle the printer using the breaker switch on the rear of the printer. Leave the unit powered off for at least 30 seconds before powering back on.
    3. Ensure the printer is on a dedicated AC circuit that meets the required specifications noted in the site preparation guide.
    4. If an issue coincided with a software update, reinstall the current PreForm version and printer firmware and reupload the print job.
  2. Common steps for print defects and failures:
    1. Confirm that you used the recommended refresh rate for your material.
    2. Check that you’ve performed all recommended maintenance steps, paying special attention to the IR sensor, IR sensor housing, and optical cassette.
    3. Refer to the Fuse 1 generation design specifications for best practices for print success.
  3. Best practices for opening a support case with Formlabs:
    1. Provide photos of the specific error code, print defect, and any other symptoms you are seeing.
    2. Note the context of the issue (e.g., did the issue occur immediately after installation, after a software update, etc.).
    3. Note the frequency of this issue and whether it is persistent or intermittent.
    4. Note the material type, refresh rate, and whether you are printing with an inert gas atmosphere.
    5. Note the Serial Name of your printer.
    6. Note the serial number of each build chamber that has shown this issue (especially if there are different results from one build chamber to another).
    7. Provide diagnostic logs from your Fuse 1 generation unit.
    8. Note all troubleshooting steps already attempted.

Diagnostic logs

Formlabs printers maintain diagnostic logs to provide detailed information about the printer. Include these diagnostic logs with other relevant observations and details when contacting Formlabs Support or your certified service provider to speed up resolution.

For printers connected to the internet over an active Wi-Fi or Ethernet connection:

  1. Tap the gear icon on the bottom left of the printer's Home screen. The Settings screen appears.
  2. Tap System. The System screen appears.
  3. Tap Upload Diagnostic Info. A confirmation message to upload diagnostic information appears.
  4. Tap Next to start the upload. A confirmation message appears when the upload is complete.
  5. If the printer displays an error message indicating that it cannot upload the logs, there may not be enough storage space on the printer for the upload. Delete print jobs from the Print History to clear enough storage space to upload the diagnostic logs.
  6. Restart the printer and try again.

For printers not connected to the internet:

  1. Open PreForm.
  2. Click Edit Job Setup. The Job Setup window opens.
  3. Select the printer’s serial name.
  4. Click Download Logs. A confirmation window appears.
  5. Click Browse to download the diagnostic logs to a preferred location on your computer.
  6. Click OK. The diagnostic logs save and appear in the encrypted FORMLOGS format.
  7. Attach the file when contacting Formlabs Support or your certified service provider.
  8. If PreForm displays the message ERROR_BAD_STATE, there may not be enough storage space on the printer for the upload. Delete print jobs from the Print History to clear enough storage space to upload the logs.
  9. Restart the printer and try again.

Learn more about options for network and non-network connections.

Error 1

Error 1 indicates that an unexpected error occurred while the printer was executing an internal operation. This may be caused by a corrupted PreForm file or a one-off firmware error. To resolve this error:

  1. Update PreForm and the printer’s firmware.
  2. Regenerate the FORM file in PreForm.
  3. Reupload the FORM file to the printer. Formlabs recommends deleting the original print job from the printer’s queue as well.
  4. Attempt another print.
  5. Upload diagnostic logs.
  6. Initiate a factory reset by tapping Settings > System > Factory Reset. When the reset is complete, try printing again.

If you see this error message repeatedly, contact Formlabs Support or a certified service provider.

Error 2

Error 2 indicates that a layer file in the print’s FORM file was missing, causing the print to fail. To resolve this error:

  1. Update PreForm and the printer’s firmware.
  2. Regenerate the FORM file in PreForm.
  3. Reupload the FORM file to the printer. Formlabs recommends deleting the original print job from the printer’s queue as well.
  4. Attempt another print.

If you see this issue repeatedly, contact Formlabs Support or a certified service provider.

Error 8

Error 8 indicates that a layer file in the print’s FORM file was corrupted, causing the print to fail. To resolve this error:

  1. Update PreForm and the printer’s firmware.
  2. Regenerate the FORM file in PreForm.
  3. Reupload the FORM file to the printer (it is recommended to delete the original print job from the printer’s queue as well).
  4. Attempt another print.

If you see this issue repeatedly, contact Formlabs Support or a certified service provider.

Error 29

Error 29 indicates that the printer’s galvanometer control board encountered an error. To resolve this error:

  1. Confirm the printer is on its own dedicated circuit, as outlined in the Fuse 1 generation site preparation guide.
  2. Update PreForm and the printer’s firmware.
  3. Delete old print files from the printer.
  4. Attempt another print.

If you see this issue repeatedly, contact Formlabs Support or a certified service provider.

Error 56, Error 57, and Error 58

Error 56, Error 57, and Error 58 indicate the printer was unable to communicate with the galvanometers. This may indicate that a layer file in the print’s FORM file was corrupted. To resolve this error:

  1. Power the printer off using the switch in the back and leave off for at least 30 seconds. Power the printer back on.
  2. Update PreForm and the printer’s firmware.
  3. Regenerate the FORM file in PreForm.
  4. Reupload the FORM file to the printer. Formlabs recommends deleting the original print job from the printer’s queue as well.
  5. Attempt another print.

If you see this issue repeatedly, contact Formlabs Support or a certified service provider.

Error 61

Error 61 indicates the printer was unable to read the FORM file. This is most likely caused by a corrupted FORM file. To resolve this error:

  1. Update PreForm and the printer’s firmware.
  2. Regenerate the FORM file in PreForm.
  3. Reupload the FORM file to the printer. Formlabs recommends deleting the original print job from the printer’s queue as well.
  4. Attempt another print.

If you see this issue repeatedly, upload the diagnostic logs and contact Formlabs Support or a certified service provider.

Error 63

Error 63 indicates the printer was unable to read the FORM file. This is most likely caused by a corrupted FORM file. To resolve this error:

  1. Delete print jobs from the Print History or perform a factory reset.
  2. Update PreForm and the printer’s firmware.
  3. Regenerate the FORM file in PreForm.
  4. Reupload the FORM file to the printer.
  5. Attempt another print.

If you see this issue repeatedly, upload the diagnostic logs and contact Formlabs Support or a certified service provider.

Error 67

Error 67 indicates that the printer was unable to communicate with the galvanometers (or “galvos”) that aim the laser. To resolve this error:

  1. Power the printer off using the switch in the back and leave off for at least 30 seconds. Power the printer back on.
  2. Update PreForm and the printer’s firmware.
  3. Attempt another print.
  4. If the issue reoccurs, re-seat the galvo cables and try again.

If the issue persists, contact Formlabs Support or a certified service provider for potential replacement of the galvanometer driver board.

Error 83

Error 83 indicates there was an issue with on-device communication. To resolve this error:

  1. Power the printer off using the switch in the back and leave off for at least 30 seconds. Power the printer back on.
  2. Attempt another print.

If you see this issue repeatedly, contact Formlabs Support or a certified service provider.

Error 86

Error 86 indicates there was an issue starting the print. To resolve this error:

  1. Power the printer off using the switch in the back and leave off for at least 30 seconds. Power the printer back on.
  2. Attempt another print.

If you see this issue repeatedly, contact Formlabs Support or a certified service provider.

Error 90, Error 93, Error 94, and Error 95

Error numbers 90, 93, 94, and 95 are all related to motor movements within the printer:

  • Error 90 indicates an issue with processing information from a particular motor’s encoder board.
  • Error 93 and Error 95 indicate that one of the motors in the printer or build chamber could not move properly.
  • Error 94 indicates that a motor was able to spin for a very long time without the component colliding with a hardstop as expected.

Each of these error codes has a sub-code that corresponds to the motor that reported the error:

  1. Hopper (right) side flipper
  2. Buffer (left) side flipper
  3. Recoater
  4. Build chamber print bed
  5. Doser

For a more thorough explanation of these error messages and detailed troubleshooting steps, see the article Fuse 1 generation motor movement errors (Error 90, 93, 94, and 95). If the issue persists, contact Formlabs Support or a certified service provider.

Error 98

Error 98 indicates the printer encountered an unexpected error while starting the heater controller.

This error code has a sub-code that corresponds to the heater that reported the error:

  1. Air heater
  2. Cylinder upper heater
  3. Cylinder lower heater
  4. Buffer trough heater
  5. Hopper trough heater
  6. Piston top heater
  7. Hopper quartz tube
  8. Buffer quartz tube
  9. IR sensor

Regardless of the error sub-code, follow the same troubleshooting steps for all heaters. To resolve this error:

  1. Update your printer’s firmware.
  2. Power the printer off using the switch in the back and leave off for at least 30 seconds. Power the printer back on.
  3. Attempt another print.
  4. If the error reoccurs, follow the troubleshooting steps for the specific heaters listed below. If the problem persists, contact Formlabs Support or a certified service provider for further assistance.

Error 98/7 and 98/8

  1. Reset the corresponding quartz tube following the instructions in Replacing the Fuse 1 quartz tube heaters [EN] [DE] [ES] [FR] [IT] [JA] [ZH].
  2. Attempt another print.

Error 98/2, 98/3, and 98/6

  1. Unplug the build chamber plug from the printer. Inspect the plug and ensure it is free of debris. Clean the plug with compressed air if needed and reconnect, ensuring that the build chamber plug is fully seated.
  2. Attempt another print.
  3. If the error returns, test another build chamber, if one is available.

Error 98/9

  1. Lift the IR sensor off of the IR sensor housing. Disconnect and reconnect the sensor cable. Place the IR sensor back on its housing, ensuring that it sits flush.
  2. Attempt another print.

Error 101

Error 101 indicates the printer encountered an error while starting the heater controller. To resolve this issue:

  1. Use the rear breaker switch to power cycle the printer for 30 seconds before starting a subsequent print.
  2. Delete all jobs from the print queue.
  3. Update the printer’s firmware. If the firmware is up to date, reflash the currently installed firmware.

If this error message persists, contact Formlabs Support or a certified service provider.

Error 102

Error 102 indicates that a heater control loop was stuck waiting for input. Most commonly, this occurs because an alert is left on the printer display waiting for resolution. With the introduction of a new priming routine in firmware version 1.19.0 and later, multiple subsystem checks are no longer performed while the printer is heating. This change prevents the risk of a heater timeout if you do not interact with the printer during heating. To resolve this error:

  1. Confirm whether this issue coincides with a printer resolution request. If it does, resolve the underlying issue causing the printer resolution request. Examples include intake pressure warnings and optical cassette detection warnings.
  2. Confirm the printer's firmware version and update if necessary.
  3. Confirm if the issue recurs. If the issue recurs on multiple prints, reupload the printer’s firmware and reupload the print job.

If you see this error message repeatedly after power cycling and updating to the latest firmware version, contact Formlabs Support or a certified service provider.

Error 108

Error 108 indicates that the printer encountered an unexpected error while communicating with the camera. To resolve this issue:

  1. Power the printer off using the switch in the back and leave off for at least 30 seconds. Power the printer back on.
  2. Update PreForm and the printer’s firmware.
  3. Attempt another print.
  4. Perform a factory reset and try again.

If you see this issue repeatedly, contact Formlabs Support or a certified service provider.

Error 111

Error 111 indicates that the printer was unable to communicate with the camera. To resolve this error:

  1. Power the printer off using the switch in the back and leave off for at least 30 seconds. Power the printer back on.
  2. Update PreForm and the printer’s firmware.
  3. Attempt another print.

If you see this issue repeatedly, the camera may need to be replaced. Contact Formlabs Support or a certified service provider.

Error 112 and Error 113

Error 112 and Error 113 indicate unexpected surface defects in the print area. Ensure that the infrared sensor and optical cassette are clean and that the seal around the build plate is intact. If you see this error message repeatedly, contact Formlabs Support or a certified service provider.

Further documentation and troubleshooting steps can be found here.

Error 118

Error 118 indicates there was an issue with on-device communication. To resolve this error:

  1. Delete all jobs from the print queue.
  2. Update PreForm and the printer’s firmware.
  3. Attempt another print.

If the issue persists, contact Formlabs Support or a certified service provider.

Error 167

Error 167 indicates a timeout from one of the heaters. To resolve this error:

  1. Delete all jobs from the print queue.
  2. Update PreForm and the printer’s firmware.
  3. Attempt another print.

If the issue persists, contact Formlabs Support or a certified service provider.

Error 170

Error 170 indicates a compatibility issue between PreForm and the printer’s firmware. To resolve this error:

  1. Delete all jobs from the print queue.
  2. Update PreForm and the printer’s firmware. If the firmware is up to date, reflash the currently installed firmware.
  3. Regenerate the FORM file in PreForm.
  4. Reupload the FORM file to the printer.
  5. Attempt another print.

Error 172

Error 172 indicates an issue with the installed firmware. This error is often seen after replacing one of the printer’s control boards. To resolve this error, update or reinstall your printer’s firmware via PreForm.

Error 173

Error 173 indicates the printer was unable to check the firmware on one of its control boards. To resolve this error:

  1. Power the printer off using the switch in the back and leave off for at least 30 seconds. Power the printer back on.
  2. Attempt another print.
  3. Manually reinstall the printer firmware via PreForm.

If you see this issue repeatedly, contact Formlabs Support or a certified service provider.

Error 174

Error 174 indicates the printer cannot read data from the IR sensor. Reseat the IR sensor. When the IR sensor is seated properly, the indicator light on the top of the sensor turns green. If you see this error message repeatedly, contact Formlabs Support or a certified service provider.

Error 175

Error 175 indicates that the print enclosure door is open or not properly secured. To resolve this error:

  1. Close the print enclosure door.
  2. Press firmly to ensure that the door is fully latched.
  3. If necessary, squeeze the door shut using the cutout on the right side of the printer for leverage.

Error 176

Error 176 indicates that one of the printer’s interlocks is malfunctioning or was opened during a print. This error rarely occurs on current printer firmware and has been replaced with more descriptive interlock errors. Update PreForm and the printer’s firmware. If an interlock issue recurs on current release firmware, refer to that error code’s section on this support article. If you see Error 176 repeatedly after updating the printer’s firmware, contact Formlabs Support or a certified service provider.

Error 177

Error 177 indicates the level of powder in the hopper is running low. Add powder to the hopper.

If the printer displays this error when there is powder in the hopper, one or both of the powder sensors in the hopper may be faulty or damaged. Replacement powder sensors are available for purchase on the Formlabs Store. Follow the guide Replacing the Fuse 1 generation hopper powder sensors to replace the component.

Error 180

Error 180 indicates that the output of one or more of the heaters is lower than it should be. Read the support article Fuse 1 generation error messages: Error 180/1-8 Heater Current Too Low for specific troubleshooting steps. Contact Formlabs Support or a certified service provider for additional guidance.

Error 181

Error 181 indicates that the output of one or more of the heaters is higher than expected. To resolve this error:

  1. Power the printer off using the switch in the back and leave off for at least 30 seconds. Power the printer back on.
  2. Attempt another print.

If the issue persists, contact Formlabs Support or a certified service provider.

Error 194

Error 194 indicates that the printer did not detect the optical cassette during its preprint checks. To resolve this error, update your printer’s firmware to version 1.19.0 or later. This error was removed in firmware 1.19.0 and later and replaced with a reminder to install the optical cassette prior to starting a print.

On earlier firmware versions, uninstall and reinstall the optical cassette, retry with another optical cassette (if available), and clean the upper laser window. For additional cleaning guidance, see our article on this error.

If you see this error message after updating your printer’s firmware, contact Formlabs Support or a certified service provider.

Error 195

Error 195 indicates that the printer could not communicate with one of the pressure sensors. This error does not indicate that the pressure reading is too high or too low, and is most common when printing with nitrogen on Fuse 1+ 30W printers. To resolve this error, update your printer’s firmware to version 1.19.0 or later. If you see this error message after updating your printer’s firmware, contact Formlabs Support or a certified service provider.

Error 196

Error 196 indicates that the pressure at the intake fan was too low. To resolve this error:

  1. Check that the air filters are clean.
  2. If this issue persists after cleaning the filters, replace the intake filter.

If you see this error message with a new intake filter, contact Formlabs Support or a certified service provider.

Error 197

Error 197 indicates that the print enclosure pressure check has failed. Check that the air filters are clean, there is powder in the hopper, and all doors are securely closed. Read the support article Fuse 1 generation error messages: Pressure warnings for specific troubleshooting steps about Error 197.

If you see this error message repeatedly, contact Formlabs Support or a certified service provider.

Error 206

Error 206 indicates that the printer cannot detect a build chamber. Ensure that a build chamber is plugged in and secured to continue printing.

Error 208

Error 208 indicates that the inserted build chamber and the printer have different voltage requirements. Check the serial name printed on the build chamber, which starts with BC-FS1-120V or BC-FS1-230V, and ensure that it matches the voltage requirement for your printer. Use a different build chamber if one is available and contact Formlabs Support or a certified service provider.

Error 209, Error 210, and Error 211

Error 209, Error 210, and Error 211 indicate that the printer’s preprint voltage check failed. To resolve this error:

  1. Power the printer off using the switch in the back and leave off for at least 30 seconds. Power the printer back on.
  2. Update PreForm and the printer’s firmware.
  3. Check that the input voltage from the AC utility that the printer is plugged into is sufficient and matches the voltage type of the printer.
  4. Attempt another print.

If you see this issue repeatedly, contact Formlabs Support or a certified service provider.

Error 213

Error 213 indicates that the printer encountered an unexpected error while communicating with the powder card reader. To resolve this issue:

  1. Update the printer’s firmware.
  2. Power the printer off using the switch in the back and leave off for at least 30 seconds. Power the printer back on.
  3. Attempt another print.
  4. Upload diagnostic logs.
  5. Initiate a factory reset by tapping Settings > System > Factory Reset. When the reset is complete, try printing again.

If you see this issue repeatedly, contact Formlabs Support or a certified service provider.

Error 216 and Error 217

Error 216 and Error 217 indicate that the initial camera check was too dark or too bright. This is a PrinterWatcher failure and could have a variety of root causes. If the steps in the linked article do not resolve the issue, reseat the camera cable on both ends.

If you require additional assistance troubleshooting PrinterWatcher failures, please contact Formlabs Support or a certified service provider. To assist with troubleshooting when working with Formlabs Support:

  1. Update to the latest firmware.
  2. Enable remote assistance by tapping Settings > System > Remote Assistance and toggling Remote Assistance to ON.
  3. Enable image collection by tapping Settings > System > Print Image Collection.
  4. Connect the device to the internet.

Error 246

Error 246 indicates that the printer’s galvanometers were being driven too hard. To resolve this error:

  1. Power the printer off using the switch in the back and leave off for at least 30 seconds. Power the printer back on.
  2. Update PreForm and the printer’s firmware.
  3. Attempt another print.

If you see this issue repeatedly, contact Formlabs Support or a certified service provider.

Error 248

Error 248 indicates that the printer’s galvanometer control board is non-operational. This issue primarily occurs on Fuse 1+ 30W printers, but may also occur on Fuse 1 printers. To resolve this issue:

  1. Ensure the printer’s firmware is up to date. If the firmware is up to date, reflash the currently installed firmware.
  2. Power the printer off using the switch in the back and leave it off for at least 30 seconds. Power the printer back on.

If the issue persists, the galvanometer control board may be damaged. Contact Formlabs Support or a certified service provider for assistance.

Error 257

Error 257 indicates that there was current running through a heater when there was not expected to be. Subsequent print attempts may fail with error message Error Code 101 NONOPERATIONAL_DEPENDENCY. This usually indicates an issue with a heater, harness, or the heater control board. It can also be caused by electrical noise interfering with the printer’s subsystems. To resolve this issue:

  1. Upload diagnostic logs.
  2. Confirm that the printer is on a dedicated AC circuit. If it is not, connect it to a dedicated circuit.
  3. Power the printer off using the switch in the back and leave off for at least 30 seconds. Power the printer back on.
  4. Ensure the printer’s firmware is up to date. If the firmware is up to date, reflash the currently installed firmware.
  5. Unplug the build chamber plug from the printer and reconnect, ensuring that the build chamber plug is fully seated.
  6. Attempt another print. Do not touch the printer until it displays an error message or proceeds with the preprint process.
  7. If the printer’s power source is known to have electrical noise or has a history of power surges consider installing a line conditioner. Refer to our supplier article for a list of models by region.

If you see this error message repeatedly, contact Formlabs Support or a certified service provider.

Error 258, Error 259, and Error 261

Error 258 and Error 259 are both related to the temperature sensors inside the printer. Error 258 indicates that one of the sensors in the print enclosure or the build chamber reported indecipherable readings. Error 259 indicates that one of the temperature sensors stopped reporting readings altogether. If the printer cannot monitor its internal temperature while printing, it aborts the print for safety reasons. Error 261 indicates that the temperature sensor measured a temperature above the allowable range, but is usually associated with a malfunctioning sensor as well.

For detailed troubleshooting information for these error codes, refer to this article regarding temperature sensor errors. For further assistance and clarification, contact Formlabs Support or a certified service provider.

Error 260

Error 260 indicates that a temperature sensors in the print enclosure or the build chamber reported temperatures below the minimum setpoint. If any of the heaters fail to reach their setpoints during the preprint process or cannot maintain their setpoints during a print, the print is aborted to conserve material.

Read the support article Fuse 1 generation error message: Error 260 for specific troubleshooting steps about Error 260.

Error 263

Error 263 indicates that one of the printer’s interlocks is malfunctioning or was opened during a print. This error rarely occurs on current printer firmware and has been replaced with more descriptive interlock errors. To resolve this issue:

  1. Check that the IR sensor is properly installed.
  2. Check that the print enclosure door and filter cabinet door are securely closed.
  3. Update PreForm and the printer’s firmware.
  4. If you see Error 263 repeatedly after updating the printer’s firmware, delete all print jobs from the printer. Power cycle the printer by disconnecting the power cable, waiting one minute, then reconnecting the printer to power. You may need to repeat this process two or three times.
  5. If a more specific interlock-related error recurs on a current release firmware, refer to that error code’s section on this support article.

If the issue persists, contact Formlabs Support or a certified service provider.

Error 264

Error 264 indicates that the fan speed was too low to print. This error generally indicates a failure to initialize or that the print started before the fan was ready. To resolve this issue:

  1. Clean the printer’s air filters and fans.
  2. Power the printer off using the switch in the back and leave off for at least 30 seconds. Power the printer back on.
  3. Update PreForm and the printer’s firmware.
  4. Allow the printer to stabilize for at least 5 minutes after turning it on before starting a print.
  5. Attempt another print.
  6. Check that the printer fans are spinning. If none of the fans are spinning at all, the Motor and Temperature Board (MoTempBo) may need to be replaced. Follow the instructions in Replacing the motor and temperature board. Replacement boards can be purchased from the Formlabs Store.

If you see this issue repeatedly, contact Formlabs Support or a certified service provider.

Error 270

Error 270 indicates that the printer waited too long for input from an encoder board. The error has a sub-code that corresponds to the board that reported the error:

  1. Motor and Temperature Board (MoTempBo)
  2. PostRock Board (PRB)

Regardless of the error sub-code, follow the same troubleshooting steps. To resolve this issue:

  1. Update PreForm and the printer’s firmware.
  2. Delete old print files from the printer.
  3. Attempt another print.
  4. Initiate a factory reset by tapping Settings > System > Factory Reset. When the reset is complete, try printing again.

If the issue persists, contact Formlabs Support or a certified service provider.

Error 293

If the printer restarts unexpectedly while in the middle of a print job, it displays Error 293 or PR_ERROR_RESET_WHILE_PRINTING when it turns back on. This error means that the printer did not finish the last print job normally. For example:

  • Your facility loses power so the printer turns off mid-print.
  • Someone pulls the power cord out of the wall or the printer to turn it off mid-print.
  • A brownout or other momentary power dip causes the printer to turn off and immediately restart mid-print.
  • A loose or damaged power cable causes the printer to turn off.
  • An unusual electrical issue within the printer causes it to reset.

To resolve this issue:

  1. Check if you’ve had a power outage that could explain the printer turning off mid-print. Consider investing in an uninterruptible power supply (UPS) if you experience frequent outages.
  2. Confirm that the printer is on a dedicated power circuit.
  3. Check that the printer is running the latest firmware.
  4. Test the printer with another plug or another power cable.
  5. If you are already using a UPS, test the printer without the UPS to see if it is the source of the problem.

If the problem happens consistently, especially if it repeatedly happens at a particular part of the print, then there may be an electrical issue within the printer. Upload diagnostic logs and contact Formlabs Support or a certified service provider.

Error 298 and Error 299

Error 298 and Error 299 indicate that the printer encountered an unexpected error while communicating with the laser. This may be caused by electrical interference or by a firmware glitch.

  1. Check that the printer is running the latest firmware.
  2. Delete all jobs from the print queue.
  3. Power cycle the printer, then try printing again.

If you continue to see this error message after performing the troubleshooting steps, contact Formlabs Support or a certified service provider.

Error 301

Error 301 indicates the printer was unable to communicate with the galvanometer control board. To resolve this error:

  1. Power the printer off using the switch in the back and leave off for at least 30 seconds. Power the printer back on.
  2. Update PreForm and the printer’s firmware.
  3. Attempt another print.

If you see this error message repeatedly, contact Formlabs Support or a certified service provider.

Error 302 and Error 303

Error 302 and Error 303 indicate that the printer has detected that the laser fired when it was not supposed to. These errors are generally false positives caused by small power fluctuations within the printer, but the printer prevents further use as a precaution.

To resolve this issue, power cycle the printer and try again. If the error message persists, contact Formlabs Support or a certified service provider. They can determine whether the error message was legitimate and reset your machine if required.

Error 304

Error 304 indicates that the printer waited too long for a response from a subsystem within the machine. To resolve this issue:

  1. Power the printer off using the switch in the back and leave off for at least 30 seconds. Power the printer back on.
  2. Update PreForm and the printer’s firmware.
  3. Attempt another print.

Error 306

Error 306 indicates that the laser’s operating temperature has reached or exceeded 40 °C (104 °F) and has subsequently shut down to prevent permanent damage or premature failure.

Check the following:

  • The printer is positioned at least 20.0 cm (8.0 in) away from a wall.
  • The room’s ambient temperature does not exceed 20–27 °C (68–81 °F).
  • The room has sufficient airflow 24/7, i.e., ventilation/AC should remain turned on after hours.
  • The printer is not near additional equipment that may be exhausting large amounts of heat while running.

If you see this error repeatedly, contact Formlabs Support or a certified service provider.

Error 313

Error 313 occurs when the laser power has decreased compared to its original factory measurement. This typically indicates a decline in laser performance and may require replacing the laser assembly. To resolve the issue, upload diagnostic logs and contact Formlabs Support or a certified service provider. If the laser power degradation is confirmed, the laser assembly must be replaced. This error was removed in firmware 1.23.0. On earlier firmware versions:

Fuse 1 laser assemblies

For Fuse 1 laser assemblies, remote recalibration is necessary after replacement. To arrange a remote calibration, schedule an appointment with Formlabs Services. This process ensures the printer is properly calibrated to work with the new laser assembly.

Tip:

The laser power calibration can be updated before installing the replacement laser. To do this, share the serial number of the new laser assembly (in the format “PLOMxxxxxxxx” or “ASMxxxxxx,” found on the laser packaging) with Formlabs Services.

To prepare the printer for remote calibration:

  1. Enable remote assistance: Go to Settings > System > Remote Assistance, and toggle it ON.
  2. Enable Dashboard logging: Go to Settings > System > Dashboard Logging, and toggle it ON.
  3. Ensure the printer is connected to the internet. Any standard network connection is sufficient, but the printer must be accessible from outside the local network.
  4. Verify the printer can access port 9993, especially if there are network restrictions on port access.

Fuse 1+ 30W laser assemblies

Remote recalibration is not required after replacement. The printer can be used immediately.

Error 314

Error 314 indicates that the laser power has exceeded 110% of its original level measured at the factory. To resolve this issue:

  1. Power the printer off using the switch in the back and leave off for at least 30 seconds. Power the printer back on.
  2. Update PreForm and the printer’s firmware.
  3. Attempt another print.

If the error reappears, the laser assembly likely needs to be replaced. Contact Formlabs Support or a certified service provider.

Error 322

Error 322 indicates that the build chamber inserted into the printer is assigned to a different material type than the printer.

If you see this error, insert a build chamber assigned to the material in the printer, or reassign the inserted build chamber by tapping Settings > Tools > Reassign Build Chamber Powder Type on the printer’s touchscreen.

Error 326 and Error 327

Error 326 indicates that the printer did not get the required heater current measurement. Similarly, Error 327 indicates that the printer waited too long for a heater current measurement. These errors have a sub-code that corresponds to the heater that reported the error:

  1. Air heater
  2. Build chamber upper heater
  3. Build chamber lower heater
  4. Buffer (left) side trough
  5. Hopper (right) side trough
  6. Build chamber piston top
  7. Hopper side quartz tube heater
  8. Buffer side quartz tube heater
  9. Print bed

To resolve the error:

  1. Power cycle the printer using the breaker switch on the rear of the printer. Leave the unit powered off for at least 30 seconds before powering back on.
  2. Ensure the printer’s firmware is up to date. If the firmware is up to date, reflash the currently installed firmware.
  3. If the error is related to one of the heaters in the build chamber, retry with another build chamber (if available).
  4. If the error is related to one of the quartz tube heaters, check that they are properly connected and undamaged. If either quartz tube heater is damaged, replace it. Follow the instructions in Replacing the Fuse 1 quartz tube heaters [EN] [DE] [ES] [FR] [IT] [JA] [ZH]. Replacement quartz tubes can be purchased from the Formlabs web store.

Warning:

Do not perform this procedure if the printer was printing less than six hours prior. Allow the print enclosure to fully cool to room temperature before touching or inspecting any Fuse 1 components. Failure to do so may result in serious burns or lacerations from broken quartz glass.

  1. If the error persists, upload diagnostic logs and contact Formlabs Support or a certified service provider.

Error 338

Error 338 indicates that the nitrogen pressure inside the Fuse 1+ 30W printer is too low during printing. To resolve this error, follow these steps for preparing the printer’s nitrogen system and ensure the nitrogen supply is running consistently throughout the print. If the error persists, contact Formlabs Support or a certified service provider.

Error 339

Error 339 indicates that the nitrogen pressure inside the Fuse 1+ 30W printer is too high during printing. To resolve this error, follow these steps for preparing the printer’s nitrogen system. If the error persists, contact Formlabs Support or a certified service provider.

Error 341

Error 341 indicates that the printer’s Gas Mode Controller (GMC) did not successfully transition between states within the expected time. To resolve this error:

  1. Unplug the printer, wait at least two minutes, then reconnect it power and try another print.
  2. Ensure the printer’s firmware is up to date. If the firmware is up to date, reflash the currently installed firmware.
  3. Check the nitrogen source:
    • Verify that the nitrogen generator and its connection meet Formlabs specifications.
    • Check the nitrogen handling system for any leaks or irregularities.
    • Specifically inspect the nitrogen valve to confirm it moves freely and operates correctly.

If the issue persists, contact Formlabs Support or a certified service provider.

Error 346

Error 346 indicates an issue with reading or writing data associated with the printer's laser. To resolve this issue:

  1. Power the printer off using the switch in the back and leave off for at least 30 seconds. Power the printer back on.
  2. Update PreForm and the printer’s firmware.
  3. Attempt another print.

If the issue persists, contact Formlabs Support or a certified service provider.

Error 349

Error 349 indicates that the printer detected black frames from the camera but was unable to reinitialize the camera hardware. To resolve this issue:

  1. Power the printer off using the switch in the back and leave off for at least 30 seconds. Power the printer back on.
  2. Update PreForm and the printer’s firmware.
  3. Attempt another print.
  4. Upload diagnostic logs.
  5. Initiate a factory reset by tapping Settings > System > Factory Reset. When the reset is complete, try printing again.
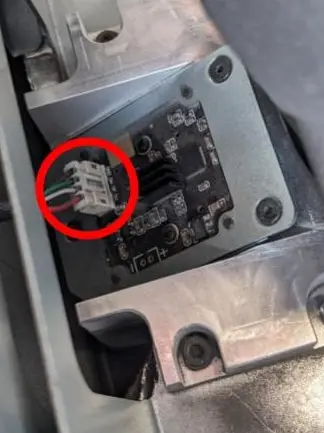
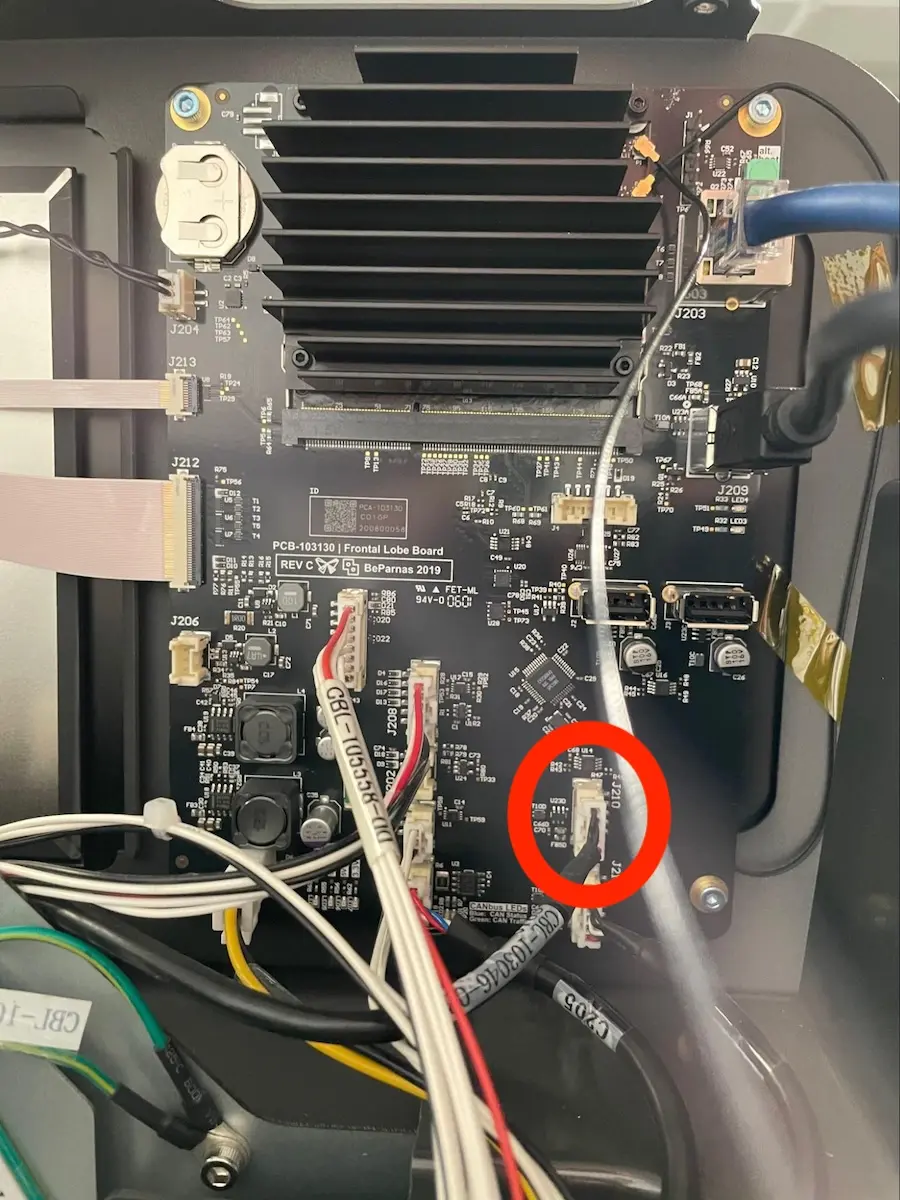
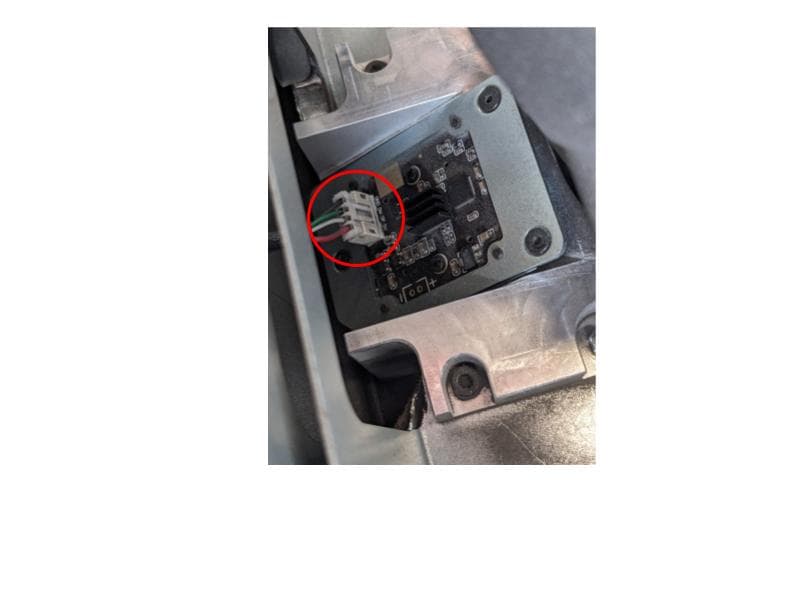
  6. Access the printer’s camera by removing the top enclosure panel and upper cooling shroud, following the instructions in the guide for checking the Fuse 1 generation motherboard LEDs. Locate the camera, positioned between the IR sensor and the front of the printer. Reseat the camera cable, reassemble the printer, and attempt another print. Do not remove the camera module.
Fuse 1 generation camera cable location

If the issue persists, contact Formlabs Support or a certified service provider.

Error 350

Error 350 indicates a PrinterWatcher software malfunction. To resolve this issue:

  1. Power the printer off using the switch in the back and leave off for at least 30 seconds. Power the printer back on.
  2. Update PreForm and the printer’s firmware.
  3. Attempt another print.

If the issue persists, contact Formlabs Support or a certified service provider.

Error 352

Error 352 indicates a laser error due to a corrupted PreForm file. To resolve this issue:

  1. Update PreForm and the printer’s firmware.
  2. Regenerate the FORM file in PreForm.
  3. Reupload the FORM file to the printer. Formlabs recommends deleting the original print job from the printer’s queue.
  4. Attempt another print.
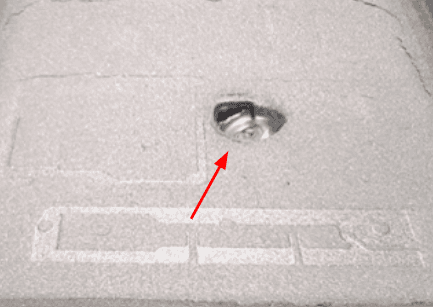
Error 352
Melted plastic inside the build chamber.

Error 353/9

Error 353/9 indicates that there was an issue with the IR sensor or one of the quartz tubes.

To resolve this error:

  1. Ensure that there is enough powder in the machine.
  2. Clean the IR sensor and IR sensor cone.
  3. Reseat the IR sensor, ensuring the IR sensor is sitting flush in the IR sensor housing.
  4. Run another print.
  5. If the printer throws Error 180/7 or Error 180/8 during the print process, one of the quartz tube heaters is malfunctioning. Follow the instructions in Replacing the Fuse 1 quartz tube heaters [EN] [DE] [ES] [FR] [IT] [JA] [ZH]. Replacement quartz tubes can be purchased from the Formlabs web store.
    • Error 180/7 indicates that the hopper (right) side quartz tube heater is malfunctioning.
    • Error 180/8 indicates that the buffer (left) side quartz tube heater is malfunctioning.

If you still have issues after following the troubleshooting steps above, contact Formlabs Support or a certified service provider.

Error 366

Error 366 indicates that the filter door is open. This may occur if the filter door was not properly closed or the door opened during printing. To resolve this issue:

  1. Close the filter door. Press firmly to ensure that the door is firmly latched. Check that the door is registering as shut when the print starts.
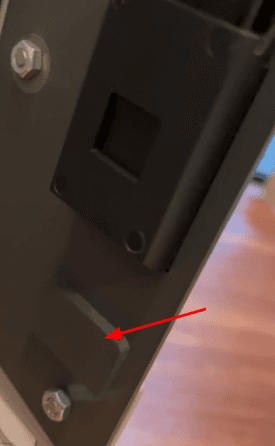
  2. Inspect the filter door and the side panel for any gaps that may prevent the limit switch from engaging.
    1. If a gap is found, this can be resolved by adding a spacer such as a piece of cardboard to the black component that contacts the limit switch to increase the door’s weight and ensure it latches properly.
alttext
Place spacer here.

If the error persists, contact Formlabs Support or a certified service provider.

Error 367

Error 367 indicates that one of the magnetic interlocks on either the enclosure door or the IR sensor was opened. Refer to the steps above for resolving Error 174 and Error 175.

If you see this error repeatedly, contact Formlabs Support or a certified service provider.

Error 369

Error 369 indicates that one of the interlocks encountered an error. To resolve this issue:

  1. Power cycle the printer using the breaker switch on the rear of the printer. Leave the unit powered off for at least 30 seconds before powering back on.
  2. Ensure the printer’s firmware is up to date. If the firmware is up to date, reflash the currently installed firmware.
  3. Attempt another print.

If the issue persists, contact Formlabs Support or a certified service provider.

Error 371

Error 371 indicates that one of the sensors encountered an error. To resolve this issue:

  1. Power cycle the printer using the breaker switch on the rear of the printer. Leave the unit powered off for at least 30 seconds before powering back on.
  2. Ensure the printer’s firmware is up to date. If the firmware is up to date, reflash the currently installed firmware.
  3. Attempt another print.

If the issue persists, contact Formlabs Support or a certified service provider.

Error 372

Error 372 indicates that the IR sensor needs calibration. To resolve this issue:

  1. Power cycle the printer using the breaker switch on the rear of the printer. Leave the unit powered off for at least 30 seconds before powering back on.
  2. Ensure the printer’s firmware is up to date. If the firmware is up to date, reflash the currently installed firmware.
  3. Attempt another print.
  4. If the issue persists, replace the IR sensor.

Error 374

Error 374 indicates an issue with the temperature reading from a non-critical heater. The relevant heater is turned off and the printer’s touchscreen displays the error message, but the print continues. This may result in printed parts with poorer surface quality and degraded mechanical properties.

For detailed troubleshooting information for these error codes, refer to this article regarding temperature sensor errors. For further assistance and clarification, contact Formlabs Support or a certified service provider.

Error 376

Error 376 indicates an alert was left on the printer display waiting for resolution. This error code was introduced in firmware version 1.17; previous versions will result in Error 102 in these circumstances. With the introduction of a new priming routine in firmware version 1.19.0 and later, multiple subsystem checks are no longer performed while the printer is heating. This change prevents the risk of a heater timeout if you do not interact with the printer during heating.

  1. Check that the printer is running the latest firmware.
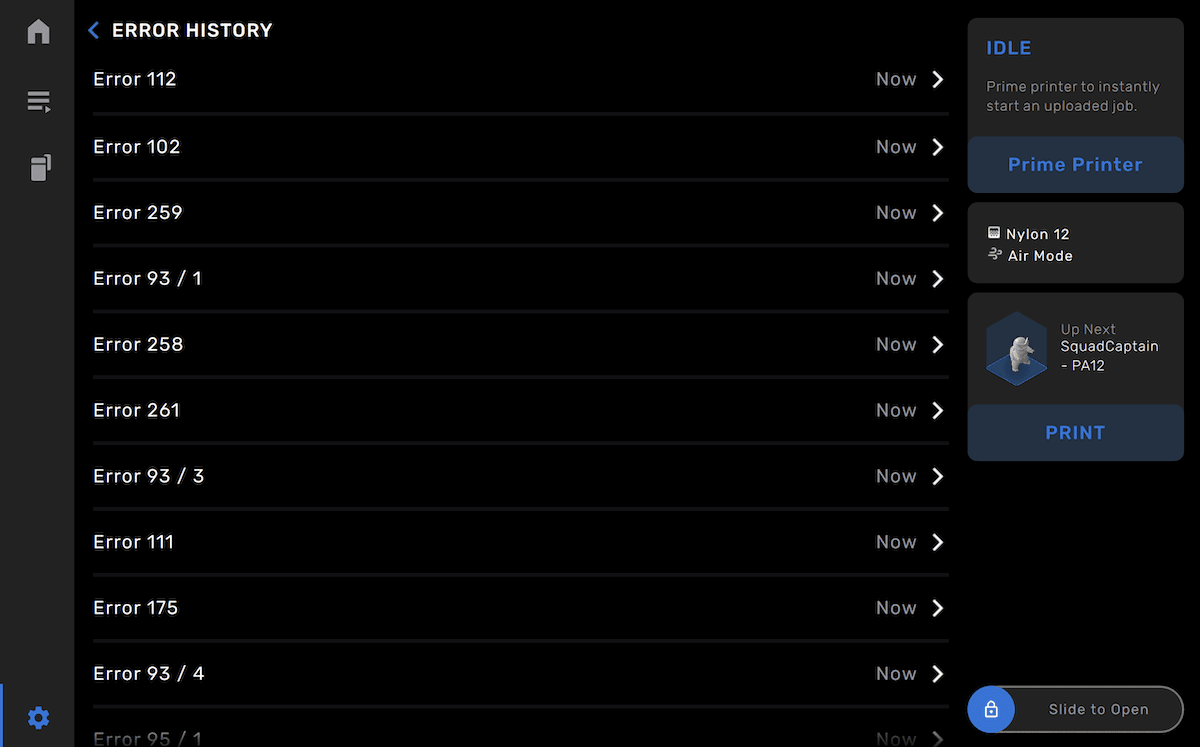
  1. Confirm whether this issue coincides with a printer resolution request by viewing the Error History screen on the printer’s display or by downloading the printer history in PreForm and checking the ErrorHistory.csv file. If it does, resolve the underlying issue causing the printer resolution request.
Error History screen.
  1. If the issue persists, reflash the currently installed firmware, reupload the print job, and try again.

If you see this error message repeatedly after power cycling and updating to the latest firmware version, contact Formlabs Support or a certified service provider.

Error 377

Error 377 indicates that a layer file in the print’s FORM file was corrupted, causing the print to fail. To resolve this error:

  1. Update PreForm and the printer’s firmware.
  2. Regenerate the FORM file in PreForm.
  3. Reupload the FORM file to the printer. Formlabs recommends deleting the original print job from the printer’s queue.
  4. Attempt another print.

If you see this error message repeatedly, contact Formlabs Support or a certified service provider.

Inlet pressure out of range (Fuse 1+ only)

On the Fuse 1+, the error messages Inlet Pressure Too Low and Inlet Pressure Too High indicate that the nitrogen intake pressure is out of range. Adjust your nitrogen source so that its output pressure is between 248–862 kPa (36–125 psi). Replace the nitrogen source if necessary.

Nitrogen pressure out of range (Fuse 1+ only)

On the Fuse 1+, the error message Nitrogen Pressure Out Of Range indicates that the internal nitrogen pressure is not between 123–133 Pa (0.018–0.019 psi). To adjust the internal nitrogen pressure:

  1. Open the IR sensor access door on the top of the printer.
  2. Locate the pressure control knob.
  3. Slowly turn the pressure control knob clockwise to reduce the nitrogen pressure or counter-clockwise to increase the nitrogen pressure. Wait five seconds after each adjustment to allow the pressure to settle.
  4. When the touchscreen indicates that the nitrogen pressure is within the necessary range, close the IR sensor access door.

“Reboot the printer” error message

Under rare circumstances, the printer may display the error message: Please reboot the printer. If the issue persists, please contact Formlabs Support. This error message is caused by the printer not passing its validity checks during startup, which can happen if one of several components in the printer is unplugged or not operational. To resolve this error:

  1. Check the motherboard LEDs to ensure that the status and SOM LEDs are lit properly.
  2. While you can access the motherboard, force a factory reset using the button on the motherboard.
  3. Fuse 1 only: On Fuse 1 printers, damage to the RFID board or cable is a common cause of this error message. Turn off the printer, unplug the RFID board, and turn the printer back on.
    1. If the printer does not display the error message when the RFID board is unplugged, replace the RFID board. Replacement RFID boards are available for purchase on the Formlabs Store. Follow the instructions in the guide Replacing the Fuse 1 RFID board to replace the component.
    2. If the same behavior persists, you may also need to replace the RFID cable. Contact Formlabs Support.

If the issue persists, contact Formlabs Support or a certified service provider.

Factory reset instructions

On some occasions, a factory reset may correct unusual printer behavior. Formlabs troubleshooting steps for certain error messages, such as Error 1 and Error 213, include initiating a factory reset. Formlabs Support or a certified service provider may also ask you to perform a factory reset while helping you with a printer issue. A factory reset erases custom settings, including prints saved in the Queue and network connections.

Notice:

A factory reset erases all print job information, custom settings, and diagnostic logs. Upload diagnostic logs before performing a factory reset.

To perform a factory reset, tap Settings > System > Factory Reset, then follow the prompts on the touchscreen. To confirm a successful factory reset, tap Queue on the touchscreen. After a successful reset, the print queue is empty.

If you cannot perform a factory reset due to a touchscreen issue, you can force a factory reset using a button on the printer motherboard:

  1. Turn off the printer using the breaker switch at the back of the machine, leaving the power cable connected to the rear panel.
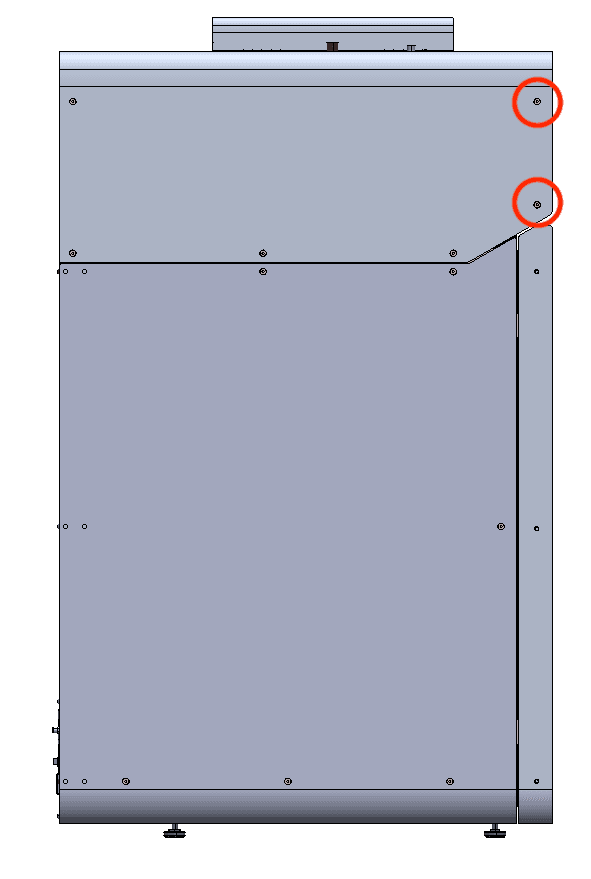
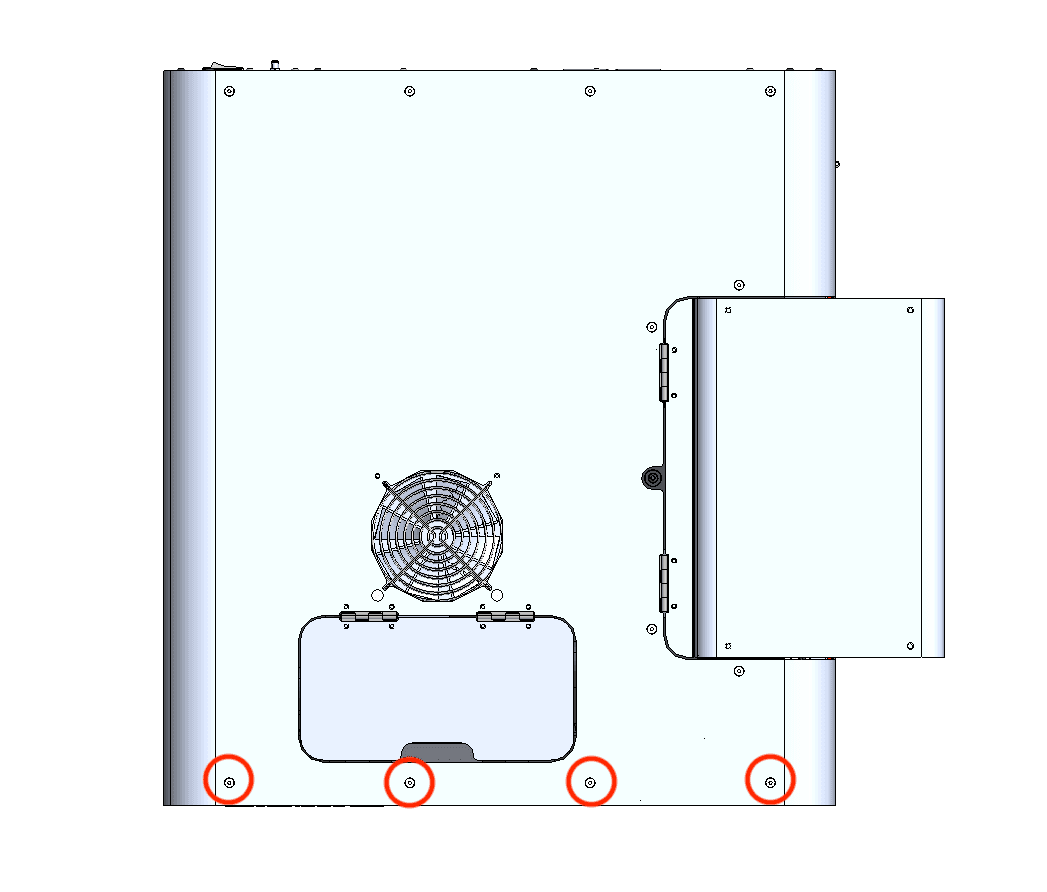
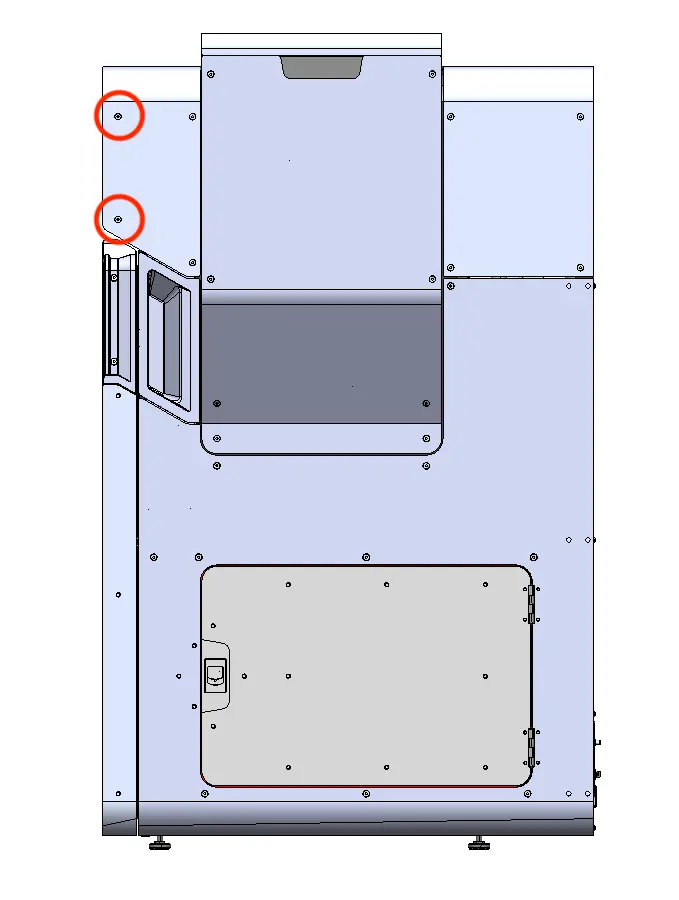
  2. Using a 2.5 mm hex driver, loosen and remove the eight 6.0 mm M4 countersunk screws that flank the display along the buffer, top, and hopper sides of the printer.

Accessing the factory reset button on a Fuse 1 generation printer
  1. Carefully pivot the display down and away from the printer.
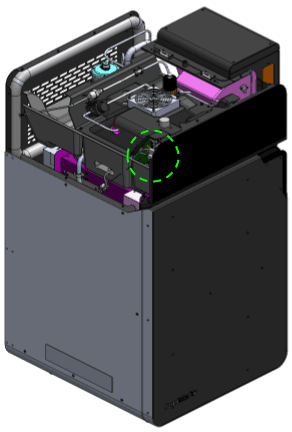
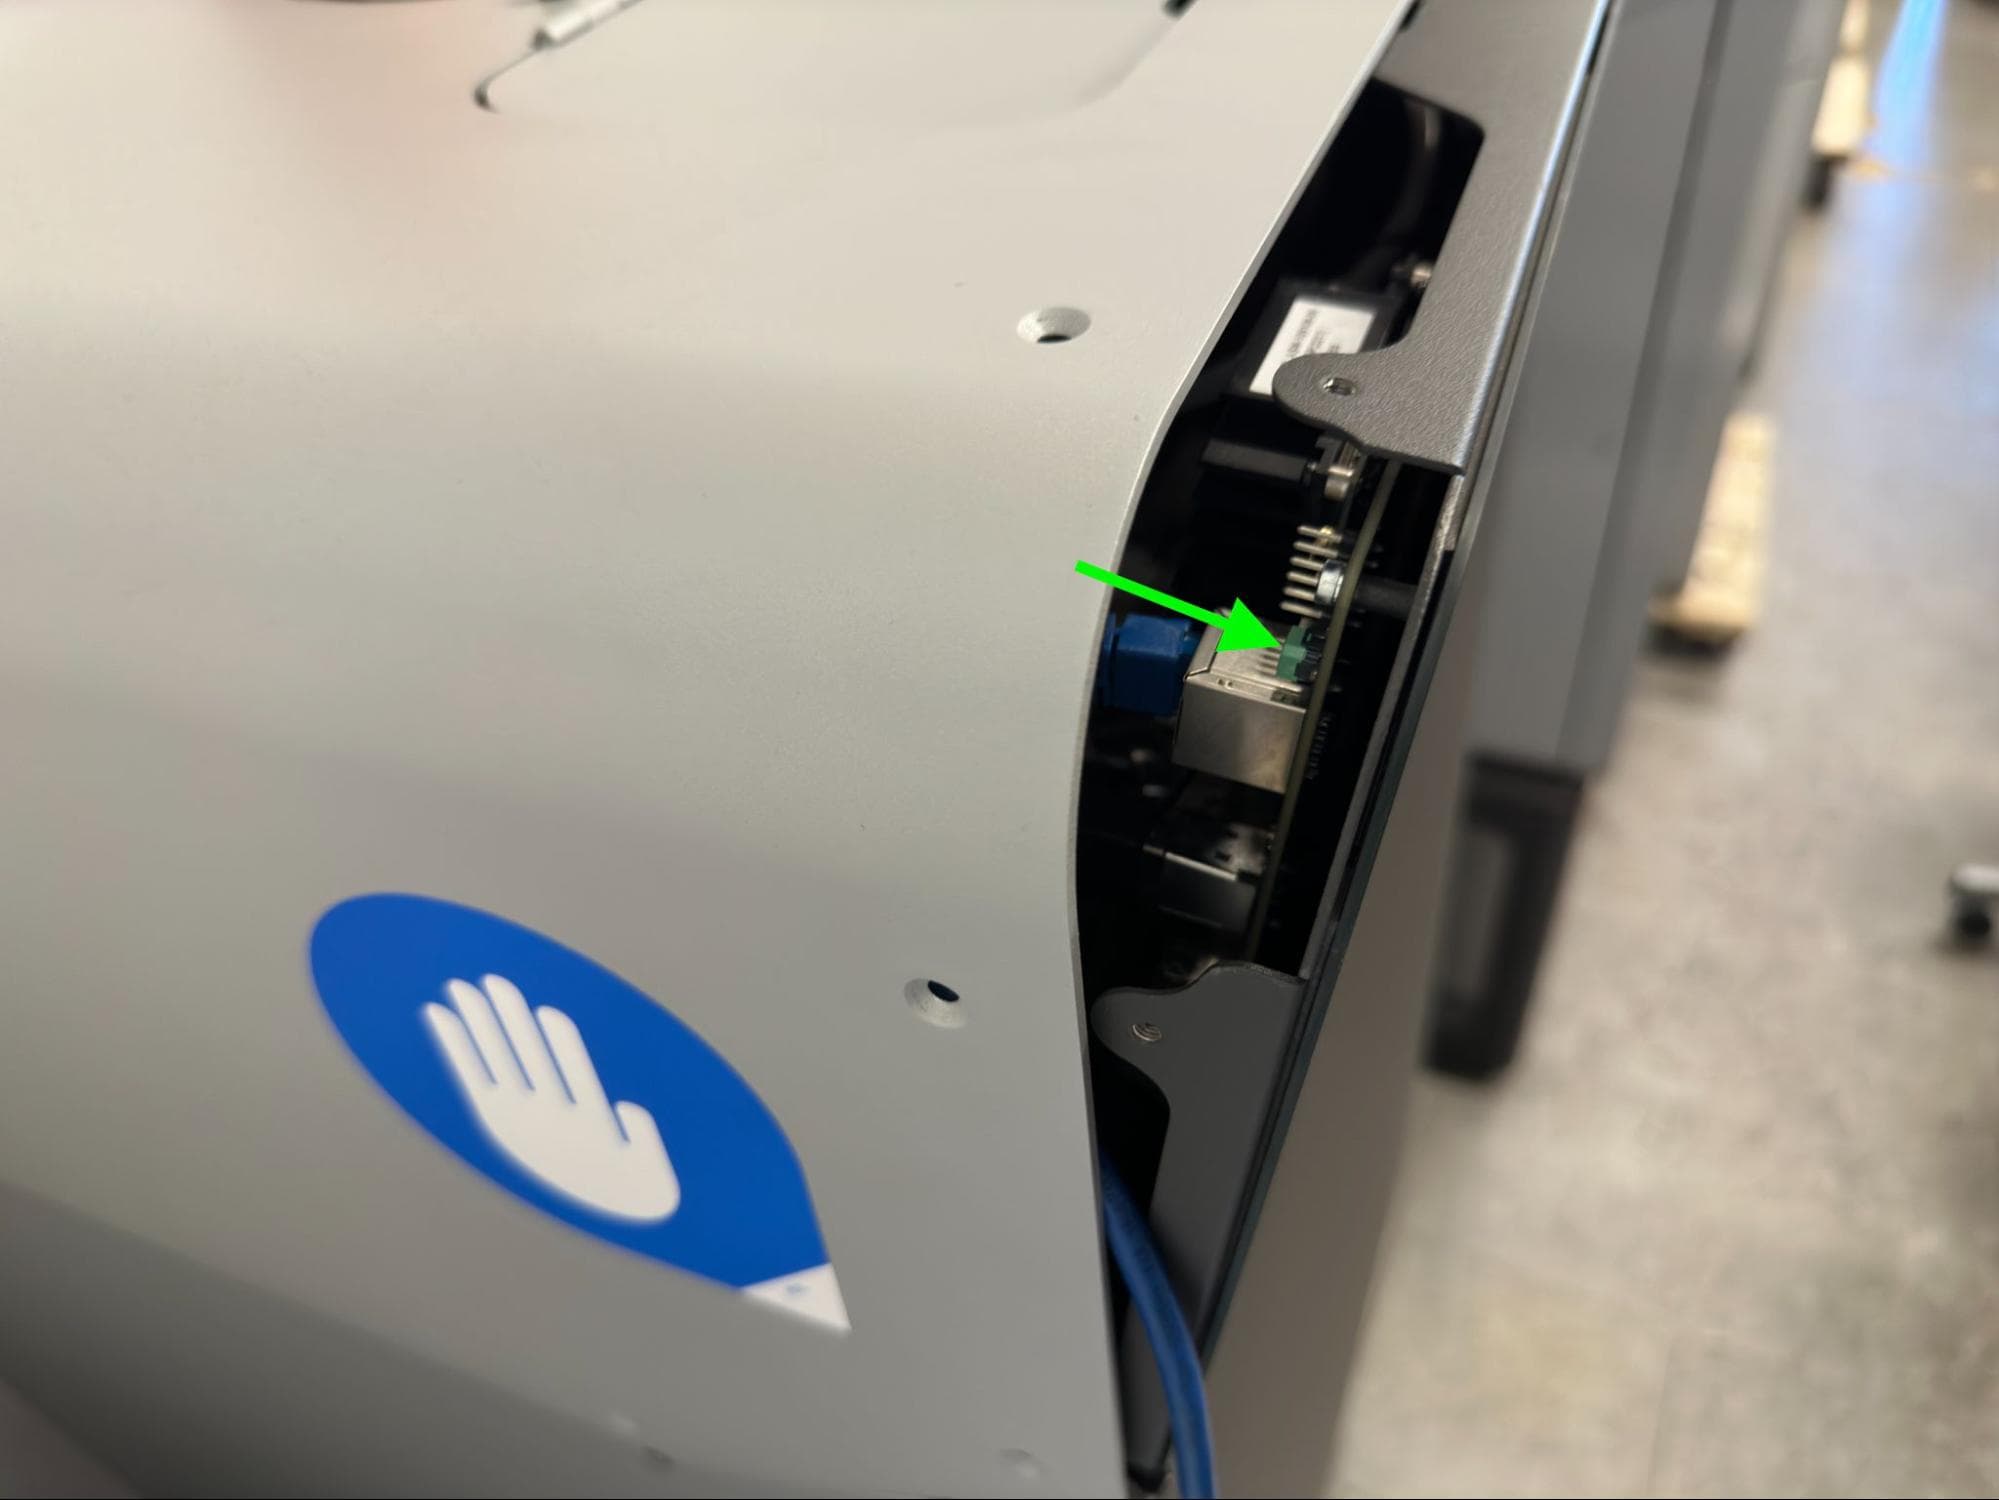
  2. Locate the green switch, positioned behind the top-left corner of the display panel.
Locating the factory reset button on a Fuse 1 generation printer
  1. Turn the printer on using the rear breaker switch, then immediately hold down the green switch.
  2. After the message Performing Factory Reset appears on the touchscreen, release the green button.
  3. Allow the printer up to five minutes to complete the factory reset. The printer may reboot during the reset process.
  4. Push the display back into place, aligning the screw holes in the top of the printer with the corresponding holes in the display.
  5. Thread one 6.0 mm M4 countersunk screw into each of the eight screw holes around the display. Using a 2.5 mm hex driver, tighten until snug.
  6. After the printer reboots, the onboarding process will start on the touchscreen. Follow the instructions to complete the reset process.